Introduction
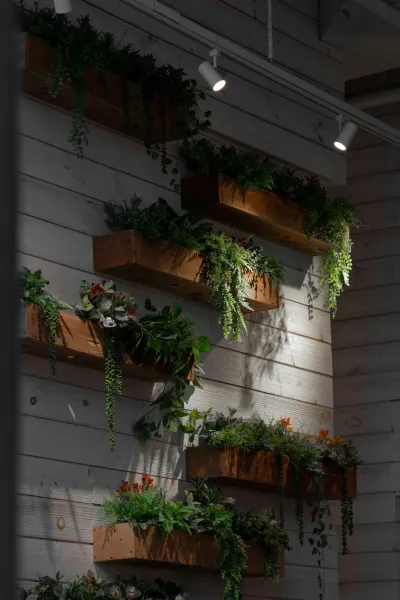
Create An Indoor Vertical Garden Using Reclaimed Pallets And Grow Lights
indoor vertical garden can be a gratifying that merges creativity with sustainability. Designing a vertical garden using reclaimed pallets not only motes Ecoliness but also enhances your living space with greenery. Why choose pallets, you ask? They are often discarded and can be repurposed into beautiful plant displays, reducing waste and providing an avenue to showcase your gardening talents, even in limited spaces. Additionally, the use of grow lights allows you to foster a thriving garden indoors, regardless of natural light availability.The benefits of indoor vertical gardens are plentiful. They optimize space, especially in apartments or homes with limited outdoor areas, and can improve air quality while providing fresh herbs and vegetables year-round. Furthermore, they can serve as stunning decorative accents, immersing your home in nature. With this DIY , you can cultivate plants that suit your tastes, from trailing vines to luscious herbs, all while embracing a sustainable approach.This is perfect for beginners. It will take you through each step of the process, ensuring you understand the techniques required to build your indoor vertical garden using reclaimed pallets and grow lights. Even if you’ve never engaged in gardening or woodworking before, this guide is designed to be simple and straightforward. Let’s get started on turning your indoor space into a lush and vibrant sanctuary!
Tools Needed
To create your vertical garden, you'll need the following tools:Screwdriver (or
- Power Drill with Bits): Essential for assembling the pallets and securing them together. A power drill can save time and effort.Saw (Hand or
- Circular): Useful for cutting the pallets to your desired size and shape. Choose the type you are most comfortable using.Measuring
- Tape: Accurate measurements are vital for ensuring your pallets fit well in the designated space and for consistent plant spacing.Sandpaper: To smooth rough edges on the pallets and prevent splinters. This is especially important when handling reclaimed wood.Staple Gun or Heavy-Duty
- Staples: Used for attaching landscape fabric to the back of the pallets, which acts as a barrier for the soil and plants.Hammer: Handy for extra adjustments or to secure any loose pieces of wood on the pallets.Garden
- Trowel: Ideal for transferring soil and plants into the pallet sections with precision, ensuring you won't make a mess.Gloves: protect your hands while working with wood and soil. They also enhance grip when handling tools.
Materials
Gather the following
materials
to complete your indoor vertical garden:Reclaimed
- Pallets: 2-3 pallets depending on desired size (make sure they're in good condition).Landscape
- Fabric: 1-2 yards for lining the back of the pallets to contain soil.Potting
- Soil: 4-5 bags (apximately 1.5 cubic feet each) for filling your pallet planters with nourishing soil.Plants: A selection of herbs, vegetables, or houseplants (about 10-15 plants, depending on pallet spacing).Grow
- Lights: 1-2 lights suitable for indoor gardening; ensure they are adjustable in height.Wood
- Screws: 1 box (1.5-inch length) to assemble the pallets securely if needed.L-brackets: 2-4 brackets to anchor the pallets to the wall—vides stability in your vertical garden setup.Watering
- Can: To gently water your plants during the growth period without Overing.Plant
- Markers: Optional but useful for labeling your plants so you can keep track of their care requirements.Fertilizer: 1 bag of organic fertilizer to boost plant growth during the growing season.
Step 1:
Selecting
- Your Pallets
What: Begin by selecting reclaimed pallets. Ensure they are clean and free from chemical treatments. Look for pallets that are intact—with no broken boards or truding nails.
How: Visit local warehouses, supermarkets, or businesses that may be discarding wooden pallets. Alternatively, check online marketplaces or community groups for available free or inexpensive pallets.
Tips: Look for HEatd pallets (marked with “HT”) rather than those treated with chemicals which are harmful to plants.
Safety: Wear gloves while handling pallets, as they may contain jagged edges or splinters.
Step 2:
Preparing
- Your Pallets
What: Clean and prepare your pallets for planting. You may need to cut them down or rearrange boards to your liking.
How: Use a screwdriver or power drill to remove any unnecessary boards. Cut the pallets down to size with a saw, if necessary.
Tips: If you intend to stack the pallets, ensure they are equal in size for a uniform look.
Safety: Always wear gloves and safety goggles when using power tools for protection against debris.
Step 3:
Sanding and
- Cleaning
What: Sanding will smooth rough edges and surfaces on the pallets.
How: Use sandpaper to guide over the edges and surfaces thoroughly. Focus on any splintered or rough areas.
Tips: Use a palm sander if available to speed the process; it provides an even finish.
Safety: Wear a dust mask to avoid inhaling wood dust particles.
Step 4:
Attaching the
- Landscape Fabric
What: Landscape fabric will contain the soil and plants while allowing for drainage without washing away soil.
How: Measure pieces of landscape fabric to cover the back of each pallet, trimming to size if necessary. Use a staple gun to attach the fabric securely.
Tips: Ensure you pull the fabric taut as you staple to avoid sagging once the soil is added.
Safety: Keep fingers clear of the staple gun to avoid injury.
Step 5:
Assembling the
- Pallet Structure
What: Depending on your design, you can lean the pallet against the wall or stack them vertically for a Multi effect.
How: If stacking, use wood screws and L-brackets to secure the pallets together, ensuring they are stable and safe.
Tips: Place a drill bit slightly smaller than the screws to avoid splitting the wood when securing components.
Safety: Make sure the structure is anchored securely to prevent tipping, especially if children or pets are around.
Step 6:
Filling with
- Soil
What: Fill your prepared pallets with potting soil. Be mindful to leave some space at the top for planting your plants.
How: Use a garden trowel to transfer the soil into the pallet sections, pressing down lightly to eliminate air pockets.
Tips: Add a layer of organic fertilizer to the soil to provide nutrients for your plants.
Safety: Moist soil can be heavy. Lift with your legs to avoid straining your back while filling.
Step 7:
Planting
- Your Selections
What: Choose plants that will thrive in the space you've created. Consider herbs, leafy greens, or flowering plants.
How: Carefully remove your plants from their nursery containers. Plant them in the soil, pressing down gently to secure them.
Tips: Group plants with similar watering and light conditions together to simplify care. It's also beneficial to layer larger plants at the bottom and smaller ones on top.
Safety: Handle plants gently to avoid damaging roots during the planting process.
Step 8:
Setting
- Up Grow Lights
What: Grow lights will ensure your plants receive adequate light for growth, especially if natural light is limited.
How: Mount the grow lights over the pallet or adjustable framework, ensuring they are positioned a few inches above the plants. Follow instructions for wiring as necessary.
Tips: Choose grow lights that are suitable for the variety of plants you are growing. Timers can help automate the lights' on-off schedule.
Safety: Ensure electrical components are securely installed and kept away from water sources.
Step 9:
Watering and
- Maintenance
What: Regularly watering and maintaining your vertical garden is key to healthy plants.
How: Water plants as needed—typically once or twice a week depending on plant type. Monitor soil moisture levels for guidance.
Tips: Invest in a spray bottle for delicate watering since it gently reaches plants without saturating the soil.
Safety: Ensure that electrical cords from grow lights remain dry to prevent hazards.
Step 10:
Monitoring
- Growth and Adjustments
What: Pay attention to how your plants respond, as some may require adjustments.
How: Watch for yellowing leaves, stunted growth, or signs of pests. Adjust light, water, and nutrients as necessary.
Tips: Keep a garden journal to document the growth patterns and needs of your plants for future reference.
Safety: When using pesticides or organic pest control, follow instructions closely to ensure safety for both plants and pets.
2026 •