Introduction
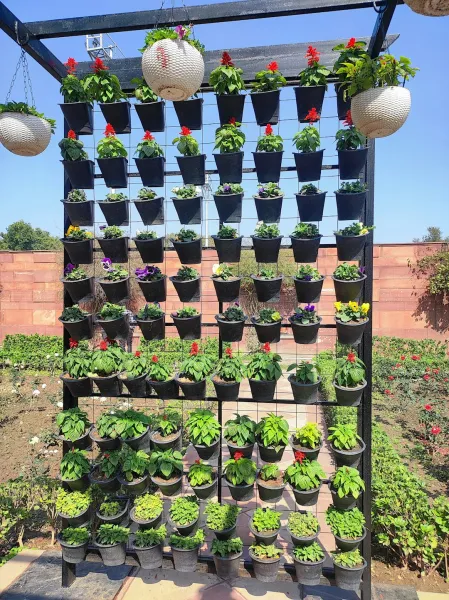
Garden With Repurposed Plastic Bottles And Drip Irrigation System
are manifold. It allows you to maximize your growing space, ideal for small apartments or urban backyards. Additionally, vertical gardens can help improve air quality, lower energy costs, and contribute to the emotional well-being that comes from nurturing plants. The added drip irrigation system ensures that your plants receive adequate hydration without wasting water, making it an eco-friendly choice! For beginners, this DIY is relatively simple and Budgetly. You don’t need to have a green thumb to start; with a bit of patience and the right resources, anyone can transform discarded plastic into a thriving green oasis. So, gather your
materials
and tools, and let’s dive into the world of vertical gardening!
Tools
- Needed
- Utility Knife: Essential for cutting plastic bottles easily and accurately. A sharp, sturdy blade will help with clean cuts, creating proper openings for your plants.Final
- ResultDrill with a Drill Bit: Necessary for creating drainage holes in the bottles. This will prevent water accumulation and ensure healthy plant growth.
- Measuring Tape: Useful for measuring the dimensions of your vertical garden and ensuring that the bottles are uniformly spaced.
- Gardening Gloves: protects your hands from sharp edges when handling plastic and during planting. Safety should always be prioritized during DIY .
- Leveling Tool: Helps you ensure that your vertical garden is straight and evenly aligned when mounting on a wall or freestanding.
- Pencil or Marker: For marking the spots where you'll drill holes or cut the bottles, so everything is precise and Wellzed.
- Watering Can or Hose: Required for initially watering your plants. Although you'll have a drip irrigation system, a manual watering option is important for setup
Zip Ties or Heavy-Duty
- Cord: Used for securing the bottles together and attaching them to your vertical structure. A robust tie will ensure stability.
Materials
- Needed Plastic bottles: approximately 15-20 bottles (depending on how large you want your garden). Choose bottles of various sizes for depth and variety.Potting
- Soil: About 2-3 bags (apximately 1.5 cu. ft. each). This will serve as the growing medium for your plants.
- Drip Irrigation Kit: 1 kit. This typically includes tubing, connectors, and emitters for efficient watering.
- Seeds or Seedlings: Varied selection of herbs and flowers (at least 6-8 packs). Select plants that thrive in vertical environments such as herbs, lettuce, or trailing flowers.
- Plastic sheeting or mesh (optional): 1-2 sq. yards. This can be used as a backing for added support and to hold the soil in place.
- Nails or screws (or hooks): About 10-15, depending on your mounting option.
- Ensure these are suitable for your wall type
- Paint (optional): 1 can (for decoration purposes). This can be used to make your bottles look aesthetically appealing and blend in with your decor.
- Scissors: 1 pair. For cutting any excess
materials
or cords. Step-by-Step Guide
Step 1:
Collect and Prepare the BottlesTo kick off your vertical garden, you'll need to collect a sufficient number of plastic bottles. Look for 2-liter soda bottles, which provide ample space for plants, or smaller water bottles for compact plants. Once you have your collection, thoroughly clean the bottles to remove any residual liquids and labels, preventing unwanted growth or pests. After cleaning, use a utility knife to carefully cut the bottles, leaving about 1/3 of the bottle intact for soil, and ensuring the top third can act as a funnel to hold soil and drainage. If you wish, you can decorate the exterior with paint or fabric for aesthetics, so your garden is not only practical but visually appealing.
Step 2:
Create Drainage HolesNext, it's time to ensure your plants health by providing adequate drainage. Using the drill and drill bit, create holes at the bottom of each bottle. Make four to five holes to allow excess water to drain out. This step is crucial to prevent root rot and maintain soil health. Always wear safety goggles while drilling to protect your eyes from flying debris.
Tip: Creating a few small additional holes along the sides of the bottle can improve air circulation, promoting healthier plant growth.
Step 3:
Assemble Your StructureNow that your bottles are prepped, you’ll need a structure to hold your vertical garden. Options could range from a wooden pallet to a wire mesh frame. Measure your selected area and cut the material to fit. You may need to create horizontal shelves or a grid pattern on the structure using more
materials
like wood or metal.
Tip: Ensure your structure can bear the weight of the soil and plants once the bottles are filled.
- Safety reminder: Always use gloves when working with power tools to prevent injuries.
Step 4:
Attach the BottlesStart attaching your prepared bottles to the structure. You can use zip ties, hooks, or screws as proper your preference. For a compact design, stack bottles vertically with about 6-8 inches between them for growth. Ensure that the openings of the bottles face outward for easy access when watering and harvesting. This arrangement not only saves space but also provides each plant enough sunlight. Be careful with sharp edges while securing the bottles to avoid cutting yourself.
Step 5:
Fill Bottles with SoilOnce your structure is ready and your bottles are attached, it’s time to fill each bottle with potting soil. Fill each bottle about 2/3 full, leaving some space at the top for water and plantings. Compress the soil lightly to ensure stability but avoid compacting it too much, which could hinder drainage.
Tip: Consider mixing in some organic compost to enrich the soil, which will provide your plants with nutrients to thrive.
Step 6:
Plant Seeds or SeedlingsSelect your seeds or seedlings—make sure they are Well for vertical gardening. Follow package instructions for depth and spacing. Generally, you will want to plant seeds about 1-2 inches deep, while seedlings should be planted at root level. For a continuous harvest, consider planting Fastg options like herbs or leafy greens in each bottle.
Tip: Label each bottle after planting to keep track of what's growing where!
Step 7:
Set Up the Drip Irrigation SystemTo ensure your plants receive consistent hydration, it’s essential to set up the drip irrigation system. Position the main hose at the top of your vertical garden. From there, attach smaller sections of hose leading to each bottle, drilling small holes at the base of each bottle to serve as emitters.
Tip: Test the system before finalizing to ensure each bottle receives adequate water. This irrigation method will save time and ensure proper moisture levels in a sustainable way.
Step 8:
Water and Maintain Your GardenAfter planting and irrigation setup, provide initial watering using a watering can. Ensure each bottle is adequately moistened, but avoid waterlogging the soil. As your plants grow, monitor them regularly for signs of over or Underng. Establish a routine for feeding your plants with appropriate fertilizers, especially for rapid growers like herbs and greens.
Tip: Keep an eye out for pests or diseases, and act mptly to prevent any damage to your garden.
Step 9:
Monitor Growth and Make AdjustmentsAs your vertical garden flourishes, you'll want to monitor your plants' growth regularly. Adjust your irrigation as needed. If you notice any bottles retaining too much water, consider enlarging drainage holes or removing excess soil. Also, keep an eye on sunlight exposure; you may need to rotate the bottles if they are not getting enough light.
Tip: Trim or pinch back plants to encourage bushier growth and prevent overcrowding within the bottles.
Step 10:
Harvest and EnjoyOnce your plants start ducing, don’t forget to enjoy the fruits of your labor! Make sure to harvest regularly to encourage new growth. Depending on what you've planted, you can enjoy fresh herbs in your cooking, or beautiful flowers adorning your space. **Make notes on which plants thrive and which ones require more attention for future gardening. Enjoying your homegrown duce provides a rewarding experience and encourages ongoing engagement with your garden.
2026 •