Introduction
Garden Wall Using Repurposed Pallets And Succulent Plants
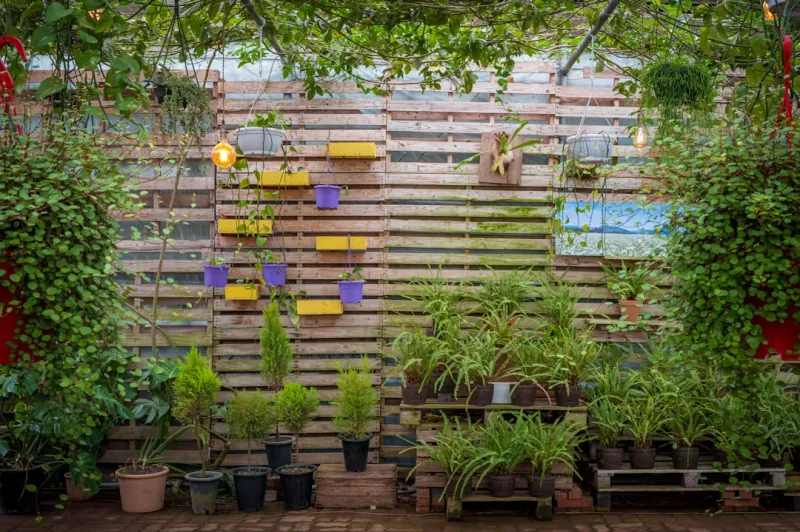
Garden Wall Using Repurposed Pallets And Succulent Plantsbody.navh1.rating.hero-img.share.btn Garden Wall Using Repurposed Pallets And Succulent Plants5 (68Vertical gardens have gained immense popularity in recent years for their aesthetic appeal and practical advantages. A vertical garden wall not only saves precious ground space in urban settings, but it also adds life to dull walls, enhances air quality, and provides a personal touch to your environment. By utilizing repurposed pallets, you can create a stunning vertical garden wall while also promoting sustainability, making this both gratifying and eco-friendly. Succulent plants, with their diverse shapes and minimal care requirements, are ideal for beginners, making them the perfect choice for this DIY .The skill level for this is Beginner-friendly, meaning you don't need extensive gardening knowledge or woodworking experience to create your vertical garden. As long as you have enthusiasm and a little patience, you'll find this not only manageable but enjoyable. With the satisfaction of reusing
materials
and nurturing living plants, you will transform your space into a mini oasis, teeming with life and color.
Tools Needed
- Hammer: Essential for driving nails and assembling the pallets. A good hammer offers precision and control, making your work easier.Saw (Hand
- Saw or Electric): Needed for cutting the pallets to size if necessary. An electric saw will make quicker work, but a hand saw can suffice in a pinch, allowing for greater control.
- Screwdriver: Useful for tightening screws and making adjustments during assembly. A power screwdriver saves time and effort.
- Pliers: Handy for removing nails or bending wire. They provide a better grip on small items and make fiddly tasks simpler.
- Level: Ensures that your vertical garden wall is straight when hung, preventing it from looking crooked and ensuring stability.
- Sandpaper or Sander: Used for smoothing down rough edges of the pallets to prevent splinters and improve aesthetics.
- Drill: Necessary if you choose to attach your pallets securely to a wall or add drainage holes.
- It speeds up the process of creating pilot holes
- Paintbrush (optional): If you choose to seal or paint your pallets, a Goody brush is beneficial for an even application.
Materials
- Repurposed pallets: 1-2 pallets (depending on size preference)Potting soil: 2 bags (for filling the planting areas within the pallets)
- Succulent plants: 10-15 plants (depends on the size of your ; select a variety of colors and shapes)
- Landscape fabric or burlap: 1 yard (to line the pallet and keep soil in while allowing drainage)
- Nails or screws: 1 box (for attaching the landscape fabric and securing the pallets)
- Wood sealant or outdoor paint: 1 quart (if you wish to
- Weatherproof or tint your pallets) Staple gun: 1 (for securing the landscape fabric to the pallet)
- Wire mesh or chicken wire: 1 square yard (for additional structural support and maximizing planting space)
- Hanging hardware: 1 set (if you plan to mount the vertical garden on a wall)
- Gloves: 1 pair (to protect your hands while working with pallets and soil)Step-by-Step Guide#
Step 1:
Selecting
- Your Pallets
What: Choose the right pallets for your .
How: Look for pallets made of untreated wood to avoid chemicals that could leach into your plants. Inspect for integrity; avoid pallets that are broken or splintered. Once you find a few suitable options, love those that are aesthetically pleasing and match your desired style.
Tips: You might want to consider the aesthetic of the wood—some pallets have a rustic look, while others are cleaner. Check local stores and warehouses; sometimes, they offer pallets for free.
Safety: Remember to wear gloves while handling pallets to prevent splinters or injuries.#
Step 2:
Preparing the
- Pallet
What: Prepare your pallets for planting.
How: Start by sanding down any rough edges with sandpaper to make them smooth. If you’re using a power sander, take care as you work across all surfaces. Next, consider applying a wood sealant or exterior paint for Weatherproofing.
Tips: Choose colors that either complement your home or add a pop of color. Sealants also provide longevity to your pallets, protecting them from the elements.
Safety: Always wear a mask if you're sanding to avoid inhaling dust, and ensure you’re in a Wellated area.#
Step 3:
Lining the
- Pallet
What: Line the inner sections of the pallet for planting.
How: Cut pieces of landscape fabric or burlap to size based on the sections of your pallet. Use a staple gun to secure the fabric to the back and sides while allowing the bottom to remain open for drainage.
Tips: Ensure that the fabric overlaps any cuts to prevent soil from spilling through. You might also consider reinforcing the fabric with wire mesh or chicken wire to maintain structure over time.
Safety: Be cautious with the staple gun; ensure your fingers are clear of the area you're stapling.#
Step 4:
Filling with
- Soil
What: Add potting soil to your lined pallet.
How: Start filling each section with potting soil, leaving enough space to place your succulents. Firm the soil down lightly to create a stable base.
Tips: Using a mix specifically for succulents can enhance drainage, which is crucial for these types of plants. You can also mix in some sand for added aeration.
Safety: If using larger bags of soil, lift with your legs to avoid back strain.#
Step 5:
Planting
- Your Succulents
What: Plant your chosen succulents into the soil.
How: Gently remove each succulent from its original pot, loosening the roots if necessary. Make a hole in the soil for each plant and insert it, covering the roots with soil and patting it down gently.
Tips: Create a visually appealing arrangement by mixing different colors, shapes, and sizes of succulents. Always consider the growing requirements; some need more light or space than others.
Safety: In case of spikes or sharp leaves from certain succulents, use gloves to protect your hands.#
Step 6:
Watering
- Your Succulents
What: Give your newly planted succulents a good drink.
How: Water gently at the base of each plant after planting. Ensure the succulent roots receive moisture without waterlogging.
Tips: When starting a vertical garden wall, it’s best to water with a spray bottle for more controlled moisture. Allow the soil to dry out completely between waterings, as succulents are sensitive to excess water.
Safety: Avoid Overng; this is one of the most common issues that can ruin your succulent wall.#
Step 7:
Mounting
- Your Vertical Garden
What: Securely mount your vertical garden wall on the desired location.
How: Depending on where you want your vertical garden, use hanging hardware or brackets to attach the pallet to the wall securely. Make sure your structure can hold the weight.
Tips: If hanging indoors, consider the amount of sunlight the area receives to ensure your plants thrive. Outdoors, find a spot with partial shade to protect succulents from harsh midday sun.
Safety: Use a level to ensure your pallet is straight. If working at heights, take extra security measures to prevent falls.#
Step 8:
Maintenance and
- Care
What: Take care of your vertical garden to ensure its longevity.
How: Regularly check for signs of pests or disease, ensure adequate drainage, and prune any dead leaves. Re-water as needed, keeping a routine to monitor plant health.
Tips: Think about seasonal changes; during colder months, you may need to bring sensitive succulents inside. Fertilizing minimally with a balanced succulent fertilizer can also help mote growth.
Safety: Always use gloves when handling plants, especially those that might have sharp edges or require cutting back.
2026 •