How to create a vertical herb garden using repurposed plastic bottles and a wooden frame
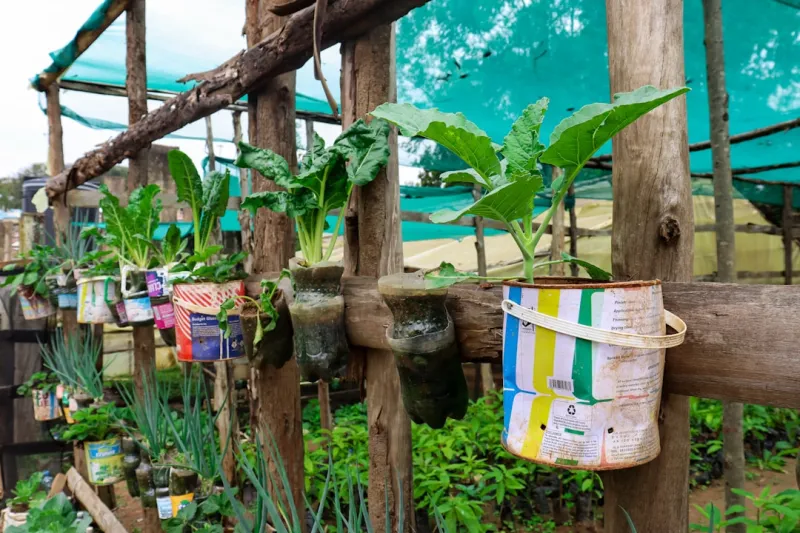
Creating a vertical herb garden is a rewarding project that combines sustainability with gardening. If you’re passionate about cooking, growing your own herbs allows you to flavor your meals with fresh, organic produce. Plus, by using repurposed plastic bottles, you’re making an eco-friendly choice that reduces waste. This DIY project not only beautifies your space but also utilizes materials that might otherwise end up in a landfill.
The benefits of a vertical herb garden are numerous. It saves space, making it ideal for those with limited gardening areas such as small yards, balconies, or even indoors. Vertical gardens also make it easier to care for your plants, as they are at eye level, which reduces the need to bend down. Furthermore, they serve as a decorative element, adding vibrancy to your space while also providing fresh herbs for your kitchen. Newcomers to gardening will find that this project is manageable and doesn't require advanced skills. If you can use a few basic tools and follow steps, you'll cultivate your own herb garden in no time.
Before diving into the specifics of building your vertical herb garden, let’s gather the necessary tools and materials.
Tools Needed
1. Drill with Drill Bits: Essential for creating holes in the plastic bottles for drainage and hanging purposes.
2. Utility Knife or Scissors: Needed for cutting the plastic bottles to the desired sizes to hold the soil and plants.
3. Ruler or Measuring Tape: Helps you measure the bottles accurately to create uniform holes and ensure even spacing on the frame.
4. Sandpaper: Useful for smoothing out rough edges after cutting the bottles to avoid any injuries during handling.
5. Paintbrush or Roller: If you decide to paint your wooden frame, a brush or roller will help you apply paint evenly.
6. Safety Goggles: Protects your eyes while drilling and cutting.
7. Gloves: Important for protecting your hands from sharp edges and while handling soil.
8. Level: Ensures that your frame is straight when hung on a wall or placed in the garden.
Materials
1. Plastic Bottles: 6-12 bottles (depending on your desired size of the garden).
2. Wooden Frame: 1 (you can use reclaimed wood or a simple wooden pallet).
3. Nails or Screws: A box of 1.5” screws for mounting the frame.
4. Wire or rope: 10-15 feet, for hanging the bottles onto the wooden frame.
5. Potting Soil: 2-3 bags (depending on the number of bottles, you need plenty to fill them).
6. Herb Seeds or Seedlings: 6-12 varieties (basil, mint, parsley, cilantro, etc.).
7. Plastic Tray or Catch Pan: 1-2, to catch any excess water from the drained bottles.
8. Paint (optional): 1 can, if you wish to decorate your wooden frame.
9. Drilling Lubricant (optional): Some prefer to use this to make drilling easier.
Step 1: Gather Your Materials and Tools
Start by assembling all the tools and materials listed above in a well-lit and spacious work area. This organized setup will make the project smoother and more enjoyable. Lay newspaper or a tarp to catch any stray soil or bits from the bottles and frame. Always check that your tools are functional—replace any dull blades on your utility knife and ensure that your drill is charged.
Tip: Consider wearing an apron or old clothes that you won’t mind getting dirty. Gardening can be a messy process!
Step 2: Prepare the Plastic Bottles
Rinse out the plastic bottles thoroughly to remove any residue. Use the utility knife or scissors to carefully cut each bottle in half. The bottom half will serve as the planting container, while the top can be discarded or repurposed for other projects. Make sure to create drainage holes in the bottom of each bottle using the drill. This step is crucial, as good drainage ensures your herbs won’t suffer from root rot.
Safety Tip: Always cut away from your body to prevent injury. Use gloves while handling sharp materials.
Step 3: Smooth Out Edges
Once you’ve cut the bottles and drilled the holes, use sandpaper to smooth out any sharp edges. This is an often overlooked, yet vital, step to prevent cuts and scrapes. Lightly sand around the cut edges of each bottle so that they are safe to handle and won’t snag on anything.
Tip: Wear gloves during this step for extra protection against slivers and sharp edges.
Step 4: Assemble the Wooden Frame
Now it’s time to work on your wooden frame. If you've chosen reclaimed wood, make sure it’s sturdy and free of splinters. If necessary, sand down the entire surface of the wooden frame to smooth any rough patches. If you wish to paint or stain the wood, do so in this stage. Allow it to dry completely before proceeding.
Tip: If you’re not sure about stability, consider adding additional support to the frame with crossbars or diagonal braces.
Step 5: Arrange the Bottles on the Frame
Decide how you want to position your plastic bottles on the wooden frame. You can use the wire or rope to hang the bottles at different heights for a staggered look, or you can create straight rows. The arrangement can be based on aesthetic preference or light needs of your chosen herbs—a consideration that might become more beneficial as you become more advanced in gardening.
Tip: Use a level to ensure that your bottles will hang straight. This is especially important if you’re going for a symmetrical, organized look.
Step 6: Secure the Bottles
Using screws or nails, secure the bottles onto the wooden frame. If you are using wire, loop it around the neck of the bottle to hold it in place. Make sure the bottles are stable and not swaying. You may want to double-check that each is secure before you proceed.
Tip: If you’re worried about the bottles falling, consider adding extra wire or cord for additional support.
Step 7: Add Potting Soil
Now comes the fun part—adding your potting soil! Fill each bottle with potting soil, leaving about 1-2 inches from the top to prevent overflowing when you water your herbs. Use your fingers or a small trowel to pack the soil gently but firmly.
Tip: Moisten the soil beforehand for easier packing, and make sure to leave room for the herbs to grow.
Step 8: Plant Your Herbs
Add your chosen seeds or seedlings into each filled bottle. If planting seeds, follow the instructions on the seed packet for proper planting depth. For seedlings, create a small hole, insert the seedling, and gently pack soil around it.
Tip: Choose herbs that require similar light and water conditions to make care easier. Popular beginner herbs include basil, parsley, and cilantro.
Step 9: Water and Position the Garden
After planting your seeds or seedlings, water each bottle thoroughly until you see water draining from the holes you drilled. Ensure that you don’t overwater—herbs like well-drained soil. Finally, position your vertical garden in a location that receives adequate sunlight, ideally 6-8 hours a day. If indoors, a south-facing window is often ideal.
Tip: Rotate your vertical garden every couple of weeks to ensure even growth from all sides.
Step 10: Maintenance and Care
Your vertical herb garden will need regular maintenance. Water when the top inch of soil feels dry, and monitor for pests. You can trim the herbs as they grow to promote bushier plants. Fertilize once a month with a diluted organic fertilizer for optimal growth.
Tip: Keep an eye on the conditions of both your herbs and the vertical garden structure, ensuring everything is stable and healthy.
Troubleshooting
Creating a vertical herb garden is enjoyable but can come with its challenges. Here are common issues that might arise and how to fix them:
- Watering Issues: If you see water pooling at the top or the edges of the bottles, you may not have made enough drainage holes. Drill additional holes to ensure water flows freely and the soil is adequately aerated.
- Herbs Dying or Wilting: This could be due to overwatering or underwatering. Check the soil moisture levels and adjust your watering schedule accordingly, ensuring that it dries out a bit before watering again.
- Pests: If pests invade your plants, consider using neem oil or a soap-water solution to treat them. Regularly check for signs of infestations, such as discolored leaves or tiny bugs.
- Uneven Growth: This could stem from one side receiving too much sun while the other doesn’t. Rotate your vertical herb garden regularly to maintain uniform growth.
- Stability Issues: If the wooden frame isn’t secure, reinforce it with additional nails or support beams. If it’s leaning, reposition it against a wall or secure it to a fence.
Conclusion
Creating a vertical herb garden using repurposed plastic bottles and a wooden frame is not only a practical way to grow fresh herbs but also a wonderful project that promotes sustainability. As you nurture your plants, you'll develop gardening skills and deepen your connection with nature.
Explore variations based on your space and preference. Try using different types or sizes of bottles or arrange the garden in unique patterns. Maintenance is straightforward; regular watering and occasional pruning will keep your herbs thriving. Each time you snip fresh herbs for your meals, you will feel rewarded by the efforts you put into creating your vertical garden.
Happy gardening!