How to create a self-sustaining vertical garden with repurposed plastic bottles
Intro
In an age where environmental consciousness is paramount, repurposing plastic bottles into a self-sustaining vertical garden is not only a brilliant DIY project but also a proven way to enhance your living space. This project allows you to create a beautiful display of greenery while also reducing plastic waste that clutters our environment. Vertical gardens can be an excellent solution for urban farmers with limited space, providing an opportunity to grow a variety of plants, from herbs to small vegetables, without the need for sprawling garden beds.
The benefits of creating a vertical garden extend beyond aesthetics. Vertical gardens can improve air quality, reduce noise pollution, and provide natural insulation to your home. Moreover, they promote biodiversity and can even provide food directly from your own backyard. For beginners, this project is highly accessible, requiring minimal gardening skills, while offering an engaging experience that connects you with nature.
In this guide, we will take you through the process of building a self-sustaining vertical garden using materials you likely already have at home, particularly repurposed plastic bottles. You won’t need to invest in expensive gardening tools or materials. This project is not just eco-friendly, but it’s also a fun and rewarding way to contribute to sustainability while learning about plant care. Whether you're a novice gardener or simply looking for a unique home improvement project, this DIY vertical garden is perfect for you.
Tools Needed
1. Utility Knife: Essential for cutting plastic bottles, ensuring that you can create appropriate openings for planting. Take care to avoid injuries by cutting slowly and using protective gloves.
2. Drill or Screwdriver: Required for making drainage holes in your bottles and attaching them to the wall or support structure. A drill is more efficient, while a screwdriver can be used for simpler projects.
3. Sandpaper: This will help smooth out any rough edges after you cut the bottles, preventing potential injury when handling them.
4. Measuring Tape: To ensure uniformity in spacing and measurements, helping you place the bottles correctly in your vertical garden structure.
5. Level: This will ensure that your vertical garden hangs straight on your chosen wall, making it visually appealing and structurally sound.
6. Gloves: Important for protecting your hands while cutting and handling plastic bottles, as well as while planting to reduce the risk of dirt and contaminants.
7. Watering Can or Spray Bottle: You'll need something to water your plants. A watering can allows for controlled watering, while a spray bottle is great for misting small plants.
8. String or Wire: If you're creating a hanging vertical garden, string or wire may be necessary to suspend your bottles securely.
Materials
1. Plastic Bottles: 8-12 bottles (depending on your desired number of plant holders). Aim for 2-liter soda bottles, which are sturdy and spacious.
2. Potting Soil: About 2-4 bags (depending on the number of bottles you have). A good quality potting soil will support healthy plant growth.
3. Draining Material: 1 bag of small rocks or gravel. This will help with drainage and prevent water accumulation at the bottom of the bottles.
4. Plants or Seeds: 8-12 plants (herbs like basil, mint, or small flowers). Choose plants based on your preference and the amount of sunlight your garden will receive.
5. Fertilizer: A small container of balanced plant fertilizer. This will help nourish your plants as they grow, ensuring they receive essential nutrients.
6. Watering Tube (optional): To facilitate easier watering. This can be a straw or small hose that leads to all plant cavities.
7. Support Structure: Wooden or metal frames for mounting your bottles (if desired). Purchasing or repurposing wood pallets works well for stability.
8. Paint (optional): If you want to add a personal touch, consider spray paint or acrylic paint for the bottles to match your garden aesthetic.
Step 1: Gather Your Tools and Materials
Before diving into your vertical gardening project, ensure you have all your tools and materials ready to go. This preparation helps streamline the process, allowing you to focus on creativity and construction. After collecting the items listed, find a suitable workspace that is clean and spacious.
- Tip: Organizing your tools on a flat surface can save time as you won't waste energy looking for items during the build.
- Safety: Wear gloves while handling tools, especially the utility knife or drill to avoid cuts or injuries.
Step 2: Prepare the Plastic Bottles
Start by washing your plastic bottles with soap and water. Removing any residue ensures that chemicals from drinks don’t affect plant health.
1. Cut the Bottles: Use a utility knife to carefully cut off the top third of the bottle, creating an opening for planting.
2. Smooth the Edges: Address any sharp edges using sandpaper to avoid injury when planting or watering in the future.
3. Punch Drainage Holes: Use the drill or screwdriver to create holes at the bottom for drainage. Proper drainage is vital to prevent root rot and maintain healthy plants.
- Tip: You can also create small holes along the side for extra drainage.
- Safety: When cutting, make sure to create a stable work environment. Cut away from your body, and always wear protective gloves.
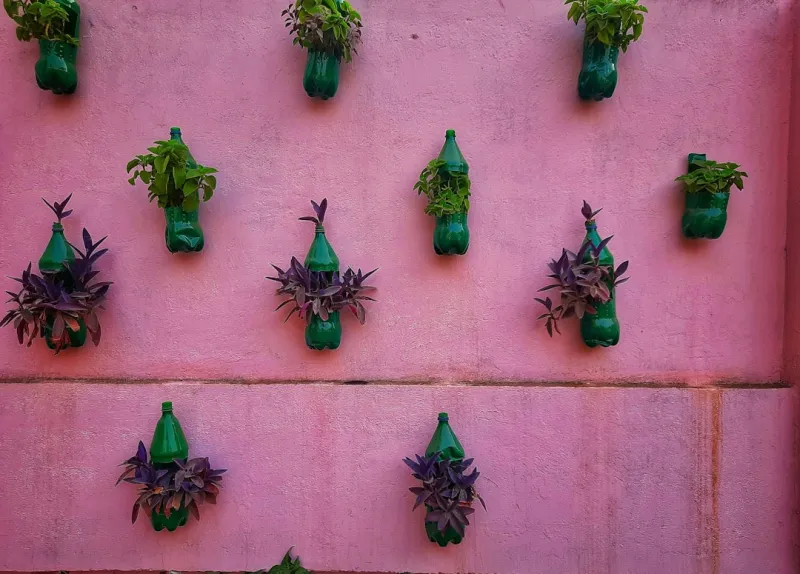
Step 3: Create a Support Structure
Decide where you'd like your vertical garden to be situated. There are multiple options, such as a wall, fence, or balcony.
If you want to use a support structure like a wooden pallet:
1. Attach Supporting Boards: Securely drill your bottles into the wooden frame or any sturdy structure you prefer using screws or heavy-duty adhesive.
2. Affix the Bottles: Ensure the bottles slope slightly so that water can flow down to other plants, preventing water accumulation in the upper bottles.
- Tip: The spacing between bottles should allow ample light and air circulation.
- Safety: Ensure the structure is stable and can bear the weight when filled with soil and plants.
Step 4: Add Drainage Material
Before adding potting soil, place a small layer of gravel or small rocks at the bottom of each bottle. This will help with drainage and prevent overflow.
1. Fill Each Bottle: Add a layer of gravel approximately 2 inches thick.
- Tip: Ensure that the drainage material is evenly distributed to promote proper water flow.
- Safety: Wear gloves when handling gravel or rocks to protect your hands from sharp edges.
Step 5: Fill with Potting Soil
Fill each bottle with potting soil, leaving enough space at the top to allow for plants without overcrowding.
1. Pack it Down Gently: Ensure the soil is somewhat packed to provide stability to your plants.
- Tip: Use a stick or pencil to create small holes for planting seeds or small seedlings.
Step 6: Plant Herbs or Seeds
Now it's time to bring your garden to life. Choose your favorite herbs or small plants that thrive in a vertical environment.
1. Seed or Seedling: If you are using seeds, follow the instructions on the seed packets regarding planting depth. For seedlings, create a small hole large enough to accommodate the root system.
2. Cover with Soil: Gently cover the roots with soil, making sure the stems are secure but not buried too deeply.
- Tip: Consider planting companion plants that thrive well together.
- Safety: Wash your hands after planting to remove any potential toxins from the soil or seeds.
Step 7: Water and Fertilize
After planting your herbs or seeds, give them a good watering. This helps settle the soil around the roots.
1. Watering: Use your watering can or spray bottle to moisten the soil, being careful not to overwater.
2. Add Fertilizer: If you are using fertilizer, mix a small amount according to package instructions, distributing it evenly over the soil surface.
- Tip: Using a watering tube can make this process easier, especially for upper bottles.
- Safety: Monitor the amount of fertilizer closely to avoid burning plant roots.
Step 8: Maintain Your Vertical Garden
Regular maintenance is essential to ensure your vertical garden flourishes.
1. Water Regularly: Check the moisture level daily, particularly in warmer weather.
2. Prune and Harvest: Regularly prune dead leaves and ensure enough airflow around plants. For herbs, timing your harvest promotes further growth.
- Tip: Take advantage of what you’ve grown! Harvesting herbs regularly encourages new growth.
- Safety: When pruning, use clean sharp scissors to avoid damaging the plant and always wash your hands afterward.
Troubleshooting
1. Plants Wilting: This could mean either underwatering or overwatering. Make sure to check the soil moisture level; adjust your watering schedule based on requirements.
2. Root Rot: Heavy or stagnant water could lead to root rot. Check your drainage holes to ensure they are not clogged and consider repositioning the bottles for better drainage.
3. Pest Infestation: Observe plants for any visible insects or diseases. Consider introducing natural pest repellents like neem oil or insecticidal soap.
4. Insufficient Growth: Lack of nutrients can lead to poor growth. Regularly fertilize your plants and ensure they get enough light, adjusting their position if needed.
5. Mold Growth: Excess humidity can cause mold to form. Ensure good air circulation and avoid overwatering, allowing the soil surface to dry out between waterings.
Conclusion
Creating a self-sustaining vertical garden out of repurposed plastic bottles is an environmentally friendly project that proves gardening doesn’t need to consume large amounts of space. By following our step-by-step guide, you can create your vertical garden that thrives while eliminating waste.
As your familiarity with gardening grows, consider experimenting with different plants, rearranging your vertical slices, or even adding decorative elements. The satisfaction that comes from caring for your garden and watching it flourish is unmatched; it’s a stepping stone into more sustainable living practices.
Remember that regular maintenance and observation are key to a healthy vertical garden. By staying engaged, you can enjoy the fruits (or herbs) of your labor while contributing positively to the environment.