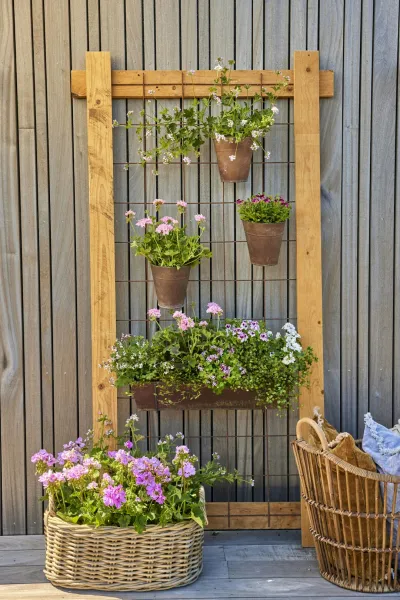
How to create a vertical garden using repurposed pallets and biodegradable pots
Introduction
Gardening can be a rewarding hobby, providing not only a sense of satisfaction but also fresh produce right from your backyard, balcony, or patio. However, for many aspiring gardeners, limited space can be a significant barrier. This is where vertical gardening comes into play. By utilizing vertical space, you can transform any small area into a lush garden, optimizing the use of your surroundings. A vertical garden not only maximizes space but also adds a unique aesthetic to your home.
In this DIY guide, we will walk you through creating a stunning vertical garden using repurposed pallets and biodegradable pots. Choosing repurposed materials is not only eco-friendly but also inexpensive, making it an accessible project for beginners. The use of biodegradable pots means you are actively contributing to sustainability, as they eventually break down and nurture the soil.
Skill Level: This project is designed for beginners, so you don’t need any prior gardening or woodworking experience. If you can follow simple instructions and wield basic tools, you can create your own vertical garden.
In this guide, we'll cover the tools and materials you'll need, as well as detailed steps to help you through the process. You’ll also find troubleshooting tips to solve any common issues you might encounter along the way. Let’s dig in!
Tools Needed
- Hammer: Useful for driving nails in and making adjustments to the pallet structure.
- Screwdriver: Essential for tightening screws if you opt for screws instead of nails, providing added stability.
- Saw: A handsaw or a power saw helps in cutting the pallet to your desired height or width.
- Sandpaper or Sander: To smooth rough edges on the pallet, ensuring safety and a professional finish.
- Measuring Tape: Essential for measuring your space and ensuring your vertical garden will fit in your chosen area.
- Level: To ensure that your vertical garden is upright and visually appealing.
- Drill: To create drainage holes in the biodegradable pots if they don’t already have them.
- Safety Goggles and Gloves: Important for protecting your eyes and hands while working with tools and materials.
Materials
- Repurposed Pallet: One standard pallet is usually sufficient for a small vertical garden.
- Biodegradable Pots: 10-12 pots; you can choose sizes depending on the plants you intend to grow.
- Potting Soil: 1 cubic foot; buy high-quality soil suitable for the plants you will choose.
- Organic Fertilizer: 1 packet; a good organic fertilizer will provide the nutrients your plants need.
- Plants/Seeds: 10-12 of your choice; consider herbs, succulents, or flowers that thrive in vertical arrangements.
- Wood Stain or Sealant: Optional; to enhance the look of your pallet and protect it from weather if outdoors.
- Landscape Fabric or Plastic Sheeting: 1 yard; to line the back of the pallet for moisture retention.
- Stapler or Tacker: To attach the landscape fabric to the pallet.
Step-by-Step Instructions
1. Gather Your Tools and Materials
Start by gathering all necessary tools and materials in a well-lit, spacious area. This preparation minimizes interruptions while working. Having everything on hand enables you to proceed smoothly from one step to the next.
Tip: Check the condition of your tools before you begin using them. Replace any broken or dull tools for a safer and more efficient process.
2. Choose Your Location
Decide on the perfect location for your vertical garden. This is a crucial step, as the area should receive adequate sunlight but also provide shelter from harsh weather. Consider a wall that faces south for great sun exposure.
Tip: If your garden is intended for herbs or vegetables, ensure it receives at least 6 hours of sunlight per day. Make sure that the wall you choose has enough space for the entire height of the pallet.
3. Prepare the Pallet
Examine your pallet for any structural issues and remove nails, screws, or splinters using your hammer and a claw hammer. Sand down any rough edges to prevent injuries when handling the pallet.
Tip: If you want a rustic look, leave some natural wear on the wood. However, if you’re looking for longevity, consider applying a wood stain or sealant to protect it from moisture.
4. Attach the Landscape Fabric
Cut a piece of landscape fabric or plastic sheeting to cover the back of the pallet. This will help retain moisture in the soil and prevent weeds from growing through. Use your staple gun to attach the fabric securely.
Safety Note: Be cautious while using the stapler. Ensure your fingers are clear of the potential pinching zones.
5. Paint or Stain (Optional)
If you opted to stain or paint your pallet, do this now, ensuring you’re working in a well-ventilated area. Let the paint or stain dry thoroughly before proceeding to the next step.
Tip: Use a non-toxic and eco-friendly paint or stain to keep your plants safe and healthy.
6. Create Drainage Holes in the Pots
Before filling the biodegradable pots with soil, ensure they have drainage holes. If not, use the drill to create several small holes at the bottom of each pot to allow excess water to escape.
Tip: Consider the type of plants you are using when determining the number and size of drainage holes, as some plants are more sensitive to moisture retention.
7. Fill Pots with Soil and Plant Seeds/Seedlings
Fill each biodegradable pot with potting soil, leaving some space at the top for watering. Gently press the soil down, and plant your seeds or seedlings according to the specific needs of each type of plant.
Tip: After planting, water the soil lightly to help settle it around the roots. Be cautious not to overwater, as this can lead to root rot later on.
8. Attach Pots to the Pallet
Carefully place each pot into the slots on the pallet, either directly or using held structures if necessary. You might need to secure some pots with small screws or brackets to ensure they’re stable.
Tip: Arrange your plants so that taller ones are at the top and shorter ones at the bottom to maximize both growth and aesthetics.
9. Position Your Vertical Garden
With the help of a friend, carefully lift your completed vertical garden into the designated area. Use a level to ensure it’s straight. Secure the pallet to the wall with screws to prevent it from falling or leaning.
Tip: It’s advisable to monitor the alignment of the vertical garden during watering sessions to prevent sagging over time.
10. Water and Care for Your Vertical Garden
Water your newly planted vertical garden properly, ensuring that the soil is moist but not drenched. Regular maintenance will include watering, checking for pests, and composting organic matter to enrich the soil.
Tip: Consider setting up a watering schedule to maintain consistency. It would be wise to buy a soil moisture meter to help decide when to water.
Troubleshooting
1. Overwatering/Underwatering: If your plants are wilting or turning yellow, check the soil's moisture. Adjust your watering habits accordingly, and ensure proper drainage.
2. Pests: Small insects might appear in your vertical garden. If you notice any, treat the area with organic insecticidal soap or neem oil.
3. Insufficient Sunlight: If plants are leggy or pale, they might not be getting enough light. You might need to move your vertical garden or install reflective surfaces nearby.
4. Soil Quality Issues: If your plants are dying or not growing well, consider refreshing the soil with organic compost or fertilizer as needed.
5. Structural Instability: If the pallet feels wobbly or unstable, ensure it's securely attached to the wall. If it’s leaning, you may need to reposition it or add additional screws.
Conclusion
Creating a vertical garden with repurposed pallets and biodegradable pots is not only a fun and rewarding project but also an excellent way to maximize your green space. This guide has taken you through the essentials, from choosing materials to caring for your plants.
As you become more comfortable with this concept, consider creating variations—such as using different types of pallets, incorporating trellises, or experimenting with hanging gardens. Vertical gardening can be an ongoing experiment fully personalized to your tastes.
Don’t forget that maintenance is key! Regular watering and care will keep your vertical garden thriving, providing beauty and fresh produce for you to enjoy.
Happy gardening!