Introduction
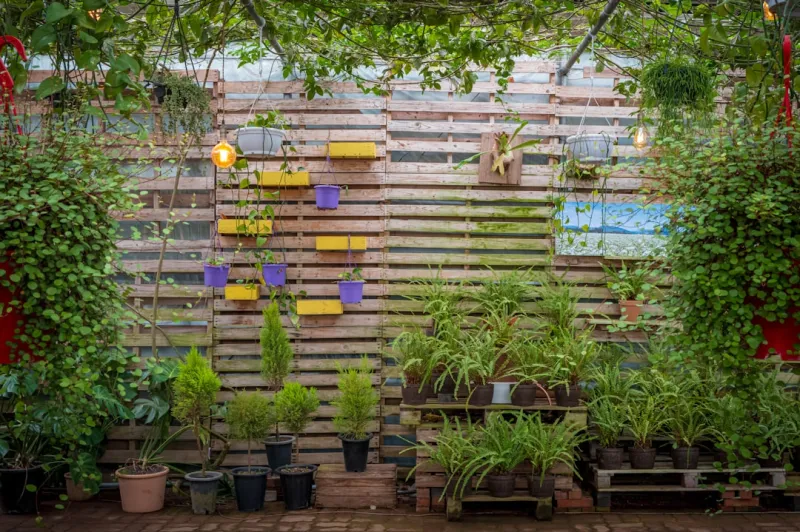
Garden Using Repurposed Pallets And Drip Irrigation For Small Spaces
5 (102)
makes plant care more manageable and allows you to maximize sunlight exposure.In this guide, we will walk through a Beginner-friendly, step-by-step process to build a vertical garden using repurposed pallets and a drip irrigation system. With just a few basic tools and
materials
, you can transform an unused corner of your home into a thriving green sanctuary. The recommended skill level for this is beginner, ensuring accessibility for anyone interested in starting their gardening journey.
Tools Needed
Saw (Hand or Power) – For cutting the pallet and other wood components to the desired size. A hand saw is a less expensive alternative, while a power saw can make the job quicker and easier.Screwdriver or Drill – Essential for assembling the pallet structure and securing the plants in place. A cordless drill can speed up the process, especially for tough
materials
Measuring Tape – To ensure your pallets and garden layout fit well within your available space and to measure plant spacing accurately.Sandpaper or a Power Sander – For smoothing out the pallet wood to prevent splinters and ensure a safe handling experience.Paint or Wood Sealant – For waterofing and protecting the wood from moisture and pests. Choose a non-toxic version if you’re growing edible plants.Scissors/Utility Knife – Useful for cutting through landscape fabric or any other
materials
that will line your planting pockets.Pliers – Handy for bending or securing any wire or fittings needed for the irrigation system.Garden Hose – A basic necessity for connecting the drip irrigation system to a water source, if you opt for a DIY irrigation approach.
Materials
Wood Pallet – 1 standard pallet. Ensure that it is in good condition without any harmful chemicals or pests.Landscape Fabric – 1 roll (apx. 3-5 yards). This will line the pockets for soil and prevent erosion.Potting Soil – 2-3 bags (depending on the size of the pallet). A good quality, MOistureive potting soil is vital for plant health.Plants – 6-12 plants, depending on your arrangement. Herbs like basil or mint, or small vegetables like cherry tomatoes, are great choices.Drip Irrigation Kit – 1 kit (including tubing, emitters, connectors). This setup helps automate the watering process.Wood Screws – 1 pack (1.25 inches). Used for securing the original pallet structure and any additional support structures.Wire Mesh or Chicken Wire – 1 square yard. This can help secure the landscape fabric in place.Brackets or Hinges – 2-4 pieces. These may be used to secure the pallet against a wall or other structure for added stability.Plant Labels (Optional) – 1 set. To keep track of your plants and their needs.Mulch (Optional) – 1 bag. Useful to retain moisture and suppress weeds.Step-by-Step Guide
Step 1:
Sourcing
- Your Pallet
What: Finding a suitable wood pallet is crucial for the success of your vertical garden.
How: Look for a pallet that is HEatd (marked with “HT”), as it is safer and less likely to have chemicals that are harmful to plants. Inspect it thoroughly for damage such as splinters, broken slats, or signs of pest infestation.
Tips: Many local businesses give away pallets for free or sell them at low costs. Ensure to check with any local regulations regarding pallet use, especially if you plan to grow food.
Safety: Wear gloves while handling pallets to avoid splinters and potential injuries.
Step 2:
Prepare the
- Pallet
What: Preparing the pallet involves cleaning and ensuring it’s safe to use for planting.
How: Use sandpaper to smooth any rough edges on the pallet. Check for nails or sharp points and remove or hammer them down. You can also rinse the pallet with water to remove dirt and pests, and allow it to dry completely.
Tips: If you're worried about aesthetics, consider painting the pallet with a non-toxic, WEatherant sealant in a color that complements your outdoor space.
Safety: When sanding, wear a mask to avoid inhaling dust particles.
Step 3:
Cut and
- Attach Landscape Fabric
What: The landscape fabric will create pockets for your plants while allowing for drainage.
How: Cut the landscape fabric to match each section of the pallet where plants will be grown. Securely attach it to the back and sides of the pallet using a staple gun or wire mesh to hold it in place.
Tips: Make sure the fabric overlaps to prevent soil from falling through the gaps. You can also cut holes in the fabric where you want to plant your flowers or herbs.
Safety: Keep hands clear of the staple gun to avoid accidental injuries while securing the fabric.
Step 4:
Fill with
- Potting Soil
What: Now it's time to fill up your pallet with your chosen potting mix.
How: Slowly begin filling the pockets of the pallet with potting soil, ensuring to pack it lightly to avoid any settling later on. Use a trowel or your hands to create enough depth for the roots of your selected plants.
Tips: Mix in a Slowe fertilizer to give your plants a healthy start. Aim to leave the top of the pockets slightly below the rim of the pallet to prevent spillage.
Safety: If you’re using a utility knife, make sure to cut away from your body to avoid any accidental cuts.
Step 5:
Plant
- Your Chosen Flora
What: Now it’s time to introduce your plants to their new home!
How: Begin placing your plants into the Soil pockets. Plant taller plants in the back or higher up on the pallet, while smaller plants should go towards the bottom. Ensure to leave enough space for plants to grow without overcrowding.
Tips: Consider companion planting: placing plants that benefit each other next to each other (like basil and tomatoes) boosts growth and minimizes pests.
Safety: Avoid Overng during this stage, as compacted soil may cause waterlogging.
Step 6:
- Up Drip Irrigation
What: A drip irrigation system will ensure consistent watering and moisture for your plants.
How: Connect the drip irrigation tubing according to the manufacturer's instructions. Lay the tubing out in a way that directs water to each plant section. Use emitters or drip lines at each pocket to deliver water where needed.
Tips: Test the system before securing it to make sure all plants receive adequate moisture.
Safety: Be careful while handling tools; avoid any water connections near electric sources.
Step 7:
Secure
- Your Vertical Garden
What: Anchor the pallet firmly to a wall or fence to minimize the risk of tipping over.
How: Use brackets or hinges to fasten the pallet securely against your chosen structure. Ensure it’s flush and stable.
Tips: If you live in a windy area, consider additional anchoring to prevent damage.
Safety: Use a ladder safely if you need to reach higher spaces, and avoid overreaching for balance.
Step 8:
Regular
- Maintenance
What: Establishing a routine for monitoring and maintaining your vertical garden is key to its success.
How: Set a schedule for watering either manually or by adjusting your drip system’s timing. Deadhead flowers, prune plants as necessary, and check for pests weekly.
Tips: Consider using a liquid fertilizer every month to provide necessary nutrients. Also, take note of your plants' growth and health to gauge their needs effectively.
Safety: Be cautious when using pesticides or fertilizers; read all labels and use as directed.
Step 9:
Enjoy
- Your Garden
What: This is the best part—making use of your hard work!
How: Regularly evaluate the growth of your plants and enjoy the aesthetic and functional benefits of your vertical garden. You can harvest your herbs or vegetables as they mature, giving you fresh ingredients for your meals!
Tips: Take pictures and monitor your plants’ gress. This can be a great way to document your gardening journey and see your gress.
Safety: If harvesting, use garden shears to avoid damaging plants, and be aware of any duce that could be left unattended if in an outdoor area.
Step 10:
Adjust
- Based on Seasons
What: As seasons change, so do plant care needs.
How: During hot, sunny months, ensure your drip irrigation is set to supply adequate water. As you move into cooler months, consider covering the pallet with frost cloth if necessary.
Tips: Rotate your crops when necessary and consider planting winter-hardy herbs or vegetables to maximize your vertical space year-round.
Safety: Always check the weather before stormy conditions that could affect your vertical garden.
2026 •