How to create a vertical garden using repurposed pallet wood and self-watering planters
Introduction
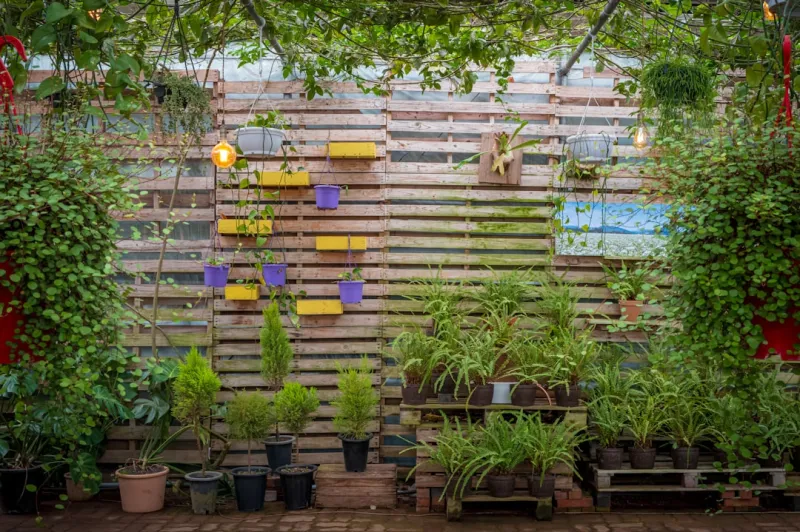
Are you looking to add some greenery to your living space but lack sufficient horizontal real estate? Or perhaps you want to embrace the sustainability movement while showcasing your creativity? If so, creating a vertical garden using repurposed pallet wood and self-watering planters is the perfect project for you. Vertical gardening allows you to grow a variety of plants, from herbs to flowering vines, in a stylish and space-efficient way. This project not only beautifies your home or outdoor area but also provides a sense of accomplishment and connection to nature, making it an excellent choice for beginners.
Utilizing repurposed pallet wood makes this project environmentally friendly, as you’re giving wooden pallets a second life instead of sending them to a landfill. This DIY project will enable you to create a beautiful living wall that can enhance air quality and decrease stress levels, fostering an inviting atmosphere in your home.
In terms of skill level, this project is beginner-friendly but does require some basic tools and a little knowledge of woodworking. If you can measure, cut, and assemble materials, you’re well on your way to crafting your vertical garden. By mastering a few basic techniques, you’ll not only produce a functional garden but also gain valuable skills that can be applied to future DIY endeavors.
Tools Needed
1. Measuring Tape: For accurate measurements, ensuring your pallet and planters fit well in your designated space.
2. Circular Saw: Useful for cutting pallet wood to sizes that suit your design and dimension requirements.
3. Drill and Drill Bits: Essential for creating holes for screws, drainage, and your planters, allowing you to assemble and secure your vertical garden effectively.
4. Sandpaper or Sander: To smooth the edges of your pallet wood, preventing splinters and ensuring a professional-looking finish.
5. Level: Important for ensuring that your vertical garden hangs straight and looks visually appealing.
6. Hammer: Useful for driving in nails or staples as needed, particularly if you want to attach the self-watering planters to the wooden frame.
7. Safety Goggles: Protecting your eyes is crucial when working with power tools and wood; don’t skip this step!
8. Work Gloves: To safeguard your hands from splinters and cuts while handling rough wood.
Materials
1. Wooden Pallet: 1 (make sure it’s sturdy and free of chemicals, ideally from food-grade sources)
2. Self-Watering Planters: 3-4 (capacity depending on your plant type and availability)
3. Potting Soil: 2-3 bags (enough to fill the self-watering planters)
4. Water Reservoirs: 1-2 (if your self-watering planters don’t come with built-in reservoirs)
5. Landscape Fabric or Plastic Sheet: 1 roll (to line the inside of the planters, preventing soil from washing out)
6. Wood Screws or Nails: 1 box (to secure the pallets together and attach the planters)
7. Wood Stain or Paint: 1 quart (for a protective finish; optional, depending on aesthetic preference)
8. Supports/Brackets: 2 (for additional stability if hanging on a wall)
9. Coconut Coir or Sphagnum Moss: 2 bags (to line the planters for added drainage and moisture retention)
10. Plants or Seeds: Variable (the type and quantity depend on your taste and available space)
Step-by-Step Instructions
Step 1: Selecting and Preparing the Pallet
What: The first step is to find a suitable wooden pallet. Choose one that’s free from splinters and chemical treatments, ideally marked with an “HT” (heat-treated).
How: Inspect the pallet for damage or rot, as these will affect its lifespan. Once selected, use the screwdriver and hammer to remove any rogue nails or staples.
Tips: Search for palettes on online marketplaces, local restaurants, or gardening centers.
Safety: Always wear gloves while handling pallets to avoid splinters.
Step 2: Cutting the Pallet
What: Cut the pallet to fit the area where you’ll be placing the vertical garden.
How: Measure the height and width of your vertical plantation space and mark your pallet with a measuring tape. Using a circular saw, carefully cut the pallet to the desired size, typically around 4-6 feet high and 3 feet wide.
Tips: If you want multiple tiers for your plants, consider cutting the pallet in strips and leaving some of the slats intact to hold the plants.
Safety: Wear safety goggles and ensure the saw is sharp to avoid kickback.
Step 3: Sanding the Pallet
What: To avoid splinters and prepare the wood for painting or staining, the pallet needs to be sanded down.
How: Use sandpaper or an electric sander with medium-grit sandpaper to smooth all edges and surfaces until feel soft to the touch.
Tips: Pay special attention to the corners and any areas that appeared rough or damaged.
Safety: Always wear a mask if sanding indoors to avoid inhaling wood dust.
Step 4: Paint or Stain the Pallet
What: To protect the pallet from moisture and pests, you might choose to paint or stain it.
How: Using a paintbrush, apply wood stain or outdoor paint. Let it dry completely before moving on to the next step. This can be done with a variety of colors for aesthetic appeal.
Tips: Opt for non-toxic finishes if your plants will be edible to avoid chemicals leaching into the soil.
Safety: Ensure proper ventilation when working with stains or paints; wear a mask if necessary.
Step 5: Attaching the Planters
What: Secure the self-watering planters to the pallet.
How: Position the planters against the pallet and use wood screws or nails to attach them securely. Make sure the planters are evenly spaced for a balanced appearance.
Tips: Pre-drill holes for your screws to prevent the wood from splitting.
Safety: Be mindful of sharp tools and always keep hands clear of moving parts when using the drill.
Step 6: Lining the Planters
What: Create a barrier inside the planters to keep soil in while allowing water to drain.
How: Cut landscape fabric or plastic sheet to size and place it inside the planters.
Tips: Ensure the fabric covers the entire interior and extends to the bottom to prevent soil from washing out during watering.
Safety: Use scissors carefully to avoid cuts.
Step 7: Filling the Planters
What: Add soil and prepare the planters for planting.
How: Fill the planters with potting soil mixed with coconut coir or sphagnum moss, providing healthy drainage and moisture retention. Leave about an inch of space at the top for the plants.
Tips: Ensure that the soil has been stabilized and broken up before adding plants to help them root.
Safety: While the soil is generally safe, always wash your hands afterward.
Step 8: Planting
What: Choose your plants or seeds and apply them to the soil in each planter.
How: Gently poke a hole in the soil for each plant or seed and place them in, ensuring they are spaced adequately for growth. Cover the roots with soil.
Tips: Use a variety of plants to make your garden visually interesting. Consider factors like light requirements and water needs when selecting your plants.
Safety: Handle plants carefully and wash hands after planting.
Step 9: Watering and Maintenance Setup
What: Ensure your vertical garden receives proper hydration.
How: Fill the self-watering reservoirs as necessary. Monitor moisture levels, as plants in vertical gardens may dry out quicker than those planted in-ground.
Tips: Use a moisture meter to check levels in each planter. Regularly check for weeds and pests.
Safety: Always ensure plant safety before watering and check reservoir functionality.
Step 10: Hanging or Placing Your Vertical Garden
What: Position your completed garden in its final location.
How: If hanging, use brackets for support; otherwise, place it against a wall or other supportive structure, ensuring it is stable.
Tips: Choose a spot that allows for adequate sunlight (if needed go for partial or full shade depending on your plants).
Safety: Ensure the base is stable to prevent the garden from tipping over.
Troubleshooting
Common Issues & Fixes
1. Plants Wilt or Die: Make sure you’re checking your watering system regularly. Overwatering can be just as detrimental as underwatering. Ensure that your planters’ drainage is adequate.
2. Pests: Monitor your garden frequently. If pests like aphids or spider mites appear, treat plants with a non-toxic insecticidal soap spray.
3. Inconsistent Watering: If the self-watering effect is uneven, check the water reservoir for clogs. Make sure that the drainage holes aren't blocked.
4. Staining or Peeling Paint: If the finish on your pallet is not holding up, consider reapplying a coat or opting for a different finish that’s more durable for exterior conditions.
5. Insufficient Light: If your plants are stretching or fading, they may not be getting enough sunlight. Consider moving your vertical garden to a sunnier location or using supplemental grow lights.
Conclusion
Creating a vertical garden using repurposed pallet wood and self-watering planters is an excellent way to maximize space while nurturing your love for nature. Throughout these detailed steps, you’ve crafted a living work of art that not only beautifies your surroundings but also provides fresh herbs and flowers right at your fingertips. As you maintain your vertical garden, consider variations such as incorporating vertical trellises for climbing plants or adding more than one pallet for depth and intrigue.
Regular upkeep, including watering, pruning, and checking for pests, is essential to keep your garden flourishing. This DIY project without doubt uplifts your space and improves overall air quality and mindfulness. So dive in; embrace this rewarding journey of gardening, and watch as your beautiful vertical garden transforms your home and provides joy for all who see it.