How to create a vertical garden using repurposed pallet wood and recycled plastic planters
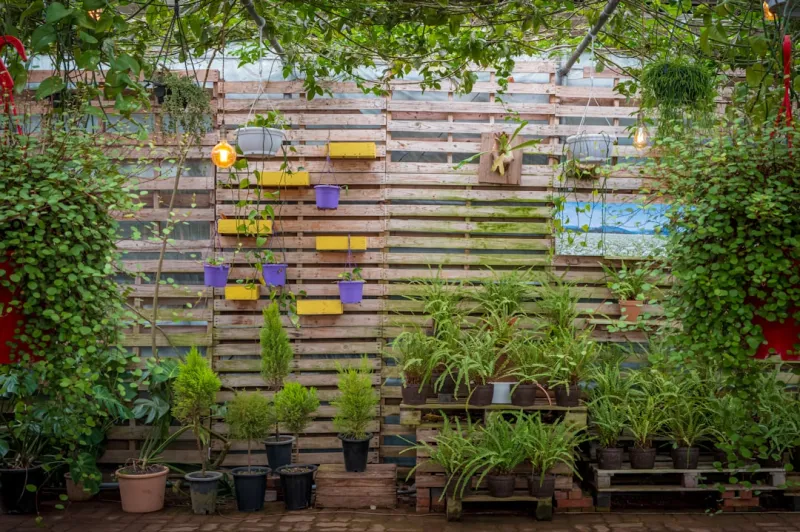
Creating a vertical garden can be one of the most rewarding projects for both new and experienced gardeners alike. Not only is it an excellent way to beautify your living space, but it allows for creative recycling that benefits the environment. The charm of a vertical garden lies in its versatility; it can transform a plain wall into a lush green display, utilizing minimal space while yielding a bounty of fresh herbs, vegetables, or flowers!
Why Choose This Project?
This project stands out because it emphasizes sustainability by using repurposed pallet wood and recycled plastic planters, making it an eco-friendly endeavor. With environmental concerns rising, it’s vital to find ways to incorporate green practices into our daily lives. Creating your vertical garden from repurposed materials showcases not just your green thumb but also your commitment to reducing waste.
Additionally, vertical gardens are perfect for those with limited outdoor space. They can fit snugly against walls, in small yards, or even indoors, allowing you to cultivate plants regardless of your living situation. Whether you're looking to grow fresh herbs for cooking, vibrant flowering plants for aesthetic pleasure, or even small fruits and vegetables, this vertical garden can cater to your needs.
Skill Level
This guide is rated for beginners. While some tools used in the project require careful handling, the overall process is straightforward. With patience, attention to detail, and this step-by-step guide, you will have a thriving vertical garden in no time!
Tools Needed
1. Power Drill: Essential for making holes in the wood and plastic for screws and drainage. 2. Screwdriver: For fastening screws securely. Hand tools are easier for beginners than a power screwdriver. 3. Saw: A handsaw or jigsaw will help you cut the pallet wood and downsize the plastic planters to fit the design. 4. Sandpaper: Important for smoothing out rough edges on the wood. This helps avoid splinters. 5. Wood Screws: To assemble the frame without causing unnecessary damage to the wood. 6. Level: Ensures that your vertical garden is straight and secure, preventing it from leaning. 7. Measuring Tape: Helps you accurately measure dimensions for cutting wood and positioning planters. 8. Gloves: Protect your hands from splinters, and sharp edges while working with wood and plastic.
Materials
- Repurposed Pallet Wood: 4-6 pallets (depending on available space).
- Recycled Plastic Planters: 6-10 planters (sized according to your chosen plants).
- Wood Screws: Approx. 30 screws (1.5 inches length recommended).
- Wood Stain or Paint: One quart (for aesthetics and protection against weather).
- Landscape Fabric: One roll (to line the planter boxes).
- Potting Soil: 2 bags (for filling the planters).
- Plants or Seeds: Choose according to your preference (herbs, flowers, or small veggies).
- Plastic Drainage Mesh: One square foot (to provide drainage, if needed).
- Staple Gun: For securing landscape fabric.
- Hanging Hardware: Depending on your choice of support for the vertical garden (hooks or brackets).
Introduction
Creating your vertical garden using repurposed pallet wood and recycled plastic planters is not only fun but also can turn an underused area of your home into a vibrant green oasis. This project promotes sustainability by repurposing materials readily available, making it an accessible venture for everyone from budding gardeners to seasoned enthusiasts.
As you embark on this journey, you'll find that growing plants vertically can also yield a variety of benefits. First, vertical gardens are a practical solution to maximize limited space while enabling the growth of your favorite plants. Second, they can enhance your home’s aesthetic appeal, providing a beautiful backdrop and infusing natural grace into your indoor or outdoor setting. Third, they can have a positive impact on your well-being, as studies show that engaging with plants can reduce stress and boost mood.
In the upcoming sections, you’ll discover every step you need, from gathering materials to maintaining your garden once it’s complete. Let’s get started!
Step 1: Gather Your Materials
Before diving into the construction, ensure you have all the necessary materials compiled in one place. You can source repurposed pallet wood from local businesses, construction sites, or even online marketplaces. Remember, you want wood that is sturdy and free from harmful chemicals or excessive rot.
For the planters, look for recycled plastic options, which should be durable enough to withstand the elements. Make sure they have adequate drainage holes, or plan to create them as needed.
Tips:
- Inspect your pallets before taking them. Avoid any that appear to be damaged or have significant mold.
- Choose planters in various heights and widths if you want to create a more dynamic visual layout.
Step 2: Preparation of Pallet Wood
Once you’ve secured your pallet wood, you need to prepare it for construction. Start by taking apart the pallets carefully using a pry bar or similar tool. Try to keep the boards intact to maintain their strength.
Next, use sandpaper to smooth out any rough edges. This not only makes the wood safer to work with but enhances its overall look when you apply a finish.
Tips:
- When unscrewing the pallets, ensure you’re wearing gloves to protect your hands from splinters.
- Keep in mind any blue markings on the wood; they indicate types of treatment. Look for HT (heat-treated) stamps to ensure safety.
Step 3: Design Your Vertical Garden Layout
Before assembling, take some time to sketch out a design for your vertical garden. Consider how many planters you want and the arrangement of the pallets. You can choose to have them in a single row or create a staggered effect for visual interest.
Measure the total height and width of the space where you’ll install the garden and mark it on your layout. It’s beneficial to decide on the types of plants you want early on, as their growth height will also influence your design.
Tips:
- Keep in mind the sunlight exposure of the location. Choose plants that require similar light conditions for convenience.
- Consider leaving a little space between the planters for added air circulation and easier watering.
Step 4: Cut the Pallet Wood to Size
This step involves carefully cutting your pallet wood to the desired dimensions. Measure twice before making any cuts to ensure accuracy. You may want to create sections where each planter will sit.
Using your saw, carefully cut the wood. This part of the project requires focus to ensure clean cuts.
Tips:
- If you are new to using a saw, practice on a scrap piece of wood first.
- Remember to wear safety goggles and a dust mask when cutting to protect your eyes and lungs.
Step 5: Assemble the Vertical Garden Frame
With your wood cut and prepared, it’s time to construct the frame. Start by laying out the pallets according to your design. Using your drill and wood screws, secure the pallets together. This will form a sturdy base for your vertical garden.
If you’re stacking multiple pallets, ensure they are secured tightly to avoid any wobbling. You might also consider attaching horizontal bars for additional support based on your design.
Tips:
- Use the level tool to ensure that each pallet is straight as you secure them.
- It may help to have a second person assist you during assembly for stability.
Step 6: Attach Planters and Line with Landscape Fabric
With the frame complete, the next phase involves positioning your recycled plastic planters onto the pallets. Make sure there’s enough space in between each planter. Use your wood screws to secure the planters firmly to the frame.
After the planters are secured, it’s time to line them with landscape fabric. Cut the fabric into appropriate sizes and staple them to the insides of each planter. This will help hold the soil while allowing excess water to drain through.
Tips:
- Position the planters lower down on the frame where they'll be easier to reach for planting and maintenance.
- Make sure there is enough fabric covering the bottom, which will help support the weight of the potting soil.
Step 7: Fill Planters with Potting Soil
Now that your planters are in place, it’s time to fill them with quality potting soil. Use soil that has good drainage properties, allowing your plants to thrive.
If you’re unsure how much soil each planter will need, fill them gradually to avoid spillage. Make sure to leave some space at the top to accommodate watering without overflowing.
Tips:
- Adding compost to the potting soil can enrich the nutrients for improved plant growth.
- You might also want to mix in slow-release fertilizers to help your plants thrive.
Step 8: Choose and Plant Your Vegetation
Choose your plants according to your vertical garden's light conditions and purpose. If you're an herb lover, basil, parsley, and thyme can fit nicely in your new garden, while colorful flowers like petunias and marigolds will add brightness.
Carefully plant your chosen vegetation in the prepared soil. Be gentle—roots can be delicate when transferring them.
Tips:
- Research the specific growth requirements and spacing for your chosen plants.
- It’s great practice to water them lightly after planting to help them settle in.
Step 9: Water and Maintain
Once everything is planted, give your vertical garden a thorough watering. Be cautious of overdoing it, as drainage is crucial to prevent root rot. Moving forward, maintain your vertical garden by regularly checking soil moisture and watering as needed.
Tips:
- Consider setting a watering schedule to help you stay consistent.
- Use a moisture meter for precise watering based on the needs of your plants.
Troubleshooting
Setting up any DIY project can lead to unexpected challenges. Here are five common issues and their solutions for your vertical garden:
1. Plant Overcrowding: If you notice your plants trying to take over one another, consider pruning or relocating them to ensure they all have room to grow healthily.
2. Drainage Problems: If you experience water seeping over the edges of the planters, check to ensure that drainage holes are not blocked. If necessary, consider adding small stones at the base for better drainage.
3. Rotting Plants: If your plants begin wilting or turning yellow, it may be due to overwatering. Evaluate moisture levels and reduce watering frequency if necessary.
4. Pests: Keep an eye out for any unwanted visitors. Pests like aphids or spider mites are common. Use organic pest control methods, like diatomaceous earth or neem oil, to combat infestations.
5. Fading Colors & Weak Growth: If plants seem unhealthy, consider whether they’re receiving enough light. If necessary, move to a sunnier spot or choose plants that tolerate low light.
Conclusion
Reflecting on your project, you've repurposed pallet wood and recycled plastic planters to create a vertical garden that’s not only sustainable but also a unique addition to your space. This guide has walked you through each step of the journey, from gathering materials to planting your favorite herbs, flowers, or vegetables.
As you nurture your garden, don’t hesitate to explore variations, like shifting your plants for seasonal blooms or changing out herbs based on your cooking preferences. Maintenance is essential to keeping your vertical garden flourishing; regular watering and monitoring for pests will go a long way.
By embracing this project, you’ve joined a fulfilling, eco-friendly movement that celebrates creativity, gardening, and the art of repurposing. Your vertical garden will be a testament to your dedication to both plants and sustainability in your home. Happy gardening!