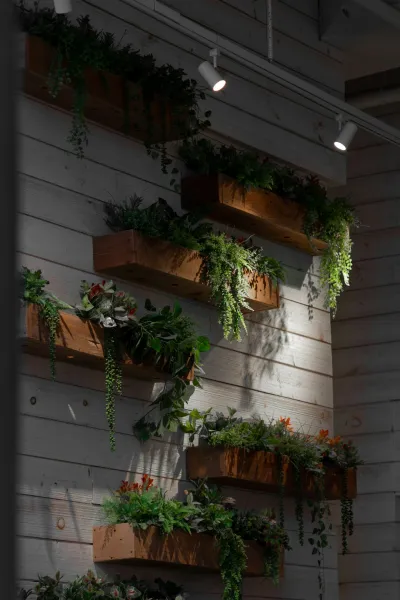
How to create a vertical garden using reclaimed pallets and native plants for a small balcony
Introduction
In today’s urbanized world, green space is becoming increasingly scarce, particularly in apartments and small dwellings. This is where a vertical garden shines as a brilliant solution. Not only does it enhance aesthetics, but it also promotes a sense of calm and connection to nature, creating a serene retreat on your small balcony. Using reclaimed pallets and native plants, this DIY project allows you to cultivate your own green sanctuary while minimizing environmental impact. Native plants are beneficial because they require less water and care, adapting easily to local climates and ecosystems.
Creating a vertical garden is also a sustainable choice; it repurposes pallets that may otherwise go to waste and promotes biodiversity. The added bonus? It's a fun way to engage with nature without the labor-intensive requirements of a traditional garden, making it ideal for beginners.
Whether you are looking to grow herbs, flowers, or a mix of both, this project allows for creativity and personalization while providing an effective way to maximize your balcony’s limited space. From choosing the right plants to ensuring proper drainage, every step of this guide will help you transform your balcony into a lush, vertical oasis. This project is perfect for anyone with basic tools and a little creativity, and we’ll guide you through the entire process!
Tools Needed
1. Hammer - Essential for securing nails and reinforcing the structure of the pallet. 2. Screwdriver - Necessary for driving screws into the pallets and ensuring stability. 3. Hand Saw or Reciprocating Saw - Useful for cutting the pallets to size based on your space needs. 4. Staple Gun - Ideal for attaching landscaping fabric or burlap to the pallets, creating a barrier for soil. 5. Level - To ensure that your pallet garden is straight and secured properly when mounted. 6. Drill - For making drainage holes in the pallets if they don't already exist, which is critical for the health of your plants. 7. Pliers - Handy for removing any nails or unwanted materials from the reclaimed pallets. 8. Garden Trowel - Useful for handling soil and plants during the planting process.
Materials
1. Reclaimed Pallet - 1 large pallet, preferably heat-treated without chemicals. 2. Landscaping Fabric or Burlap - 1-2 yards to line the back and sides, preventing soil from spilling out. 3. Wooden Screws - Approximately 20 to secure framework and attachments. 4. Potting Soil - 2-3 cubic feet; a mixture suitable for your chosen plants. 5. Native Plants - Choose 5-8 plants depending on the space and type of plants desired (preferably those that thrive in your local climate). 6. Wood Sealant or Water-resistant Paint - For protecting the pallet, 1 quart should be enough. 7. Nails - About 25 for securing various components of the structure. 8. Plastic Planters or Pots - 5-8 pots to help contain the soil and plants. 9. Sandpaper - 1-2 sheets to smooth any rough edges of the pallet. 10. Twine or Wire - For securing plants if they become top-heavy or need support.
Step-by-Step Instructions
# ### Step 1: Selecting and Preparing Your Pallet
What: Choose a suitable reclaimed pallet. Not all pallets are created equal, so it’s crucial to select one that is untreated and structurally sound.
How: Check for credibly sourced pallets (look for the "HT" mark indicating heat-treated wood). Inspect for rot, protruding nails, or damaged slats. Sand any rough spots to prevent splinters.
Tips: You can often find pallets for free at local businesses, but always ensure they are safe to use for planting.
Safety: Wear gloves while handling the pallets to protect your hands from splinters or sharp nails.
# ### Step 2: Cleaning the Pallet
What: Thoroughly clean the pallet to remove any dirt, debris, or chemicals that might harm the plants.
How: Use a mixture of warm water and mild detergent to scrub the pallet. Rinse well and allow it to dry completely in the sun.
Tips: If the pallet has not been treated, this process will help further reduce any potential contaminants.
Safety: Ensure that the pallet is fully dry to prevent mold growth in the soil.
# ### Step 3: Securing the Fabric
What: Line the backside and sides of the pallet with landscaping fabric or burlap to create a barrier for the soil.
How: Cut the landscaping fabric slightly larger than the sides of each panel. Use a staple gun to secure the fabric along the edges. This allows for proper drainage while holding the soil in place.
Tips: Ensure fabric is taut but not overly tight to allow for soil flexibility.
Safety: Use care when handling the staple gun to avoid personal injury.
# ### Step 4: Preparing the Drainage Holes
What: Ensure proper drainage to prevent water logged roots.
How: If your pallet lacks drainage holes, use a drill to create a few holes in the bottom slats, spaced evenly to allow excess water to escape.
Tips: You might want to verify that drainage holes are unobstructed once the pallet garden is set in place.
Safety: Be cautious while using power tools, adhere to operational instructions carefully.
# ### Step 5: Sealing the Pallet
What: Protect your pallet from the elements.
How: Brush or spray the wood sealant (or water-resistant paint) onto all surfaces of the pallet to prolong its life when exposed to moisture.
Tips: Choose a sealant that’s eco-friendly and non-toxic to plants; allow ample drying time as instructed on the product label.
Safety: Ensure you're working in a well-ventilated area to avoid inhaling any fumes.
# ### Step 6: Filling with Soil
What: Begin filling the pockets with potting soil.
How: Use a garden trowel to carefully fill each section of the pallet, ensuring enough depth for plant roots.
Tips: Pack the soil lightly to improve aeration while avoiding too much compaction.
Safety: Wear a dust mask if the soil is dry and could create a dust cloud upon handling.
# ### Step 7: Planting Your Native Plants
What: Select and plant your native plants accordingly.
How: Based on their size and growth habits, plant 5-8 native plants into the pocket of soil you’ve prepared, keeping in mind sunlight and water preferences.
Tips: Arrange taller plants in the middle and shorter plants on the outer edges for a more visually appealing look.
Safety: If using sharp tools or gloves, be careful to minimize the risk of injury.
# ### Step 8: Watering and Maintenance
What: Once planted, adequate water is key.
How: Water your new vertical garden thoroughly, soaking the soil but ensuring it drains well. Check that the drainage holes function properly.
Tips: Regular monitoring will help determine the plants’ water needs; as a rule, water when the top inch of soil feels dry.
Safety: Avoid over-watering to prevent slips if your balcony surface becomes wet.
# ### Step 9: Supporting Growth
What: Provide necessary support for plants.
How: Use twine or wire to help guide plant growth, especially for trailing varieties or heavy bloomers.
Tips: Begin training plants early to maintain a tidy vertical structure and avoid tangling or sagging.
Safety: Be careful when handling wire to avoid cuts or injuries.
# ### Step 10: Regular Maintenance
What: Routine checks and care ensure longevity.
How: Set a schedule for watering, deadheading, and general maintenance to keep the garden thriving. Fertilize during the growing season as needed.
Tips: Note specific plant care requirements to thrive; some may need pruning or more sunlight than others.
Safety: Always wear gloves when dealing with soil or plants to avoid skin irritation.
Troubleshooting
1. Plants Wilt or Die:
- Ensure they are not over or under-watered. Check soil moisture and adjust watering schedule accordingly.
- Investigate sunlight exposure; move plants to a sunnier or shadier location depending on their needs.
- If you did not adequately seal the pallet or if the planting area is consistently moist, consider applying more sealant or relocating the garden to a drier area.
- If soil is escaping, evaluate the landscaping fabric. It should be secure but allow water to drain. You may need to reinforce it for better soil retention.
- Regularly inspect for pests; introduce natural predators like ladybugs or use organic pest control. Ensure good air circulation around plants to reduce mildew risk.
- Take note of sunlight, drainage, and soil quality. You might need to amend the soil with compost or nutrients or reposition plants for better sunlight access.
Conclusion
Creating a vertical garden with reclaimed pallets and native plants is not merely a rewarding DIY project; it’s also an investment in sustainability, beauty, and personal mental wellness. Throughout this guide, we have provided the tools and steps necessary to take this project from conception to completion, so you'll have a lush and vibrant green space on your small balcony.
Beyond the plants chosen, consider variations such as painting your pallets a vibrant color or adding decorative elements. Consistent maintenance and monitoring for pests and growth will ensure your garden thrives.
Vertical gardening is not just a trend; it's a practical method to bring the wonders of nature into urban living spaces. Now, go ahead and let your creativity bloom in a way that embraces both sustainability and beauty!