Introduction
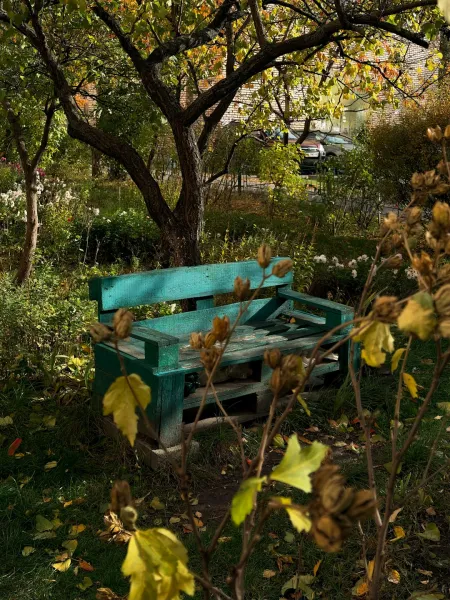
Create An Upcycled Garden Bench From Old Pallets And Paint It With Eco Friendly Colors
5 (77)
upcycled garden bench from old pallets is a rewarding and sustainable that not only enhances your outdoor space but also fosters creativity and resourcefulness. In an age where sustainability is becoming increasingly essential, using pallets—often discarded as waste—helps reduce landfill burdens while allowing you to express your personal style. Imagine lounging on your unique bench while sipping tea, enjoying a book, or hosting gatherings with friends. This offers a chance to create something beautiful while being kind to the planet. Additionally, building your bench is more than just an eco-friendly endeavor; it also develops basic woodworking skills. Even if you're a complete novice, the satisfaction that follows the successful completion of this can be phenomenal. From understanding the correct use of tools to experimenting with different eco-friendly paints, you will engage in hands-on learning throughout this process. Not only will you gain a functional piece of furniture, but you'll also acquire practical skills that can be applied in various other DIY in the future. The skill level for this is considered beginner to intermediate. As long as you are comfortable using simple hand tools and can follow a few straightforward steps, you can achieve a beautiful garden bench that will become a cherished addition to your home. So, let's roll up our sleeves and get started on this exciting upcycling venture!
Tools Needed
Saw (hand saw or circular saw) Essential for cutting the pallets to size. A circular saw can make the job quicker, whereas a hand saw can be more comfortable to control for beginners.Final Result2. Screwdriver or power drill Used for assembling the pallets together. A power drill is faster and helps to create pilot holes, ensuring the wood doesn’t split.Measuring tape Crucial for ensuring your cuts are accurate and that the bench is properly portioned. This will help you avoid wastage and mistakes.Sandpaper or power sander Necessary for smoothing the surfaces of the pallets before painting. This step will ensure a smoother finish and better paint adherence.Clamps Used to hold the pallets in place while cutting and assembling them. This is particularly helpful for preventing slips during cuts or screw insertion.Safety goggles Important for protecting your eyes from dust and debris while cutting or sanding the wood. Safety should be your priority at every stage.Dust mask Essential while sanding to prevent inhalation of wood dust, which can cause respiratory issues. It's particularly useful if you're sensitive to dust.Paintbrushes and rollers Required for applying the eco-friendly paint. Brushes offer precision, while rollers can cover larger areas more quickly.
Materials
Old pallets (2-4 depending on size) Sourced for free or at low cost; ensure they are not broken or heavily treated with chemicals.Wood screws (1-inch, about 20 screws) For assembling the different parts of the bench securely.Wood glue (1 small bottle) Used in conjunction with screws for extra strength in joints.EColy primer (1 quart) Prepares the surface for paint, ensuring better adhesion and durability while being less harmful to the environment.EColy paint (1 quart in chosen color) Durable, non-toxic option for wood, helping to preserve its beauty while being safe for plants and the earth.Outdoor wood sealant (1 quart) protects your bench from the elements; ensure it’s eco-friendly and non-toxic.Paint thinner or natural solvent (if needed) For cleaning brushes or thinning paint if necessary. Look for eco-friendly options.Clear plastic tarp or drop cloth (1) To protect your workspace from paint stains; using a tarp is also an eco-friendly choice as it can be reused.Cushions or foam padding (optional, based on preference) To enhance comfort on the bench; look for sustainably duced upholstery.Outdoor fabric (optional, for covering cushions) If you are creating cushions, ensure it's Waterant and eco-friendly.Steps to Create Your Upcycled Garden Bench
Step 1:
Source and
- Prepare Your Pallets
What: Begin by sourcing your pallets from local businesses, warehouses, or even friends who may have them lying around. Look for sturdy pallets that are in decent condition without any significant damage or treatment that could harm the environment.
How: To prepare, inspect the pallets for brands or stamps; avoid any that are stamped with "MB" (indicating Methyl Bromide treatment) as they contain harmful chemicals. Clean the pallets thoroughly to remove dirt, dust, or mold. If necessary, use a stiff brush or hose down the pallets and let them dry completely.
Tips: Check with local hardware stores or agricultural suppliers; they often have pallets available for free or very cheaply.
Safety: Wear gloves and dust masks to protect your hands and lungs when handling dirty or rough pallets.
Step 2:
Disassemble the
- Pallets
What: Once you have your pallets, the next step is to disassemble them into manageable pieces.
How: Use the saw or a crowbar to pry the slats apart. Take care to keep as many of the slats intact as possible for the bench sides and seats. Aim to gather long, even pieces as well as shorter slats.
Tips: For ease, try cutting through the nails with a recicating saw if you have one, or leverage a hammer and a chisel if necessary.
Safety: Always wear gloves when operating tools, especially harsher ones like crowbars, to prevent injuries to your hands.
Step 3:
Design
- Your Bench
What: Before moving onto construction, design your bench. Consider how many seating spaces you want and the overall size of the bench.
How: Sketch a simple design that includes dimensions. This can help greatly in choosing the right lengths of slats when assembling. Traditional garden bench dimensions are around 15-18 inches in height and 4-6 feet in length.
Tips: Visualize the final duct before you start assembling. Play around with the configuration of the slats and position them as you'd like them to appear.
Safety: It's advised to model your designs on paper first rather than cutting blindly into your
materials
Step 4:
Assemble the
- Base of the Bench
What: Once you have a design laid out, it's time to assemble the base of your garden bench.
How: Use two long pieces of wood arranged parallel for the bench’s length. Attach shorter pieces between these to create the frame. Secure the joints with wood screws, applying some wood glue as well for extra durability.
Tips: Use clamps to hold the pieces together while you screw them in; this makes it easier to hold everything steady and align your pieces perfectly.
Safety: Be careful when using power tools; maintain a firm grip and stay aware of your surroundings.
Step 5:
Create the
- Seat and Backrest
What: You now need to create the seat and backrest parts of your bench.
How: Lay down the slats across the width of the bench base for the seat. After attaching the seat slats, if you are adding a backrest, frame and secure additional slats diagonally for support.
Tips: Ensure spacing between the slats; about half an inch is good for drainage and ease of cleaning. Measure before cutting to ensure uniformity.
Safety: Avoid having the backrest too high; this can affect stability. Measure your angles and supports carefully.
Step 6:
Sand and
- Prepare for Painting
What: Preparing your bench for painting is crucial for a polished finish.
How: Use a power sander or sandpaper to smooth the entire bench, paying special attention to edges and corners. This step helps avoid splinters and prepares the wood for paint adhesion.
Tips: Start with a rougher grit sandpaper and transition to finer grit, ideally 120-220 for finer finishes.
Safety: Ensure your work area is free from debris and excess wood dust to prevent slips while you work.
Step 7:
Prime the
- Bench
What: Priming the wood before applying paint will enhance the color vibrancy and aid in paint adherence.
How: Use an eco-friendly primer and apply it evenly across all surfaces using a paintbrush or roller. Allow it to dry completely according to the primer's instructions.
Tips: Be thorough. Skipping this step can lead to uneven color or peeling paint later on.
Safety: Always work in a Wellated area when applying primer or paint to avoid inhaling fumes.
Step 8:
Paint the
- Bench
What: Now to add color! This step allows room for creativity, as you can choose the color that best fits your garden aesthetics.
How: Apply your chosen eco-friendly paint with a brush and, if desired, finish with a roller for larger areas. Multiple coats may be necessary for full coverage.
Tips: Light, even strokes will help avoid paint drips. Plan to do two to three coats for optimal color depth and finish.
Safety: Again, ensure ventilation and consider wearing a mask to avoid inhaling paint fumes.
Step 9:
Seal the
- Bench
What: To long the life of your painted bench and protect it from the elements, sealing is essential.
How: Apply an outdoor wood sealant after the paint has fully cured. Follow the manufacturer’s instructions for application techniques and drying times.
Tips: A brush can help get into tight spots where paint might not settle well. Use a clear sealant unless you want to tint the color slightly.
Safety: Ensure you’re wearing gloves and working in a ventilated area, as some sealants can release strong fumes.
Step 10:
Final
- Assembly and Placement
What: It’s time to finish your by positioning the bench and (if desired) adding comfort elements.
How: Once the sealant has dried completely, you can move your bench into the desired spot in your garden. If you added cushions, place them neatly on the bench.
Tips: Consider placing the bench in a shaded area or under a tree for comfort on hot days. If you want stability, attach the bench to a stable base or ground anchors.
Safety: Ensure the bench is sturdy before sitting or placing any weight on it. Test it out carefully before allowing others to use it.
2026 •