How to create an indoor vertical garden using repurposed plastic bottles and LED grow lights
Introduction
In the modern world, where urban living often means limited space and access to nature, creating an indoor vertical garden offers a refreshing escape. This innovative gardening method allows you to bring a touch of greenery to your living space, promote cleaner air, and even grow your own herbs and vegetables. What if I told you that you can create this green sanctuary using repurposed plastic bottles and LED grow lights? Not only does this project support sustainability by reducing plastic waste, but it also enables you to cultivate a vibrant garden without the need for extensive outdoor space.
The benefits of creating an indoor vertical garden are numerous. From improving air quality to enhancing mood and creativity, plants are known for their therapeutic effects. Additionally, growing herbs and vegetables indoors can significantly reduce grocery costs and ensure that you have fresh, organic produce at your fingertips. This project is perfect for beginners, requiring minimal gardening skills while allowing for creativity and personal expression through design.
As you embark on this journey, remember that the okay skill level ensures that even those without prior gardening experience can successfully create their very own vertical garden. So, gather your materials and get ready to transform your home with a lush indoor vertical garden that not only looks good but also serves as a personal haven.
Tools Needed
1. Scissors or Utility Knife – Essential for cutting the plastic bottles into the desired shape and size. A utility knife provides a clean, precise cut, useful for larger bottles.
2. Drill or Hole Punch – Used for creating drainage holes at the bottom of each bottle to prevent overwatering, which can cause root rot in plants.
3. Sandpaper – Important for smoothing out rough edges after cutting the bottles, ensuring safety when handling them.
4. Level – Ensures that your vertical garden hangs straight on the wall. Keeping it level adds to aesthetics and allows for even light distribution.
5. Tape Measure or Ruler – This will help you measure distances accurately when hanging your garden to ensure it fits your chosen space.
6. Paintbrush or Spray Bottle – Ideal for applying paint or sealant on plastic bottles if you choose to decorate or protect them from UV light.
7. Safety Glasses – A must for protecting your eyes from plastic shards while cutting or drilling. Safety should always be your first concern during DIY projects.
8. Gloves – Protect your hands from sharp edges or any cuts while handling the plastic bottles.
Materials
1. Plastic Bottles (10–15) - You can use 2-liter soda bottles or smaller ones, depending on the size of your garden. 2. Potting Soil (1 bag) – Organic potting soil provides the nutrients your plants need to thrive. 3. Plants/Seeds (5–10 types) – Choose easy-to-grow varieties such as herbs (basil, mint, parsley) and small leafy greens (lettuce, spinach). 4. Command Hooks or Hanging Wire (1 pack) – Useful for attaching your plastic bottles securely to the wall or vertical frame. 5. LED Grow Lights (1-2) – Ensure your plants receive adequate light. Look for adjustable options with a timer feature for convenience. 6. Watering Can or Spray Bottle – Essential for watering your plants without overdoing it, particularly in a confined space. 7. Plastic Container for Water Drip Tray (1) – To catch any excess water that drains from the bottles. 8. Optional: Paint or Sealer – If you want to decorate your bottles or protect them from light degradation. 9. Optional: Small Stones or Gravel (1 bag) – Used as a drainage layer at the bottom of the bottles (if desired).
Step-by-Step Guide
Step 1: Prepare Your Workspace
Before diving into your vertical garden project, it’s crucial to prepare a clean and organized workspace. This step sets the tone for your entire DIY experience. Ensure you have ample space to cut and drill without obstruction or clutter. Cover your working surface with a drop cloth or cardboard to catch any debris from cutting the plastic. Gather all your tools and materials within reach, and consider having a trash bag nearby for quick cleanup. Take a few moments to familiarize yourself with the tools you're using, especially if it's your first time. Safety is paramount, so wear gloves and safety glasses.
Step 2: Gather and Prepare Plastic Bottles
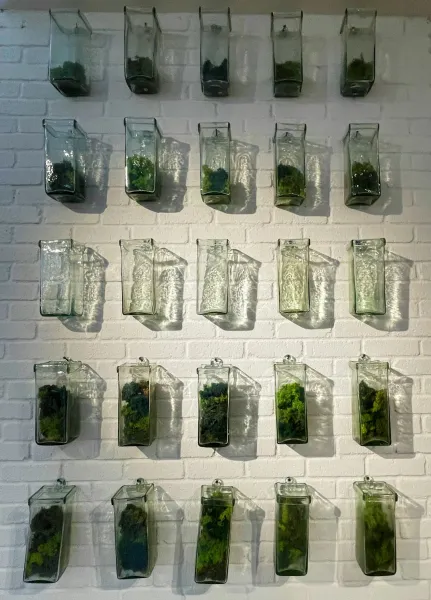
Start collecting your plastic bottles. Wash them with soap and water to remove any residue, then make sure they are completely dry before proceeding. Using your scissors or utility knife, carefully cut the bottles in half vertically. Be mindful of the sharp edges; use sandpaper to smooth these out afterward. If you’re using larger bottles, consider cutting them into thirds, depending on the height of your vertical space. Tip: Keep the caps on for added aesthetics or as a base, but remember to poke holes if you want drainage. You'll create tapered top sections for smaller plants and larger openings for bigger plants.
Step 3: Create Drainage Holes
Next, drill small holes at the bottom of each bottle to allow water to drain freely, preventing root rot that can develop from excess moisture. Use a drill or a hole punch for this task. Ensure the holes are evenly spaced across the bottom—around 3 to 5 holes will suffice. If you’re using a spray bottle or watering can, be aware of potential overwatering. Safety Tip: Always wear protective gear to protect against flying plastic shards or any accidental slips while drilling.
Step 4: Construct a Vertical Frame (Optional)
To create a more structured garden, consider assembling a vertical frame using wood or PVC pipes. This will serve as the backbone for your hanging bottles. Measure your space and cut the materials to your preferred height, ensuring it can support the weight of the bottles after they are filled with soil and plants. Use a level to ensure the frame remains upright. Secure your frame against the wall with screws or brackets for stability. Alternatively, if you're opting for wall-mounted bottles without a frame, skip to the next step.
Step 5: Plant Selection and Filling
Choose your plants wisely! As mentioned, herbs and small leafy greens are excellent options. Before filling the bottles, line the bottom with a small layer of gravel or stones if you desire further drainage. Add potting soil to each bottle up to about three-quarters full. For seeded varieties, plant according to seed packet instructions, ensuring they have sufficient space to grow. If using starter plants from a nursery, gently remove them from their original containers and transplant them into the bottles. Tip: Water the soil lightly after planting and avoid packing the soil too tightly.
Step 6: Secure Your Bottles
Now it’s time to hang your bottles on your vertical frame or wall. If using hooks, mark the desired location on the wall or frame, ensuring it’s level. Use command hooks for an easy installation that won’t damage your walls or screws for a more permanent solution. If using wire, create loops to hang the bottles securely, ensuring they are stable and won’t fall. If your plants are top-heavy as they grow, consider adding supports as necessary. Safety Tip: If securing to a wall, check for any electrical wires or pipes behind your walls before drilling.
Step 7: Install LED Grow Lights
Position your LED grow lights above your vertical garden. Depending on the height of your garden, you may need to adjust the lights to ensure your plants receive adequate coverage. Ideally, the LED lights should be positioned close enough to provide light but not so close that they scorch the plants. Set your lights on a timer to mimic natural sunlight cycles—typically around 12-14 hours of light and 10-12 hours of darkness is ideal for most plants. Tip: Ensure to choose full-spectrum LED lights, as they provide the necessary wavelengths for plant growth.
Step 8: Watering and Maintenance
With your garden in place, establish a watering routine. Use the spray bottle or watering can to water your plants, keeping the soil moist but not overly saturated. Each plant’s water needs will vary, so keep an eye on the moisture level visually and through touching. As plants grow, they may require pruning or deadheading, so monitor their health regularly. Ensure to fertilize according to the specific nutrient needs of your chosen plants; organic fertilizers work best in indoor gardens. Tip: Keep a water drip tray beneath the bottles to catch any excess water that might leak through the drainage holes.
Step 9: Observe and Adjust
As time progresses, take the opportunity to observe your plants closely. Are they thriving? Are some plants growing faster than others? Adjust your watering schedule, reposition plants if needed, and check the placement and functionality of your grow lights regularly. Rotate plants to ensure they receive even light exposure. Enjoy the experience of watching your garden evolve—if certain plants are not doing well, research potential issues and solutions.
Step 10: Gather Your Harvest
Once your plants are mature, enjoy the fruits of your labor! Harvest your herbs and greens as needed, beginning with the outer leaves to ensure continual growth from the center. Fresh herbs elevate your culinary creations, while greens can supplement salads or smoothed. For best taste, use your harvest shortly after cutting, as freshly picked herbs have a vibrant flavor that store-bought varieties cannot replicate. Tip: Share your harvest with friends or neighbors, fostering connections through the joy of gardening.
Troubleshooting
1. Plants Wilting or Turning Brown Fix: This often indicates either underwatering or overwatering. Check the soil moisture; if it's too dry, increase watering. If it's too wet, reduce watering frequency and ensure proper drainage.
2. Pests Fix: Inspect plants regularly for pests like aphids or spider mites. Introduce natural predators or homemade solutions like neem oil to treat infestations. Keep your gardening area clean and free from dead plants or leaves.
3. Poor Light Distribution Fix: If plants are stretching or leaning, they likely need more light. Adjust the position of your LED lights or rotate your plants to promote even growth. Ensure all parts of the garden receive adequate light throughout the day.
4. Mold Growth Fix: Mold can develop in overly moist conditions or without adequate air circulation. Ensure proper drainage and limit watering frequency. Improve air circulation through strategic placement of fans or removing excess soil that might remain overly damp.
5. Slow Growth Fix: If plants are not growing as expected, check for light, nutrients, and water levels. Ensure your plants receive enough sunlight or nutrient-rich soil. Consider adding a well-balanced fertilizer if nutrients seem inadequate.
Conclusion
Creating an indoor vertical garden from repurposed plastic bottles and LED grow lights is not only an engaging project but also a step toward sustainability and personal well-being. This DIY endeavor beautifully merges creativity with practicality, allowing you to transform an unused wall or corner in your home into a vibrant green space. Regular maintenance and observation are key to thriving plants, so remain attentive and enjoy the fruits of your labor.
As you become more comfortable with your indoor garden, consider experimenting with different plants, incorporating hydroponics, or even establishing a themed garden centered around a specific culinary focus. Each variation can be tailored to your preferences, expanding your gardening skills and enriching your indoor environment. Celebrate your commitment to green living--after all, every plant nurtured is a step toward a healthier planet.
By Alex, Home Hack Lab