How to create an indoor vertical garden using repurposed pallets and LED grow lights
Setup & Materials
By Alex • November 15, 2025 • DIY Guide
Creating an indoor vertical garden is an exciting way to bring nature into your home, especially when space is limited. The concept is simple: utilize vertical space on your walls by repurposing old pallets to create a stunning vertical garden. With the addition of LED grow lights, you can ensure your plants thrive, regardless of the natural light available in your indoor space.
In this project, you'll learn not just how to make a vertical garden but also how to embrace sustainability by giving new life to pallet wood that may otherwise go to waste. Repurposing pallets is not only eco-friendly but also cost-effective, and it provides a unique aesthetic to your home. The act of gardening itself can be therapeutic, offering a sense of accomplishment and a touch of tranquility in your busy life.
Whether you want to grow herbs for culinary use, houseplants for improved air quality, or simply add a splash of greenery to your indoor environment, this DIY project offers numerous benefits. Furthermore, the skill level required is beginner-friendly, making it accessible even if you've never created anything before. With patience, creativity, and our easy-to-follow steps, you’ll cultivate a vibrant vertical garden in no time.
Tools Needed
Power Drill: To make holes for screws and provide stability in your pallet structure.
Saw: A handsaw or jigsaw will help cut pallets into desired sizes, adapting them to fit your space and design.
Screwdriver: Essential for assembling the frame of the vertical garden and securing the pallets together.
Measuring Tape: To ensure accurate measurements for cutting and arranging the pallets.
Level: Ensures that your garden is straight on the wall, avoiding any awkward angles that might affect aesthetics or water drainage.
Sandpaper or Sander: Smooths out rough edges and surfaces to prevent splinters or damage to your hands and plants.
Paint or Wood Sealant (Optional): To protect your pallets from moisture and prevent rot, especially if you are placing them in a humid area.
Safety Goggles and Gloves: Protects your eyes and hands from dust and sharp objects while working with tools and materials.
Materials
Repurposed Pallet Wood: 1-2 pallets, depending on the size of your vertical garden.
Hanging Planters: 5-10 small to medium-sized pots or containers for herbs or flowers, with drainage holes.
Potting Soil: Approximately 2-3 cubic feet, depending on the number of planters you use.
LED Grow Lights: 1-2 fixtures, depending on the size of your vertical garden, with adjustable brightness.
Screws: 1 box of wood screws (size 1.5-2 inches) for securing pallets and hangers.
Brackets or Wall Anchors: 4-6 units to secure the vertical garden to the wall.
Watering Can or Spray Bottle: For nurturing your plants and ensuring they receive the right amount of moisture.
Plant Fertilizer: Appropriate for the types of plants you choose, as well as frequency and type (liquid or granular).
Plastic Sheeting or Landscape Fabric: At least 1-2 yards, for lining the planter boxes to hold soil and moisture.
Rope or Twine: 10-20 feet for optional decorative hanging plants or securing plants in place.
Step-by-Step Instructions
1. Selecting and Preparing Your Pallets
Start by sourcing your pallets. Look for those that are marked "HT" (heat-treated), as they are safe and free of chemicals. Avoid wet or broken pallets. Once you have chosen pallets, clean them thoroughly with a pressure washer or scrub brush to remove dirt and debris.
Next, inspect the wood for any loose nails or splintered pieces. Remove any protruding nails using a hammer. Sand down the surface using sandpaper or a sander to avoid splinters—this is particularly important if children or pets will be around.
2. Designing Your Garden Layout
Before you begin cutting, plan out how you want your vertical garden to look. Consider the number of pallets and the arrangement on the wall. Sketch a simple design that includes the position of your planters, plants, and grow lights. Remember to incorporate drainage—ensure the bottom planters are higher than the upper ones to allow water to flow downwards.
This step is crucial to visualizing how your garden will work, as well as determining the height at which you want the pallets mounted to accommodate your ceiling height and ease of access for watering and harvesting.
3. Cutting the Pallets to Size
Using your saw, cut the pallets according to your design. You may choose to cut them vertically, horizontally, or leave them intact depending on your vision.
Tips: If you're uncertain about cuts, always measure twice and cut once. If you have leftover wood, you can use it for future projects or to create additional designs or supports.
4. Assembling the Vertical Garden Frame
Once you have your pallets cut, lay them out on the floor. Start assembling the frame by stacking pallets on top of each other. Secure them using wood screws in the corners where they meet. Use a screwdriver to tighten the screws and maintain stability.
Safety Tips: Ensure you wear safety goggles to protect your eyes from dust and splinters, and work in a space where you have enough room to maneuver with your tools.
5. Attaching Planters to the Pallets
Now, it’s time to attach your planters. Line the back of each planter with landscape fabric or plastic sheeting to retain soil and moisture. If your planters don’t have drainage holes, drill small holes at the bottom.
Using screws and a power drill, attach your planters to the pallets at your previously marked positions, ensuring they are secure and level. Be mindful of the weight of the plants and soil; ensure the pallets can support them.
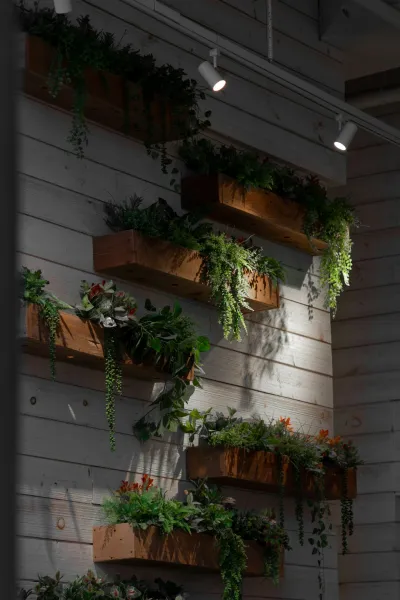
6. Mounting the Vertical Garden
Next, you’ll mount your vertical garden on the wall. Using a level, mark with a pencil where the brackets or wall anchors will go. Drill into the wall to place your anchors or brackets, ensuring they can support the entire weight of your garden.
Carefully lift the pallet garden and secure it to the wall using the anchors. Adherence to safety measures is paramount—consider having someone assist you for extra hands during this heavy-lifting phase.
7. Installing LED Grow Lights
Once your vertical garden is secured to the wall, install LED grow lights. Position them above the garden to ensure even light distribution. Follow the manufacturer’s instructions for installation, ensuring all electrical connections are secure. Adjust the height to suit the plants’ needs.
Tip: Set the grow lights on a timer to mimic natural sunlight cycles, providing approximately 12-16 hours of light for optimal plant growth.
8. Filling Planters with Soil and Planting
Now that the structure is complete, fill each planter with potting soil. Give yourself ample room to plant—don’t overpack the soil. Make holes in the soil according to the size of your plants or seeds.
Plant your chosen greenery, be it herbs, flowers, or small vegetables. Ensure they are spaced adequately to promote airflow and growth. Once planted, water them gently to help settle the soil around the roots.
9. Watering and Fertilizing Your Plants
Be mindful of your watering schedule. Since your garden is indoors, the plants may require different watering than outdoor plants. Generally, check the soil moisture before watering—only add water when the top inch feels dry.
You can also apply fertilizer according to plant type and frequency recommended on the packaging. Monitor your plants for signs of over-fertilization, such as burnt leaf edges, and adjust according to their needs.
10. Regular Maintenance and Monitoring
Take note of your garden's progress. Make it a habit to check the plants regularly for pests, diseases, or wilting. Adjust your LED grow light as necessary, moving it closer or further away as per the plants’ growth.
Plan to rotate your plants based on their growth and light exposure—this will ensure they all receive adequate light and nutrients over time.
Troubleshooting Common Issues
1. Insufficient Growth
Fix: Evaluate your grow lights. They might not be close enough or powerful enough for the light needs of your plants. Adjust brightness or duration accordingly.
2. Overwatering or Underwatering
Fix: Check the moisture level more frequently and adjust your watering schedule. Consider using a moisture meter for accuracy.
3. Pest Infestations
Fix: Regularly check for insects and treat infestations with organic insecticidal soap or neem oil. Keep plants healthy to make them less vulnerable.
4. Planters Rotting
Fix: Ensure your planters have adequate drainage holes. Line them with landscape fabric or use a potting mixture designed to prevent rot.
5. Plant Yellowing
Fix: This often indicates nutrient deficiency or overwatering. Monitor your watering habits and adjust your fertilization schedule based on plant needs.
Conclusion
Creating a vertical garden using repurposed pallets and LED grow lights not only utilizes an underappreciated material but also allows you to cultivate a vibrant living space indoors. By following the detailed steps outlined above, you can enjoy fresh herbs, beautiful flowers, or lush foliage all year round—enhancing both the aesthetic and the air quality of your home.
From varying the types of plants you choose to experimenting with different lighting setups, there are numerous ways to put your unique spin on this project. With regular maintenance and care, your indoor vertical garden will become a source of pride and a fulfilling hobby.
So, gather your tools, get creative, and transform your home with this sustainable and rewarding project!