Introduction
Friendly Vertical Garden Using Reclaimed Pallets And Repurposed Containers
5 (82)
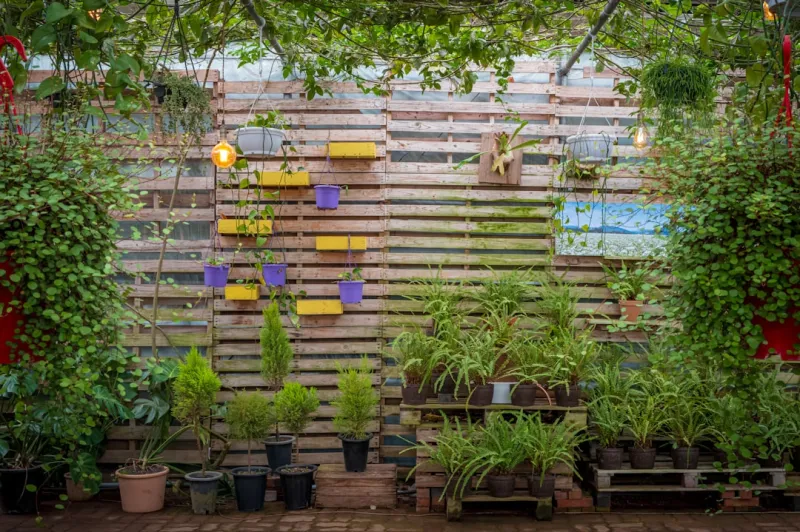
Vertical Garden Using Reclaimed Pallets And Repurposed Containersbody.navh1.rating.hero-img.share.btnVertical Garden Using Reclaimed Pallets And Repurposed ContainersVertical Garden Using Reclaimed Pallets And Repurposed Containersh2.content pVertical Garden Using Reclaimed Pallets And Repurposed ContainersVertical Garden Using Reclaimed Pallets And Repurposed ContainersVertical Garden Using Reclaimed Pallets And Repurposed ContainersVertical Garden Using Reclaimed Pallets And Repurposed Containersh2aVertical Garden Using Reclaimed Pallets And Repurposed ContainersVertical Garden Using Reclaimed Pallets And Repurposed Containersh2aVertical Garden Using Reclaimed Pallets And Repurposed ContainersVertical Garden Using Reclaimed Pallets And Repurposed Containersh2aVertical Garden Using Reclaimed Pallets And Repurposed ContainersVertical Garden Using Reclaimed Pallets And Repurposed Containersh2aVertical Garden Using Reclaimed Pallets And Repurposed ContainersVertical Garden Using Reclaimed Pallets And Repurposed Containersh2aVertical Garden Using Reclaimed Pallets And Repurposed ContainersVertical Garden Using Reclaimed Pallets And Repurposed Containersh2aVertical Garden Using Reclaimed Pallets And Repurposed ContainersVertical Garden Using Reclaimed Pallets And Repurposed Containersbody.Nav.Nav ah1.rating-chip.hero-imgh2pulli.social-share.share-grid.btn#fb-root}Vertical Garden Using Reclaimed Pallets And Repurposed ContainersVertical Garden Using Reclaimed Pallets And Repurposed Containersimgh2.btn-box.btnVertical Garden Using Reclaimed Pallets And Repurposed ContainersVertical Garden Using Reclaimed Pallets And Repurposed ContainersCreating a vertical garden can be an incredibly rewarding , particularly when you combine sustainability with creativity. This will take you through the process of building an eco-friendly vertical garden using reclaimed pallets and repurposed containers, perfect for beginners looking to green their living space. As urban environments expand and green space diminishes, vertical gardens offer a solution that maximizes the use of limited ground area. By upcycling
materials
like old pallets and containers from household items, you reduce waste and enrich your home with fresh greenery.The benefits of having a vertical garden are numerous. Not only does it bring aesthetic appeal to your space, but it also improves indoor air quality and can even provide fresh herbs and vegetables for your kitchen. Moreover, the act of gardening itself fosters relaxation and can serve as a form of exercise. This can be done in yards, balconies, or even indoors, making it versatile and accessible for everyone. The skill level for this is Beginner-friendly; you won’t need advanced construction skills, just a little creativity and patience.Let’s dive into this engaging to bring some life and freshness into your environment!
Tools
- Needed
- Screwdriver or Drill: Essential for fastening screws into pallets and securing your garden structure. A drill speeds up the process significantly and is a versatile tool for various DIY tasks.Saw: A handsaw or power saw will allow you to cut pallets and containers to the appropriate sizes to fit your design. A jigsaw is great for making intricate cuts if desired.Sandpaper: Used to smooth rough edges on your pallets, ensuring they are safe to handle and visually appealing. This also helps preserve the wood by preventing splintering.Staple
- Gun: This is useful for attaching landscaping fabric to the internal sides of the pallets, preventing soil spillage while allowing for water drainage.Level: Ensures your vertical garden is straight and sturdy when mounted on the wall or when placed against a stable surface.protective
- Gloves: Important for your safety to avoid splinters, especially when handling old pallets that may have rough areas.Paintbrush: If you plan to stain or paint your pallets for aesthetic appeal, a quality paintbrush will help achieve a clean finish.Measuring
- Tape: Precision is key in DIY , and this tool ensures your cuts and arrangement are accurate.
Materials
- Reclaimed Pallet: 1-3 pallets, depending on how large you want your vertical garden. Ensure the pallets are in good condition and have not been treated with toxic chemicals.Landscaping
- Fabric: 1-2 yards, used to line your pallets to hold soil while allowing adequate drainage.Soil: 2-3 bags (depending on pallet size) of potting soil or a mix suitable for container gardening, essential for plant growth.Repurposed
- Containers: 5-10 containers of various sizes, such as old tin cans, plastic bottles, or ceramic pots. Make sure they can drain well.Screws: 1 bag (typically 1.25 to 1.5 inches long) to secure various components together.Wood
- Stain or Sealant: 1 smaller can, if desired for aesthetic finishing or to protect the wood from the elements.Plants or
- Seeds: Various herbs, flowers, or vegetables of your choice depending on your space and interests.Watering
- Can or Bottle: To keep your plants hydrated and happy.Hanging
- Wire (Optional): If you desire to create a more dramatic vertical look, hanging wire allows for more flexibility in plant arrangement.Step-by-Step Instructions#
Step 1:
Select the Right LocationBefore any wood cutting or planting begins, it’s essential to decide where you want your vertical garden to reside. Key factors include adequate sunlight, protection from harsh winds, and easy access for watering and maintenance. This location could be an empty wall in your yard, a balcony, or even an indoor space with sufficient light. Once you have chosen a spot, consider marking out the dimensions to visualize how the pallets will fit.
Tip: If planting edible plants like herbs or veggies, ensure they receive ample sunlight, ideally 6–8 hours of indirect sunlight daily.#
Step 2:
Gather and Prepare Your PalletsObtain the pallets by scouring local businesses or recycling centers. Ensure they are in good condition and free from mold or chemicals. Once you have your pallets, ceed to clean and sand them down with sandpaper. This step prevents splinters from hurting your hands and gives a nice finish if you choose to stain or paint them later.Safety
- Note: Always wear gloves while handling pallets, as they can have sharp edges.#
Step 3:
Cut Pallets and Adjust SizesDecide how tall or wide you want your vertical garden, and use your saw to cut the pallets to the desired dimensions. Standard pallets are typically 48 inches by 40 inches, but feel free to modify them as needed. Pay particular attention to the cuts to ensure they are even and straight.
Tip: If you want a staggered look, consider using pallets of different heights when you assemble them later.#
Step 4:
Line with Landscaping FabricNow that your pallets are ready, the next step is to line the inside of each pallet with landscaping fabric. This fabric will keep the soil contained while also allowing for proper drainage. Cut pieces of the fabric to fit the dimensions of each pallet and staple them inside.
Tip: Leave some excess fabric around the top edge to fold over the soil later, which will help retain moisture.#
Step 5:
Securely Assemble the PalletsIf you’re using multiple pallets, it’s time to assemble them into a vertical design. Stack the pallets as preferred, using screws to secure each layer together. You can also attach a bracket to the wall if you are mounting it. It’s crucial that everything is level and secure to prevent it from toppling over.
Tip: Consider adding horizontal bars to create additional shelf space to accommodate more plant containers.#
Step 6:
Fill with SoilWith the pallets lined and secured, it’s time to fill them with soil. Start filling from the bottom pallet up, ensuring it’s compact and stable to support the plants. Use potting soil or a mix suitable for container gardening. Fill it to about an inch below the top edge to provide space for watering without overflow.
Tip: Mix in some organic compost for added nutrients and better drainage.#
Step 7:
Prepare and Place Contained PlantsNow, it’s time to plant your chosen plants in your repurposed containers. Be sure to poke drainage holes in whatever containers you use if they don't already have them. Once filled with soil, consider arranging the containers in a way that compliments the overall vertical design.
Tip: Group plants based on their light and water needs, keeping Sun plants together.#
Step 8:
Hang or Secure VerticallyOnce everything is filled and arranged, it’s time to hang or secure your vertical garden in the desired location. Use strong screws and brackets to secure it to a wall, or simply lean it against a stable structure. Double-check to ensure everything is snug and Welled.Safety
- Note: Ensure that the screws and fixtures are rated for the weight of the pallets and containers when full of soil and water.#
Step 9:
Water and Maintain Your GardenBefore the final touch, water your newly planted garden thoroughly to help settle the soil. It's important to monitor moisture levels, especially in the first few weeks. A light watering schedule is ideal to keep the plants thriving. As the plants grow, you’ll want to regularly prune to mote healthy growth.
Tip: Consider collecting rainwater for a sustainable watering method.#
Step 10:
Enjoy Your Vertical Garden!Now that your vertical garden is fully planted and secured, it’s time to sit back and enjoy the fruits of your labor! Make sure to pull out any weeds and do routine checks for pests. Consider rearranging plants as they grow or even swapping them out seasonally for renewed aesthetics.
Tip: Take photos to document your gardening journey; it’s gratifying to see how the plants evolve and thrive over time!
2026 •