How to create a vertical vegetable garden using reclaimed pallets and drip irrigation
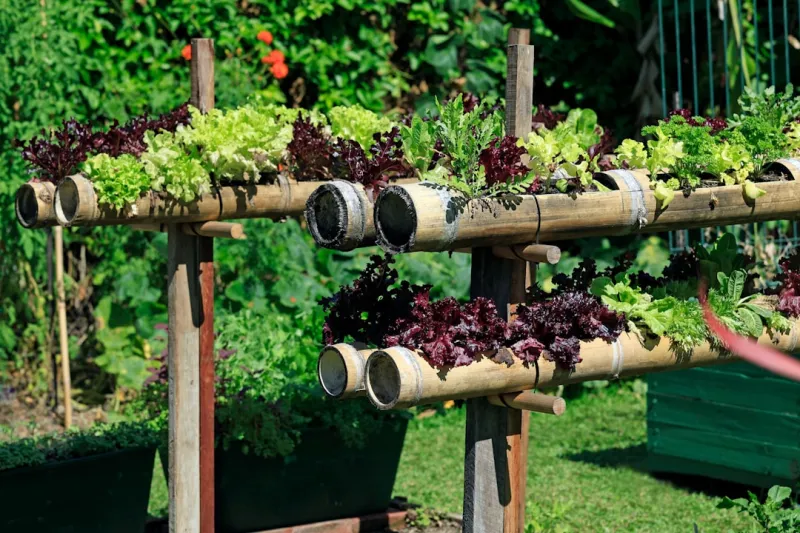
Creating a vertical vegetable garden using reclaimed pallets and drip irrigation is an excellent way to indulge your green thumb while maximizing your space efficiency. Urban dwellers, small backyard owners, or anyone looking to grow fresh produce without extensive land will find this project particularly rewarding. Not only does vertical gardening allow you to cultivate your favorite vegetables and herbs, but it also enhances your outdoor space's visual appeal. By recycling pallets, you reduce waste while creating an eco-friendly garden feature that can yield fresh, organic produce.
Why This Project?
Vertical gardening has gained popularity due to its many advantages. Firstly, it saves space—perfect for homes with limited yard area. Secondly, it makes gardening accessible regardless of varying ground conditions; even if your soil quality is poor, vertical gardens offer a viable alternative. Plus, this project promotes sustainable practices by using reclaimed wood, keeping money in your pocket and reducing environmental impact. Additionally, incorporating a drip irrigation system not only conserves water but ensures your plants receive a consistent moisture level essential for their growth and health.
Skill Level
This project is designed for beginners, so if you’ve never tackled a DIY project before, don’t worry! With clear instructions and a reasonable amount of time, you too can build a functional and beautiful garden using reclaimed materials. Dedication and patience are your best tools.
---
Tools Needed
1. Hammer: Essential for driving nails into wood to secure your pallet structure together. 2. Screwdriver: You may use both manual and electric screwdrivers, depending on preference, for easier assembly, particularly if you are using screws. 3. Saw: A handsaw or power saw will help you cut the pallets to your desired sizes. 4. Pliers: Useful for gripping and bending any wiring or nails that might need adjustments. 5. Measuring Tape: Ensures accurate measurements for your pallets and spacing as you build your garden. 6. Drill: Facilitates making holes for drainage and securing irrigation lines. 7. Level: Checks if your vertical frame is even and balanced to ensure the stability of your garden. 8. Safety Equipment: Always wear gloves and goggles to protect your hands and eyes while working with wood and power tools.
Materials
1. Reclaimed wooden pallets (2-4, depending on size) 2. Landscaping fabric (1-2 yards) – this will prevent soil from falling through the gaps in the pallets. 3. Wood screws (1 box) – for securely attaching the pallets. 4. Drip irrigation kit (1) – to efficiently water your vertical garden. 5. Potting soil (3-4 bags) – to fill the planter boxes you create with your pallets. 6. Vegetable plants or seeds (as desired) – choose herbs and veggies like lettuce, tomatoes, or peppers that thrive in vertical environments. 7. Plastic or wooden planters (variety depending on vegetables) – to hold the soil in the pallet structure. 8. Bungee cords or twine (1 roll) – optional for securing your plants if needed. 9. Outdoor wood sealer (1 can) – to protect your reclaimed wood against rot and weathering. 10. Hose – to connect with the drip irrigation kit and supply water.
---
The Steps
# ### Step 1: Sourcing Reclaimed Pallets
The first step is to gather your reclaimed wooden pallets. Visit local warehouses, grocery stores, or construction sites to find pallets that are free or inexpensive. Ensure they're in good condition—look for structural integrity without severe breaks, and check for any chemicals that may have been used on them. It’s best to choose pallets labeled as "HT" (heat-treated) as these are safe for planting.
Tips: Bring gloves to protect your hands while handling them. Check for nails sticking out that you might need to pull out or hammer down before starting your project.
# ### Step 2: Disassembling the Pallets
Once you’ve secured your pallets, disassemble them with your hammer or pry bar. You may need to remove the slats if you plan to use only parts of the pallet for your vertical garden. Keep the nails as they can be used again, but if they are too bent or broken, consider replacing them with screws for added strength.
Safety: Ensure you wear gloves to avoid splinters and goggles when using any tools.
# ### Step 3: Designing Your Vertical Garden
Before you start building, sketch a design for your vertical garden. Decide how many tiers you want, what plants to grow, and how they will be spaced. Generally, starting with three levels is an excellent approach for a beginner.
Tips: Keep in mind the sunlight requirements of your plants when designing your layout. Taller plants should ideally be positioned towards the back if it’s against a wall.
# ### Step 4: Constructing the Frame
Using your level and measuring tape, assemble the pallets into a standing vertical structure. Secure the pallets together using wood screws to ensure stability—as you build upwards, ensure each layer is level before moving on.
Tips: Use outdoor wood sealer on the wood to enhance its durability against the elements. This is particularly important for vertical gardens exposed directly to rain and sun.
# ### Step 5: Preparing for Planting
Line the interior base of the pallets with landscaping fabric. This will prevent the soil from leaking out while allowing for drainage. You may also create small planters by cutting additional wood scraps (if available) to hold the soil in the designated planting areas.
Tips: Make sure the fabric is taut but not overly stretched to provide enough room for dirt and roots.
# ### Step 6: Filling with Soil
Fill the planters with potting soil, ensuring it’s slightly packed to avoid excess moisture and ensure your plants have a stable environment to grow. Aim for an even amount of soil across all sections to promote balanced growth.
Tips: Moistening the soil slightly before filling can make it easier to work with. Be sure to leave some space at the top of each planter for watering.
# ### Step 7: Installing Drip Irrigation
Now, it’s time to set up your drip irrigation system. Follow the kit's instructions to connect the tubing from your water source. Lay it out along the top of the vertical structure, ensuring equal distribution to each planter. Cut small holes in the tubing to allow water to drip into each section of your garden.
Tips: Regularly check for clogs in the system, especially when using organic materials that may decompose and cause blockages.
# ### Step 8: Planting Your Seeds/Plants
Now, it’s time to plant your vegetables! Choose easy options like lettuce, herbs, or cherry tomatoes. Sow seeds directly into the soil or transplant seedlings, ensuring they are spaced appropriately based on their mature size. Gently press the soil around each plant to secure it.
Tips: Water the seedlings after planting to help them settle. Keep an eye out for pests and monitor their growth.
# ### Step 9: Maintenance and Care
Make it a routine to check your garden regularly. Ensure the drip irrigation is working correctly, and monitor the soil moisture levels. Remove any dead leaves or weeds as they appear to discourage pests and promote air circulation.
Tips: Adjust the watering frequency based on seasonal changes; remember that hot summer days may require additional watering periods, whereas cooler months may require less frequent watering.
# ### Step 10: Enjoying the Fruits of Your Labor
As your plants grow and mature, enjoy the bounty of your vertical garden! Most vegetables and herbs will provide harvests greater than their size might suggest. Pick them regularly to encourage new growth, and consider sharing the surplus with family and neighbors.
Tips: Stay engaged in your garden's growth process! Explore your local community groups or online forums dedicated to gardening for additional support and tips.
---
Troubleshooting
1. Pests: If you notice pests like aphids or spider mites, consider using insecticidal soap or neem oil to treat the affected areas.
2. Plant Wilting: This can indicate underwatering or overwatering. Ensure the drip irrigation is functioning correctly and check moisture levels in the soil.
3. Poor Growth: If your plants aren’t thriving, you may need to amend the soil with compost or organic fertilizer to ensure they get adequate nutrients.
4. Soil Erosion: Fix any soil leaks by adding more landscaping fabric or compacting the soil at the top level to minimize erosion.
5. Fungal Issues: Limited airflow can lead to fungal problems. Make sure there’s space between your plants and that the vines have room to breathe. Remove any affected plant parts.
---
Conclusion
Creating a vertical vegetable garden using reclaimed pallets and drip irrigation is a fun and fulfilling project that brings the joy of gardening into your life—even in small spaces. Not only will you be able to grow fresh herbs and vegetables, but you also contribute positively to the environment by using reclaimed materials and conserving water.
Variations
Once you feel comfortable with your vertical garden, explore variations. Consider adding flower plants for visual appeal, using different pallet arrangements, or incorporating trellis for climbing plants like cucumbers or peas.
Maintenance
Keep in mind that consistent maintenance is key to the health of your vertical garden. Regular watering, pruning, and inspecting for pests will give you the best chance of a thriving garden. Document your gardening journey and adjust your techniques each season for continuous improvement.
Happy gardening!