How to create a vertical garden wall using repurposed pallets and indoor plants
Introduction
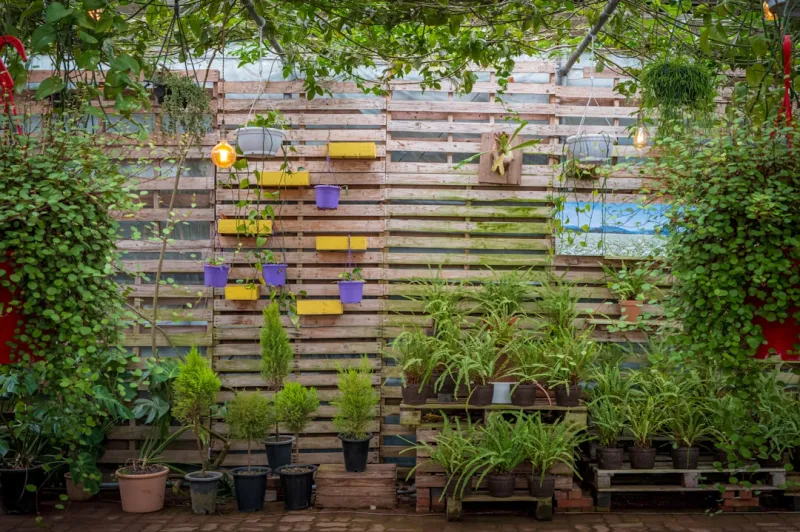
Creating a vertical garden wall using repurposed pallets is a rewarding project that combines sustainability with creativity. In an era of rapid urbanization, green spaces are quickly becoming a luxury, especially in densely populated areas. Vertical gardens or living walls are a brilliant solution to reclaim some greenery in limited spaces, transforming empty walls into lush, vibrant gardens filled with life. Utilizing repurposed pallets not only reduces waste but also lowers the cost of your gardening project, making it accessible even for budget-conscious enthusiasts.
Benefits of Vertical Gardens: Vertical gardens provide a multitude of advantages: they improve air quality, reduce noise pollution, and can serve as natural air coolers in your indoor space. Additionally, they are visually stunning, offering a dynamic focal point that breathes life into otherwise bland walls. For those with limited space, such as apartment dwellers, vertical gardens can make the most of small areas, allowing you to cultivate your love for plants without the need for expansive ground space.
Skill Level: This project is beginner-friendly. While some basic DIY skills will be beneficial, the steps provided will guide you through the process, ensuring that anyone can complete it successfully. By the end, you’ll have a charming vertical garden wall that showcases your personality and boosts your indoor environment.
Tools Needed
- Drill: Essential for creating holes in the pallet for the plants and for securing components together.
- Screwdriver: Used to fasten screws and attach pallets to the wall securely. If you have a drill driver, this can also serve this purpose.
- Saw: Depending on the pallet size and your design, you may need a saw to cut it down to the desired dimensions if it’s too large.
- Measuring Tape: To ensure your measurements are accurate, especially when planning the size of the pallet garden wall.
- Level: To ensure that your vertical garden is balanced and straight once mounted on the wall.
- Staple Gun: Useful for attaching landscaping fabric to the back of the pallet for plant containment.
- Sandpaper: To smooth out any rough edges on the pallet, preventing splinters and injuries during handling.
- Gloves: Always handy to protect your hands when handling wood or when planting.
Materials
- Repurposed Pallet: 1 (standard size; make sure it’s in good condition without splinters or cracks).
- Landscaping Fabric: 1-2 yards (to help hold the soil and retain moisture; breathable for plant roots).
- Container Soil: 2-3 bags (light, organic soil with good drainage is essential for the health of indoor plants).
- Indoor Plants: 5-7 assorted (choose based on your light conditions; good options include pothos, ferns, and spider plants).
- Watering Can: 1 (for easy watering of your plants once they’re installed).
- Wood Screws: 1 pack (for securing the pallet to the wall and for assembly).
- L-shaped Brackets: 2-4 (for added structural support; attach these on the back of the pallet if it’s heavy).
- Paint or Stain (Optional): 1-2 cans (to decorate your pallet for aesthetic appeal; ensure it’s safe for indoor use).
- Plastic Pot Liners: 7-10 (alternative to allow easy removal of plants for watering and maintenance).
Steps to Create a Vertical Garden Wall
Step 1: Find Your Pallet
Start by sourcing a suitable pallet. Many businesses give away pallets for free, or you can find them at warehouse sales or gardening stores. When choosing a pallet, look for one that is clean, undamaged, and free of pests. Tip: If you’re in doubt about the safety of the pallet (based on the stamps), choose heat-treated pallets (marked with HT) over chemical-treated ones.
Step 2: Prepare Your Workspace
Before beginning your project, identify and prepare a clean workspace, ideally outdoors or in a well-ventilated area. Lay down a protective sheet or tarp if working on a surface prone to scratches. Assemble your tools and materials nearby for easy accessibility. Safety Tip: Wear gloves to protect your hands from any splinters or sharp edges.
Step 3: Clean and Sand the Pallet
Once you have your pallet, clean it thoroughly with a damp cloth to remove dust and debris. After it’s dry, use sandpaper to smooth any rough surfaces. Pay special attention to edges and corners to prevent cuts when handling it later. Tip: Sanding down the pallet not only enhances safety but also helps any paint or treatment absorb evenly if you choose to apply it.
Step 4: Cut the Pallet if Necessary
If the pallet is larger than your intended space, measure your desired dimensions and use a saw to cut it down accordingly. Make sure your cuts are straight and clean for an aesthetically pleasing result. Tip: Always measure twice before cutting to avoid mistakes!
Step 5: Secure the Backing Material
Lay your pallet flat and cut the landscaping fabric according to the pallet’s back dimensions, leaving extra at the edges for stapling. Staple the fabric onto the back of the pallet, ensuring it covers all the slats to contain the soil. Pull the fabric tight so that it stays in place when filled with soil and plants. Safety Note: Be cautious while using the staple gun to avoid accidents.
Step 6: Fill With Soil
Turn the pallet upright and begin adding the container soil. Start with a layer at the bottom, filling it about 1/3 full, then pack the soil down slightly to prevent it from shifting. Be sure not to overfill, as soil may spill out when you insert the plants. Tip: Use soil specifically formulated for container usage to ensure your plants thrive.
Step 7: Insert Your Plants
Choose your plants carefully, considering their growth patterns and light requirements. Make small holes in the soil at intervals, ensuring a diverse mix for visual interest. After placing a plant in its spot, backfill the soil around it and pack gently to eliminate any air pockets. Tip: Always water the plants before placing them to ensure they can adjust well to their new space.
Step 8: Mount the Pallet
Choose a wall location that fits your aesthetic vision but also has suitable light conditions for your chosen plants. Using your drill, attach the pallet to the wall using wood screws. For added stability, consider using L-shaped brackets on the corners. Use the level to ensure that the pallet hangs straight. Safety Tip: Have a friend help you hold the pallet in place while you secure it to ensure it doesn’t shift.
Step 9: Water and Maintain Your Garden
After the vertical garden wall is mounted, water your plants thoroughly. Check for drainage; ensure that the water doesn't pool at the bottom since that can lead to root rot. Maintain your garden by regularly monitoring the moisture level, adjusting watering as needed based on your plants’ requirements. Tip: Implement a watering schedule to help remind yourself when to check on your plants.
Step 10: Enjoy and Personalize
Now that your vertical garden wall is complete, step back and admire your work! Personalize it further by adding decorative elements, like hanging lights or ornamental plant markers. You might also consider rotating plants based on seasons or trying new plant varieties to refresh the look. Tip: Document your progress with photos to appreciate how your garden evolves over time.
Troubleshooting
Creating a vertical garden wall is a rewarding process, but you may encounter a few common challenges along the way. Below are some issues you might face, along with potential fixes:
- Falling Plants: If plants seem unstable or are falling out, consider using small stakes to support them initially while their roots establish themselves. Ensure they're planted deep enough in the soil.
- Dry Soil: If your soil dries out too quickly, evaluate your watering routine. You may need to water more frequently or consider using a moisture-retentive soil mix.
- Pallet Rot: If you notice signs of rot, make sure your pallet is treated or sealed safely if it was previously used outdoors. Monitor moisture, and if you notice consistent rot, it may need to be replaced.
- Inadequate Growth: If plants are not thriving, check their light conditions. Some plants may require more light than others; swapping them based on light availability can optimize growth.
- Pest Issues: Regularly inspect the plants for pests like aphids or spider mites. Introduce natural remedies like neem oil or insecticidal soap for treatment if you find any infestations.
Conclusion
Creating a vertical garden wall using repurposed pallets and indoor plants is not just a fun DIY project; it's also a sustainable and aesthetically appealing addition to your home. As you step back to admire your handiwork, remember that each garden is unique and can reflect your personal style. You can explore variations by experimenting with different types of plants, changing the pallet’s paint or stain, or even adding small shelves for decorative items. Just remember to stay on top of maintenance to keep your living wall thriving.
Allow your vertical garden wall to inspire creativity and tranquility in your living space, turning every glance at your green oasis into a breath of fresh air.