Introduction
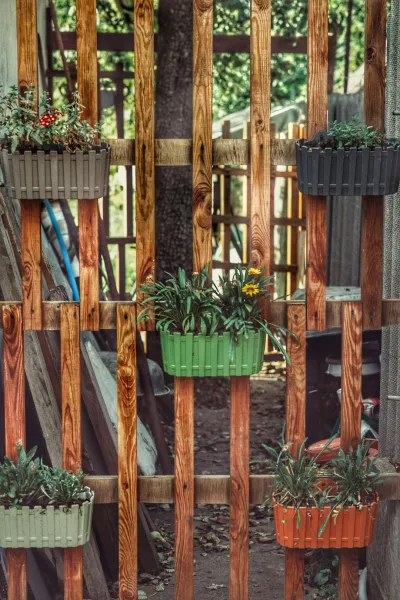
Garden Using Vintage Wooden Pallets And Sustainable Planters
is an innovative solution for those who want to bring a touch of greenery into their lives but might be struggling with limited space. Whether you live in a small apartment, have a tiny backyard, or simply wish to enhance your interior decor, creating a vertical garden using vintage wooden pallets allows you to cultivate plants in a stylish and sustainable way. This is not only environmentally friendly, utilizing repurposed
materials
, but also serves as a rewarding activity that can transform your living space.The benefits of a vertical garden extend beyond aesthetic appeal. A vertical garden can improve air quality, attract beneficial insects, and provide you with fresh herbs or vegetables at your doorstep. Additionally, the act of gardening can serve as both a form of relaxation and a sustainable hobby, bringing joy and satisfaction into your life.This guide is designed for beginners and will walk you through each step of the process, ensuring that you’re equipped to create your very own vertical garden. You don’t need prior woodworking skills, as this focuses on creativity and resourcefulness. All you need is keen interest and a little patience. So let’s dive in and create a stunning vertical garden that reflects your personality and commitment to sustainability!
Tools Needed
Before you start your vertical garden , gathering the right tools is essential. Here’s a concise list of required tools with explanations for their use:Screwdriver (Manual or
- Power): Needed for securing the wooden pallets and attaching hooks or screws for hanging your garden.Drill with
- Drill Bits: A drill can make the process of creating drainage holes and securing fixtures much faster and easier.
- Saws (Hand Saw or Jigsaw): Useful for cutting the pallets to the desired height or trimming any uneven edges.
- Sandpaper: Helps in smoothing out rough edges on the pallet to safeguard your hands and enhance the look of your garden.
- Staple Gun: Ideal for securing landscaping fabric to the back of the pallets, ensuring that soil and plants stay in place.
- Measuring Tape: Important for measuring the dimensions of your pallets and ensuring an accurate build.
- Level Tool: A level ensures that your vertical garden is perfectly straight when hung, contributing to both stability and aesthetics
- Paintbrush or Roller (optional): Helps in applying a protective wood sealant or paint to alert the vintage look of the pallets.
Materials
Once your tools are in place, it's time to gather your
materials
Below is a list of essential items you will need, along with suggested quantities:Vintage
- Wooden Pallet: 1-2 pallets, depending on the desired height and width of your vertical garden.Landscaping
- Fabric: approximately 1-2 yards; this fabric is critical for keeping soil in but allowing water to drain.
- Potting Soil: 2-3 bags (2 cu ft each); make sure to opt for organic potting soil to ensure the health of your plants. Herbs/Plants: 8-10 seedlings or cuttings; choose plants that thrive in vertical gardens, such as herbs, succulents, or flowering plants.
- Wood Sealer or Outdoor Paint (optional): 1 quart; this will protect your pallets from weather damage if your garden is outdoors.
- Screws or Hooks: 10-12 pieces; used to secure your pallets to the wall or fence, ensuring they are stable.
- Plant Labels: 8-10 labels; useful for identifying your plants and keeping track of herbs or vegetables.
- Watering Can or Hose: 1; for easy watering access, especially in tighter gardening setups.
- Gardening Gloves: 1 pair; protects your hands during planting and while working with soil.
- Trowel: 1; essential for digging, planting, and moving soil around your vertical garden.Steps to Create Your Vertical Garden
Step 1:
Selecting the Right LocationChoosing the right location for your vertical garden is crucial. Look for a spot that receives adequate sunlight (at least 4-6 hours daily), is easily accessible, and complements your home or outdoor space. When selecting a wall or fence for your pallets, ensure there’s sufficient support and stability.
Tip: If you're placing your vertical garden indoors, consider the light from windows. Use grow lights if natural sunlight isn’t enough. Always stand back and visualize the completed garden before finalizing your location.
Step 2:
Preparing the PalletBefore you start planting, it’s necessary to prepare the pallet. Begin by cleaning it thoroughly to remove dirt, chemicals, or mildew. Use sandpaper to smooth any rough areas and avoid splinters. If desired, apply the wood sealer or outdoor paint to protect against weather damage, especially if your vertical garden will be outdoors.
Tip: Leave the wooden pallet to dry after applying any sealer or paint. Choosing a transparent wood sealer allows you to retain the rustic look of the pallet.
Step 3:
Attaching Landscaping FabricTo keep soil from falling out while allowing drainage, attach landscaping fabric to the back and sides of the pallet. Cut the fabric to fit the dimensions of the pallet, then use a staple gun to secure the edges down. Be sure to leave the front open for planting.
Tip: When securing the fabric, pull it tautly to ensure no gaps that can allow soil to spill out. Alternatively, you can sew it in place if you have a sewing machine.
Step 4:
Adding SoilNow that your pallet is prepared, fill it with potting soil. You should layer it in sections and ensure each pocket is filled evenly to avoid collapsing under weight. Make sure that the soil is moist but not soggy, promoting optimal plant growth.
Tip: Use a trowel for even distribution and pack the soil lightly to create a supportive base for your plants.
Step 5:
Planting Your GardenChoose your plants based on sunlight requirements and growth patterns. Start planting seedlings into the filled pockets in your pallet, ensuring adequate spacing based on the needs of each plant type. For example, herbs like basil or cilantro work well, while smaller flowers can serve as beautiful decor.
Tip: Consider planting trailing plants at the top of the pallet to allow them to cascade downwards. This will create a lush, layered effect as they grow.
Step 6:
Securing the PalletBefore you hang your vertical garden on the wall, secure the pallet with screws or hooks, ensuring they are strong enough to hold the weight of the soil and plants. Use a level tool to make sure it’s straight before fully fixing it in place.
Tip: If you're using heavy
materials
, consider reinforcing the mounting area on the wall to support the additional weight.
Step 7:
Watering Your Vertical GardenOnce your garden is securely mounted, it's crucial to establish a consistent watering schedule. Water your plants thoroughly but avoid Overting the soil. Depending on the type of plants you used, you may only need to water once every few days.
Tip: Consider using a drip irrigation system for better control over water distribution, especially if you have larger plants or prefer Lownance setup.
Step 8:
Maintenance and CareMaintaining a vertical garden involves regular checking for pests, disease, and dead leaves. Pruning is essential to keep plants healthy and encourage growth. This upkeep extends the life of your garden and enhances the overall aesthetics. Additionally, ensure that you monitor sunlight exposure and provide supplements if necessary.
Tip: Rotate plants based on seasonal requirements and consider companion planting techniques for optimal health.
Step 9:
DecorateDecorate around your vertical garden to enhance its appeal further. Consider adding fairy lights, decorative pots, or even wall art nearby. This embellishment not only elevates the aesthetics but also creates a cozy atmosphere.
Tip: Repurpose small items found around your home—such as bottles or jars—for a creative touch to your planter setup.
Step 10:
Document Your GrowthAs your plants grow and thrive, take time to document the process. Capture gress photos to appreciate the transformation and share your journey. By keeping a growth journal, you can better track care routines, plant issues, and successes, providing deeply personal insights into your gardening process.
Tip: Create a dedicated space for documenting your vertical garden, whether online or in a physical scrapbook. This becomes a great way to celebrate your gardening journey.
2026 •