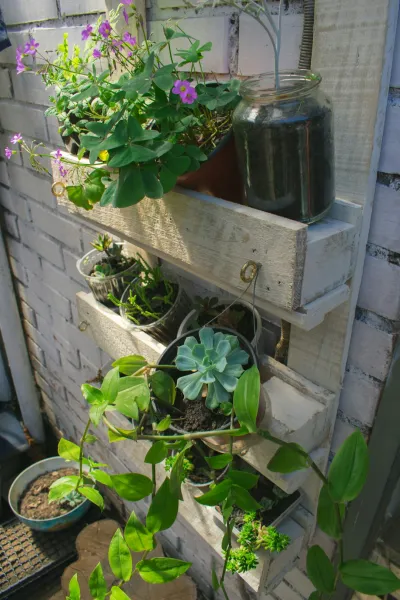
How to create a vertical garden using repurposed pallets and hanging herb planters
Introduction
Vertical gardening is a fantastic way to maximize your growing space, particularly if you live in an urban environment where square footage is at a premium. With its eye-catching design and multi-functionality, a vertical garden not only brings aesthetics into small spaces but also effectively utilizes them for planting. One of the most ingenious ways to create a vertical garden is by using repurposed pallets and hanging herb planters. This is an eco-friendly project that allows you to recycle materials and contribute to sustainability efforts, while also showcasing your gardening skills.
Creating a vertical garden offers numerous benefits. Firstly, it allows you to grow a variety of herbs, flowers, or even small vegetables in limited space, enhancing both your living environment and culinary experiences. Fresh herbs add flavor and nutrition to meals, and having them on hand can encourage healthier eating habits. The height of a vertical garden means it is easier to tend to without excessive bending or pulling weeds out of the ground, making it beneficial for gardeners of all ages, especially those with limited mobility.
This project is suitable for beginners and does not require advanced gardening or construction skills. With just a few tools and materials, anyone can transform an old pallet into a vibrant vertical garden. Whether you’re looking to add greenery to your balcony, patio, or indoor space, this DIY guide will walk you through each step to ensure you create something beautiful and functional. So, roll up your sleeves and get ready to embark on this rewarding gardening adventure!
Tools Needed
1. Drill/Driver: Essential for fastening screws and making holes for drainage. 2. Screwdriver: Handy for assembling elements and tightening screws that may be hard to reach. 3. Saw: A hand saw or jigsaw is necessary if you need to cut your pallet down to size. 4. Staple Gun: Crucial for securing landscape fabric to the pallet. 5. Paintbrush: For applying sealants or paints if you choose to finish your pallet. 6. Measuring Tape: To ensure you measure accurately for planting depth and spacing. 7. Work Gloves: Protect your hands from rough materials or sharp tools during the build. 8. Level: Ensures your vertical garden will be straight and visually appealing when hanging.
Materials
1. Repurposed Wood Pallet: 1
- Sourced from local shops or farms; make sure it’s clean and free from chemicals.
- Helps retain soil moisture while allowing drainage.
- Quality soil will promote healthy herb growth.
- Choose herbs like basil, parsley, or thyme – they are easy to grow and maintain.
- For securing components together.
- Hooks or brackets for securely hanging your vertical garden.
- Protects the wood from moisture and enhances aesthetics.
- Necessary for watering your new plants.
- Smooths rough edges on the pallet for safety and aesthetics.
- For mixing soil and catching any drips during assembly.
### Step 1: Sourcing Your Pallet
The first step in building your vertical garden is sourcing a suitable pallet. Look for one that is sturdy, intact, and made from heat-treated wood. Avoid those with chemical stamps, as these can leach harmful substances into the soil and your plants. Local grocery stores, nurseries, or hardware stores often have excess pallets they are willing to give away for free.
Tip: Inspect the pallet for nails and broken slats before deciding to take it. Look for a relatively clean and structural pallet to avoid spending additional time repairing it.
### Step 2: Preparing the Pallet
Once you have your pallet, you’ll need to prepare it for planting. Using the sandpaper or power sander, smooth any rough edges to prevent injuries when handling it. If desired, apply a wood stain or sealant to enhance your pallet’s appearance and longevity. Make sure to apply the stain in a well-ventilated area and allow ample time for it to dry before moving on to the next step.
Safety Tip: Always wear a mask and gloves when sanding to avoid inhaling dust and to protect your skin.
### Step 3: Adding Landscape Fabric
To keep the soil in place and facilitate proper drainage, staple landscape fabric on the back and bottom of the pallet. Cut the fabric into pieces that extend a bit over the sides, and secure it tightly with a staple gun. This will create pockets for the plants while allowing water to flow out.
Tip: Ensure the fabric overlaps at the seams to prevent soil from escaping. Keeping the bottom covered is crucial for soil stability.
### Step 4: Assembling the Soil Mixture
Now, it’s time to prepare your soil. Mix together potting soil with any other organic material you may want to use, such as peat moss or compost. This will enhance the soil’s nutrient quality and drainage.
Use a bucket to hold the mixture, as it can get messy! Aim for a well-aerated mix that allows roots to breathe while retaining sufficient moisture.
Tip: Customize the soil mixture according to the specific herb requirements you’re planting, as some may require different soil conditions.
### Step 5: Filling the Pockets
Carefully fill each pocket created by the landscape fabric with your soil mixture. Be sure not to overpack it; allow enough space for plant roots to grow. Press down lightly to offer some resistance, but avoid compacting it too tightly, which can impede root growth. Leave space at the top of each pocket for water.
Tip: Consider the sun exposure and drainage needs of different herbs – placing taller herbs on top can shield shorter ones.
### Step 6: Planting Your Herbs
Now it’s time to introduce your herbs into their new home. If you’re using plant starters, carefully remove them from their containers, gently loosening any tightly bound roots. For seeds, follow the planting instructions on the seed packet.
Create small indentations in the soil for each plant and ensure they’re adequately spaced for growth. After placing each herb, lightly pack the soil around the base and water them gently with a watering can or spray bottle.
Safety Tip: If using seeds, ensure they are planted at the recommended depth to maximize germination.
### Step 7: Securing the Pallet
To create a secure vertical garden, you will need to check if the pallet is heavy enough. If it’s lightweight, consider adding some weight to the bottom by filling it with rocks or heavier soil. When ready, use the hanging accessories or hooks to attach the pallet securely to a fence, wall, or any sturdy structure.
Tip: Use a level to ensure the pallet hangs straight. An unbalanced garden can tilt and unevenly water the plants, affecting growth.
### Step 8: Watering and Maintaining
Once your vertical garden is hung and planted, it’s essential to establish a consistent watering routine. Ensure that you water the plants well after planting, giving them a good drink without saturating the soil. In warm months, check moisture levels frequently and water as needed, usually every few days, while reducing frequency during cooler months.
Tip: A spray bottle can be a gentle way to moisture without overdoing it, especially for delicate seedlings.
### Step 9: Monitoring Growth
Monitor your herbs for signs of healthy growth. Keep an eye out for pests, wilting leaves, or nutrient deficiencies. Additionally, regular pruning will help your herbs thrive and encourage bushier growth.
If you find any unhealthy foliage or dead leaves, snip them off immediately to prevent disease spread and minimize pest attraction.
Tip: Consider rotating your planter or adjusting its location to ensure optimal sunlight exposure based on your herbs’ needs.
### Step 10: Enjoying the Harvest
Harvesting your herbs will be one of the most rewarding parts of this project. When herbs reach a height of about 6 inches, you can start trimming. Use sharp scissors or pruning shears to gather fresh herbs as needed. The more you trim, the bushier the plants will become.
Tip: To ensure continual growth, never remove more than a third of the plant at a time. This will help it to replenish and continue producing.
Troubleshooting
Despite your best efforts, you may encounter some common issues with your vertical garden. Here are a few challenges and quick fixes:
1. Overwatering: If plants appear wilted and soil is soggy, you’ve likely overwatered. Allow the soil to dry out, and consider adding more drainage holes in the pallet.
2. Pest Infestation: If your herbs are being eaten away, inspect for pests like aphids or spider mites. Use a mild soap spray or neem oil to deter them.
3. Stunted Growth: If herbs aren’t thriving, they may lack nutrients. Use a balanced organic fertilizer every few weeks to enrich the soil.
4. Root Rot: If your plants die suddenly, check for root rot, usually due to overwatering. Remove affected plants and improve drainage habits.
5. Inadequate Sunlight: If your herbs are pale and leggy, they might not be getting enough sunlight. Move the pallet to a sunnier location or supplement with grow lights if indoors.
Conclusion
Creating a vertical garden with repurposed pallets and hanging herb planters is a fulfilling project that transforms any small space into a vibrant green oasis. As you’ve learned in this guide, it’s an approachable DIY venture requiring minimal skills, and it brings incredible benefits, from fresh herbs at your fingertips to an artistic addition to your decor.
Feel free to get creative with different materials, colors, or even adding ornamental plants to enhance your vertical garden. Regular maintenance and observation will help you enjoy bountiful herb harvests throughout the growing season. So grab your tools and materials, connect with nature, and let your green thumb shine!