How to create a vertical garden using repurposed pallet wood and hanging planters
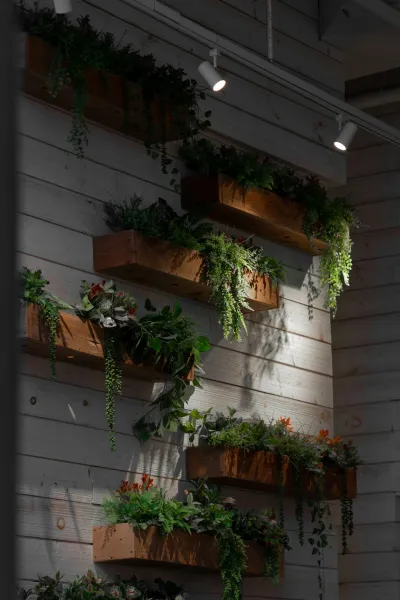
Creating a vertical garden using repurposed pallet wood and hanging planters is a rewarding and sustainable DIY project that can transform your space by adding greenery and beauty. Vertical gardens are perfect for homeowners with limited outdoor space or those who want to enhance their indoor environment. With a few materials and tools, anyone can create a stunning vertical garden that breathes life into their home or garden.
Why Choose This Project? The use of repurposed pallet wood makes this project not only environmentally friendly but also budget-friendly. By upcycling wood that might otherwise contribute to landfill waste, you're contributing to a more sustainable planet. Moreover, vertical gardens can improve air quality, reduce noise, and create an oasis of calm amidst a bustling urban environment. Additionally, anyone can partake in this creative endeavor, regardless of their skill level, as there are plenty of resources and guidance available.
Benefits of a Vertical Garden:
- Space Efficiency: Ideal for small areas, turning walls or fences into beautiful green displays.
- Aesthetics: Enhance your space with visually appealing greenery and flowers.
- Improved Air Quality: Plants filter toxins, resulting in a healthier indoor environment.
- Customization: Select your favorite plants to make the garden uniquely yours.
- Activity: Engaging in gardening is a therapeutic and relaxing experience, perfect for stress relief.
Tools Needed
- Circular Saw: For making precise cuts in the pallet wood. A circular saw will allow for cleaner and quicker cuts compared to hand saws.
- Drill: Essential for creating holes in the wood and for attaching hooks or planters. Cordless drills provide flexibility in movement while working.
- Screwdriver: Used to fasten screws and secure components. Having a screwdriver on hand saves you from potential injuries caused by using incorrect tools.
- Measuring Tape: Critical for ensuring accurate cuts and placements. Measurement is vital in creating a level and aesthetically pleasing structure.
- Sandpaper: To smooth rough edges and prevent splinters, ensuring safety while handling the wood.
- Wood Glue: Provides extra support for the joints. This can also help to hold items together while screws are being inserted.
- Paintbrush: If you decide to paint or seal your wood, a good quality paintbrush is needed to avoid streaks.
- Safety Goggles and Dust Mask: Protect your eyes from debris and prevent inhalation of dust while cutting or sanding the wood.
Materials
- Repurposed Pallet Wood: 2-3 pallets, depending on the size of your garden.
- Hanging Planters: 4-6 small to medium-sized planters. Choose different sizes for varying plant types.
- Wood Screws: 1 box, preferably 1.5-inch length to securely fasten the pallets.
- Planting Soil: 2-3 bags of potting soil or soil mix suitable for your plants.
- Herbs/Plants: 4-12 plants, depending on the number of planters. Herbs like basil, mint, and decorative plants are ideal for beginners.
- Outdoor Sealant or Paint: 1 can, if you wish to protect the wood from weather elements.
- Hanging Hooks: 4-6, to hang your planters securely on the pallets.
- Gardening Gloves: 1 pair, to protect your hands while planting and handling wood.
Intro
Creating a vertical garden using repurposed pallet wood and hanging planters is an excellent way to merge creativity with functionality, especially if you have limited outdoor space. As urban living expands and green spaces become scarcer, vertical gardening emerges as a trendy and practical solution. By repurposing pallet wood, you’re not only saving money but also contributing to environmental sustainability. This project is especially appealing to beginners because it’s manageable and provides immediate gratification as you watch your plants grow and flourish.
From vibrant flowers to fresh herbs, a vertical garden can fit a variety of plant types, allowing you to tailor your creation according to personal aesthetics or culinary needs. Regardless of whether you want to beautify a small balcony or need a vertical solution for your home’s interior, this project can be completed with minimal skill. Through a series of manageable steps, you’ll have a beautiful living wall that practically maintains itself while enhancing your lifestyle.
Step-by-Step Guide
Step 1: Gather and Prepare Your Materials
The first step to creating your vertical garden is to gather all necessary materials and tools. Inspect the pallets to ensure they are not damaged or chemically treated (look for the ‘HT’ stamp, meaning heat-treated wood). Once deemed usable, dismantle the pallets carefully using a pry bar or claw hammer. This will give you access to the individual wood planks that will serve as the foundation of your vertical garden. Measure and cut the wood into desired lengths with your circular saw, making sure you have two long planks for the sides and several shorter ones for the back and shelves of the planter. Tip: Always wear your safety goggles and gloves during this process to prevent accidents.
Step 2: Design Your Vertical Garden
Before getting into assembly, map out how you want your vertical garden to look. Consider the size of the area where you want to hang it. Decide how many tiers or levels you want for the planters. You can create multiple shelves for flowers and herbs or opt for a simpler single-tier design. This planning phase is essential to ensure things come together seamlessly. Tip: Sketching your design on paper can be helpful. Ensure you visualize where each planter will be, taking into account sunlight exposure for the plants.
Step 3: Cut and Assemble the Base Frame
Using your circular saw, cut the wood pieces according to your design. Assemble the back frame of the vertical garden using wood screws to join the vertical side planks (your cut pallet wood) to horizontal planks for stability. Make sure the structure is square by measuring diagonally across the corners; they should match. Tip: Pre-drill your holes with the drill to prevent the wood from splitting. This will also ensure that the screws are tight and secure.
Step 4: Attach the Shelves for Planters
Now it’s time to add the shelves that will hold the hanging planters. Depending on your design, screw in horizontal planks across the width of the frame. Use a level to ensure each shelf is even; this is crucial for aesthetics and also for the health of your plants, as water will run off evenly. Tip: Make sure your shelves can support the weight of the plants and soil. You might want to reinforce them with additional screws or use thicker planks.
Step 5: Sand and Treat the Wood
Now that the structure is assembled, it’s time to smooth out any rough edges. Use sandpaper to ensure there are no splinters or sharp areas, especially since you’ll be handling the pallets frequently. If you choose to paint or use an outdoor wood sealant for longevity and aesthetic appeal, now is the time to do so. Tip: Choose a sealant that is non-toxic if you are planting herbs or edible plants to avoid any chemical leaching into the soil.
Step 6: Attach Your Hanging Planters
With a stable and treated wooden structure, it’s time to attach the hanging planters. First, decide where you want each planter on the shelves, spacing them out evenly. Use screws to secure hooks to the shelves to hold the planters. You might want to use larger hooks for heavier planters. Make sure they’re firmly attached. Tip: Consider plant growth when placing your planters—taller plants should go on lower shelves so they don’t block light.
Step 7: Fill the Planters with Soil and Plants
Now comes the fun part! Fill each of your hanging planters with potting soil, leaving about an inch of space at the top. Carefully plant your chosen herbs or flowers in the planters, making sure to follow specific care requirements for each type of plant. Gently water them to help settle the soil. Tip: Mixing in some slow-release fertilizer can promote healthy growth.
Step 8: Hang and Position Your Vertical Garden
Choose a wall or space where you want to mount your vertical garden. If it’s heavy, it’s advisable to use wall anchors or screws into wall studs for additional support. Ensure that the area receives enough sunlight for the plants you’ve chosen. Hang your vertical garden with care, ensuring all hookups and brackets are secure. Tip: Consider a location that allows for easy access for watering and maintenance.
Step 9: Watering and Maintenance Schedule
Now that your vertical garden is up and thriving, it’s essential to establish a regular maintenance routine. Water the plants according to their specific needs — some may require more moisture than others. Keep an eye out for pests or diseases and treat them promptly to maintain plant health. Ensure that you prune plants as needed to encourage growth and prevent overcrowding. Tip: Create a simple calendar or reminder on your phone for watering schedules to keep your garden thriving year-round.
Step 10: Enjoy and Experiment!
Once your vertical garden is set up and flourishing, take a moment to enjoy your hard work! This is an ongoing project, so consider changing plants with the seasons or experimenting with new species to see what thrives best in your conditions. Share your success with friends or even join local gardening groups to exchange tips and plants. Tip: Document your gardening journey through photos to witness your plants’ growth and transformations over time!
Troubleshooting
1. Plants Wilting
If your plants are wilting, check the soil moisture level. They might be getting too little or too much water. Adjust your watering schedule accordingly.
2. Pests
If you notice pests on your plants, try a gentle soap spray as an organic treatment. Regularly inspecting your plants will help you catch infestations early.
3. Planters Falling
If your planters are falling, it could be due to inadequate hanging hooks or overloading them with too much soil or plant weight. Ensure to use secure hooks rated for the weight of your planters.
4. Stunted Growth
Stagnant growth might indicate insufficient light or nutrients. Reassess your plant's location or consider incorporating a liquid fertilizer to boost nutrient levels.
5. Water Drainage Issues
If water isn’t draining well from your planters, ensure that drainage holes are present. This might require replanting with more soil in conjunction with rocks at the bottom for improved drainage.
Conclusion
Creating a vertical garden with repurposed pallet wood and hanging planters is not only a fantastic way to add greenery to your space, but it’s also a sustainable choice that promotes creativity and resourcefulness. This guide outlines the process step-by-step, ensuring that even beginners can successfully assemble their own vertical oasis. Remember, the joy of gardening lies in experimenting—don’t hesitate to try different plants or planter arrangements.
For variations, consider building smaller, stacked versions of your vertical garden, or even incorporating outdoor lighting to highlight the beauty of your plants at night. Regular maintenance and care are key to ensuring your vertical garden remains healthy and vibrant. As the seasons change, embrace the opportunity to evolve your garden alongside them, enhancing your space while nurturing your love for plants.
Happy gardening!