Introduction
Garden Using Reclaimed Pallets And Organic Soil For Small Spaces
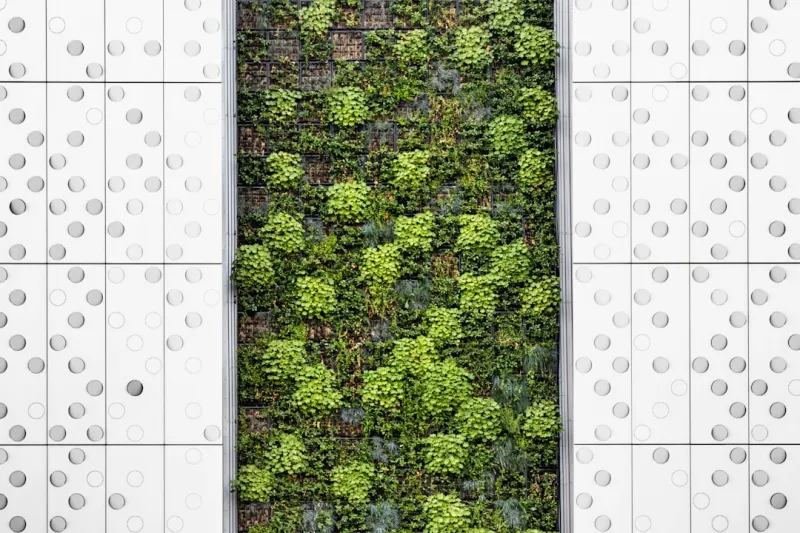
Garden Using Reclaimed Pallets And Organic Soil For Small Spacesbody.navh1.rating.hero-img.share.btn Garden Using Reclaimed Pallets And Organic Soil For Small Spaces5 (65 Garden Using Reclaimed Pallets And Organic Soil For Small Spacesh2.content p Garden Using Reclaimed Pallets And Organic Soil For Small Spaces Garden Using Reclaimed Pallets And Organic Soil For Small Spaces Garden Using Reclaimed Pallets And Organic Soil For Small Spaces Garden Using Reclaimed Pallets And Organic Soil For Small Spacesh2a Garden Using Reclaimed Pallets And Organic Soil For Small Spaces Garden Using Reclaimed Pallets And Organic Soil For Small Spacesh2a Garden Using Reclaimed Pallets And Organic Soil For Small Spaces Garden Using Reclaimed Pallets And Organic Soil For Small Spacesh2a Garden Using Reclaimed Pallets And Organic Soil For Small Spaces Garden Using Reclaimed Pallets And Organic Soil For Small Spacesh2a Garden Using Reclaimed Pallets And Organic Soil For Small Spaces Garden Using Reclaimed Pallets And Organic Soil For Small Spacesh2a Garden Using Reclaimed Pallets And Organic Soil For Small Spaces Garden Using Reclaimed Pallets And Organic Soil For Small Spacesh2a Garden Using Reclaimed Pallets And Organic Soil For Small Spaces Garden Using Reclaimed Pallets And Organic Soil For Small Spacesbody.Nav.Nav ah1.rating-chip.hero-imgh2pulli.social-share.share-grid.btn#fb-root} Garden Using Reclaimed Pallets And Organic Soil For Small Spaces Garden Using Reclaimed Pallets And Organic Soil For Small Spacesimgh2.btn-box.btn Garden Using Reclaimed Pallets And Organic Soil For Small Spaces Garden Using Reclaimed Pallets And Organic Soil For Small SpacesCreating a vertical garden is an incredible way to add a splash of greenery to your home, especially in small spaces where traditional gardening may not be feasible. Incorporating reclaimed pallets into this not only provides a rustic, charming aesthetic but also motes sustainability by reusing
materials
that would otherwise end up in a landfill. Coupled with organic soil, which nurtures healthy plants without the use of chemicals, this DIY represents a practical yet beautiful way to enhance your living environment.Why Choose a Vertical Garden?SPace
- Solution: Urban living often comes with limited outdoor space. Vertical gardens leverage verticality, allowing you to grow a variety of plants without requiring a large footprint. This makes it perfect for apartments, balconies, or small backyards.Air
- Quality improvement: Indoor plants significantly improve air quality by absorbing toxins and releasing oxygen. A vertical garden can not only beautify your space but also contribute to a healthier living environment.Natural
- Cooling: Plants can help moderate temperatures in your home by creating cooler microclimates. This can reduce your reliance on air conditioning during hot months.Therapeutic : Gardening in any form has been shown to reduce stress and improve mental well-being. Taking on a DIY like this can be incredibly rewarding, giving you both a beautiful outdoor display and personal satisfaction.Skill
- Level: This is categorized as Beginner-friendly. While some carpentry skills can be helpful, this guide walks you through each step, ensuring that anyone can create a stunning vertical garden with some time and dedication.
Tools Needed
To ensure the success of your vertical garden, gather the following tools:Drill with
- Bits: Essential for making necessary holes in the pallet for securing plants and for drainage. A drill is also needed for screwing parts together.Saw: If you need to cut the pallet to fit your designated space, a saw is indispensable. A hand saw or a power saw can work depending on your comfort level.
- Screwdriver: For tightening screws that will hold the pallets together, a screwdriver is crucial. It’s particularly useful if you're using screws rather than nails for better structural integrity.
- Measuring Tape: Important for taking accurate measurements, ensuring that your vertical garden fits well in your intended space.
- Level: Essential for ensuring that your vertical garden is straight, which is important for both aesthetic appeal and plant health.
- Gloves: protect your hands while handling reclaimed wood and soil. Additionally, gloves provide some level of protection from splinters.
- Trowel: A small hand trowel will come in handy when filling the pallet with soil and planting or transplanting seedlings.
- Drop Cloth or Tarpaulin: To protect your work surface and surrounding areas from soil and debris as you work on your vertical garden.
Materials
Here’s a list of
materials
you will need for your vertical garden:Reclaimed
- Pallet: 1-2 pallets depending on size and space.Organic
- Potting Soil: approximately 2-3 bags (2 cubic feet each).Landscape
- Fabric: 1-2 yards to line the inside of the pallet and retain soil.Staples or Heavy-Duty
- Stapler: Needed for securing landscape fabric inside the pallet.Plants or
- Seeds: Depending on your preferences; aim for 6-10 small plants or corresponding seed packets.Wood
- Screws (or nails): A carton (at least 1 pound) to secure various components of the pallet.Wood Sealer (Non-toxic): One quart, to protect the pallet from water and rot.Hanging
- Hardware: Includes wall anchors, hooks, or brackets depending on how you plan to mount the pallet.Watering
- Can or Spray Bottle: To hydrate your plants, especially when they are newly planted and establishing their roots.Fertilizer (Optional): An organic, Slowe fertilizer can help your plants thrive if desired.Step-by-Step Guide to Building Your Vertical Garden
Step 1:
Choose the
- Right Location
What: Identify a suitable wall or area where you'd like to mount your vertical garden.
How: Look for a space that receives adequate sunlight—most vegetables and herbs require at least 6 hours of sunlight proper day. Consider nearby water sources for ease of maintenance. If indoors, choose a location near a window.
Tips: Take note of any environmental factors such as wind or heavy rains that might affect your plants’ health. An overexposed spot may necessitate additional shielding.
Safety: Ensure the wall or area can support the weight of the pallet once laden with soil and plants. Check for any existing structural damage that might commise stability.
Step 2:
Prepare the
- Pallet
What: Clean and treat the reclaimed pallet.
How: Start by wiping off any loose debris and dirt. Sand down any rough edges or splinters to avoid injury. Once cleaned, apply a non-toxic wood sealer to long the life of the pallet and protect it from moisture damage.
Tips: If your wood has any signs of mold or insects, it may be best to discard it or treat it with a natural pest deterrent. Additionally, use gloves when sanding or when applying the wood sealer.
Safety: Be cautious when sanding; wear a mask to prevent inhaling dust particles. Ensure the area is Wellated, especially if applying a sealer.
Step 3:
Line the
- Pallet
What: Create a barrier within the pallet to contain soil and prevent it from falling out.
How: Cut the landscape fabric to fit the inner sides of the pallet. Secure it using a heavy-duty stapler along the edges to hold it in place.
Tips: Make sure that the fabric is tight to avoid sagging as it fills with soil. Use several layers if necessary to reinforce the structure.
Safety: Keep your hands segmented when using staples to avoid pinching or injury from the stapler.
Step 4:
Secure the
- Pallet for Installation
What: Once the pallet is lined, you'll want to reinforce its stability for hanging.
How: Use wood screws to secure any loose areas of the pallet. If you’re mounting it directly to a wall, use anchors and heavy-duty screws to attach it securely based on its weight when filled.
Tips: If using a bracket system, pre-drill holes to ensure an even fit. Use a level to check that each screw sits correctly.
Safety: Ensure you use a ladder appropriately if you need to reach high places, and ask for assistance if lifting heavy pallets.
Step 5:
Fill with
- Organic Soil
What: Add your organic potting soil to the lined pallet.
How: Start from the top of the pallet and carefully fill in soil as you move down, ensuring that it’s packed well but not too tight that it will restrict plant growth. Leave a little room at the top for watering without overflow.
Tips: Using a trowel, work the soil into the corners and crevices of the pallet for an even fill. Check for any air pockets and compress lightly if necessary.
Safety: Wear gloves while handling soil, as this exposure can lead to dirt and possible pest contamination.
Step 6:
Plant
- Your Greenery
What: Choose and plant your selected plants or seeds.
How: Dig holes in the soil with your fingers or trowel, allowing enough space for the roots. Place each plant in its hole and firmly pack the soil around it to ensure stability.
Tips: Consider companion planting or layering plants with similar sunlight and water needs. If starting from seed, read the package instructions for proper depth and spacing.
Safety: Use care when working with smaller plants as some can have thorns or irritants. Always wash your hands after touching.
Step 7:
Water the
- Plants
What: Once the plants are in place, they require watering.
How: Gently water each plant using a watering can or spray bottle, focusing on the base of the plants to encourage root growth.
Tips: Don’t overwater—check the soil for moisture before adding more. Drip trays can be placed below to catch excess water.
Safety: If watering outdoors, be mindful of water pooling that could attract pests.
Step 8:
Secure the
- Facing of the Pallet
What: To retain soil and plants, secure the back of the pallet.
How: Use wire or additional landscape fabric to create a fence-like barrier on the front of the pallet if needed, especially for smaller plants.
Tips: Make sure
materials
are Corrosionant if the pallet will be exposed to the elements.
Safety: Be cautious handling wires or heavy-duty staples as they can be sharp.
Step 9:
Installation and
- Final Touches
What: Mount the completed garden to the wall or area you’ve chosen.
How: With your partner or another person aiding, carefully lift the pallet and align it with your Preled supports. Secure all mounts firmly while ensuring the pallet remains level.
Tips: If things feel off balance upon installation, readjust and redistribute the plants, if necessary.
Safety: Always use personal protective equipment if handling heavy items.
Step 10:
Regular
- Maintenance and Care
What: After installation, continuous care is crucial for the health of your plants.
How: Establish a gwatering schedule in line with each plant's requirements. Check for pests or diseases regularly and address any issues mptly. As plants grow, pruning and deadheading should also be part of your routine.
Tips: Keep a notebook to track what plants thrive best in your system and make adjustments for future plantings.
Safety: Use a garden kneeling pad or stool to avoid strain on your knees and back during maintenance, especially if the garden is at a height that requires bending.
2026 •