How to create a hydroponic vertical garden using repurposed plastic bottles
Introduction
Have you ever considered transforming your small living space into a green oasis? Creating a hydroponic vertical garden using repurposed plastic bottles is not just a fulfilling DIY project, but it also addresses urban gardening challenges like limited space and soil quality concerns. This sustainable gardening method allows you to grow various herbs, vegetables, or decorative plants virtually anywhere: on balconies, terraces, or even indoors.
Why Hydroponics?
Hydroponics is a method of growing plants without soil, instead using nutrient-rich water. This technique is highly efficient, requiring less water than traditional gardening. Since it eliminates the need for soil, plants can absorb nutrients more effectively – leading to faster growth rates and healthier yields. Furthermore, this project aligns with the eco-conscious trend of upcycling materials that would otherwise contribute to environmental waste. Using plastic bottles reduces plastic pollution while providing you with a functional structure for your vertical garden.
Skill Level
This project is beginner-friendly, requiring only basic tool skills and creativity. With proper guidance, you can easily transform discarded bottles into an innovative garden. The satisfaction of nurturing your plants will boost your confidence, making it an excellent project for families or individuals looking to connect with nature.
---
Tools Needed
1. Utility Knife or Scissors:
- Essential for cutting plastic bottles accurately to create openings.
- Used for making drainage holes and ensuring proper water circulation.
- Allows for precise measurements when cutting bottles and arranging them vertically.
- Useful for marking where to cut and drill on your bottles.
- Protects your hands while working with sharp tools and cuts, ensuring safety.
- Ideal for watering the plants once your vertical garden is set up.
- Used to hang or secure the vertical garden, ensuring stability.
- Ensures your vertical garden is straight when hanging or positioning, providing balance.
Materials
1. Plastic Bottles (e.g., 2-liter soda bottles):
- 10–12 bottles, to create multiple planting units.
- Approximately 500ml, specifically designed for hydroponics.
- About 2–3 liters, providing support and moisture retention for plant roots.
- 10–12 pots that fit the bottle openings, allowing plant roots to extend.
- 5–6 hooks to secure the vertical garden to a wall or frame.
- 1 container (5-10 liters) to hold the nutrient solution for the plants.
- 1 meter to prevent the growing medium from washing away.
- 1 pump for easier water circulation in larger setups.
- 10–12 seedlings or seeds of your choice, such as basil, lettuce, or strawberries.
- 1 roll for sealing and securing parts of your vertical garden.
Step-by-Step Instructions
Step 1: Prepare Your Plastic Bottles
Start by gathering your plastic bottles. Rinse them thoroughly to remove any residue. Use a utility knife or scissors to cut the bottles in half horizontally, approximately 1/3 from the bottom. Each half will serve as a planting unit. Remember to leave the spout intact in the top half, as this will act as a funnel for watering.
Tip: Consider decorating the bottles if you want your vertical garden to have a more aesthetically pleasing appearance. You can paint or add stickers to personalize your garden.
Step 2: Make Drainage Holes
Using a drill with a small drill bit, create several small holes in the bottom half of each bottle. This step is critical to allow any excess water to drain out, preventing the roots from sitting in water and rotting.
Safety Note: Always secure the bottle when drilling to avoid any injuries. Wear safety goggles to protect your eyes from plastic shards.
Step 3: Attach Net Pots
Place a net pot into the opening of each top half of the bottle. If the pot does not fit snugly, you can use duct tape or string to secure it in place. The net pot will allow the roots to grow through it while the top part serves as a suitable growth environment.
Tip: Choose a net pot that provides enough space for your plant’s root system. Adjust the size of your cuts if necessary.
Step 4: Prepare the Growing Medium
Hydroponics often requires a different kind of support for the plants compared to soil. Prepare your growing medium (such as coconut coir or rock wool). Fill each net pot with the medium, ensuring it is compact but not too dense, allowing for aeration.
Tip: Soak your growing medium in water before use to allow it to expand and settle evenly in the pots.
Step 5: Add Hydroponic Nutrient Solution
Mix your hydroponic nutrient solution according to the instructions on the package. Pour the solution into the water reservoir. This nutrient-rich solution will provide all the essential nutrients your plants need to thrive.
Tip: Test the pH level of your nutrient solution to ensure it's in the ideal range for plant growth (typically between 5.5 and 6.5).
Step 6: Plant Your Seeds or Seedlings
Place your chosen seeds or seedlings into the prepped growing medium. Ensure that they are planted at the right depth according to their specific requirements. For seeds, follow the guidelines on the seed packet.
Tip: Choose plants that grow well in hydroponic systems, such as leafy greens, herbs, or even strawberries. Starting with seedlings can reduce the time until you see results.
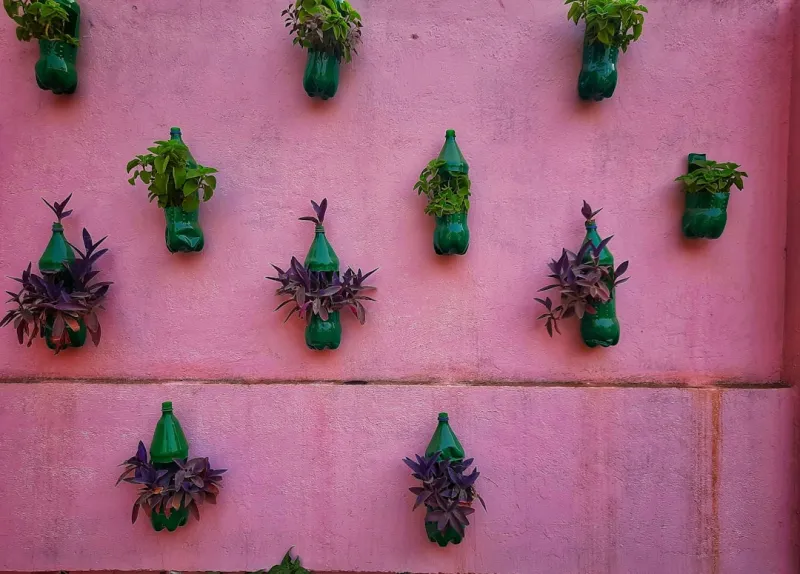
Step 7: Assemble Your Vertical Garden
Using hanging hooks or brackets, attach the top halves of the bottles to a wall or vertical frame. Make sure each bottle is positioned to allow for water and light penetration without blocking another plant's access.
Tip: Consider the sunlight needs of your plants. If they require bright light, position your garden in a location that gets ample sunlight or supplement with grow lights.
Step 8: Water Your Plants
Once your vertical garden is set up, use your watering can or spray bottle to water your plants lightly. The top half of each bottle will act as a reservoir, so ensure they are well watered, and the nutrients can flow to the bottom part.
Safety Tip: Keep an eye on water levels in your reservoir. Refill as necessary to prevent your plants from drying out.
Step 9: Monitor Growth Conditions
Monitor your vertical garden closely in the days following setup. Adjust light exposure, temperature, and humidity as needed to create an ideal growing environment.
Tip: Consider rotating the bottles if some plants are growing taller to maintain even light exposure for all plants.
Step 10: Harvest and Enjoy!
As your plants mature and are ready for harvest, take the time to enjoy the fruits of your labor. Regularly prune your plants to encourage growth and allow for better airflow between them.
Tip: Harvesting herbs by cutting them regularly promotes bushier growth. For leafy greens, cut outer leaves first, allowing the inner leaves to continue growing.
---
Troubleshooting
1. Wilting Plants: This could indicate underwatering or overwatering. Check moisture levels in the growing medium. Adjust your watering schedule accordingly. The plants should be moist, but not soggy.
2. Yellowing Leaves: This might be a sign of nutrient deficiency or excess nutrients. Test the nutrient solution’s pH and strength. Dilute the concentration or add nutrients as needed.
3. Fungal Growth: If you notice mold or fungus around the roots or the growing medium, reduce humidity levels, and make sure there's proper airflow. You may need to replace the affected medium.
4. Stunted Growth: This could be due to poor lighting or inadequate nutrients. Ensure your plants are receiving at least 12-14 hours of light daily and check your nutrient solution.
5. Pests: Keep an eye out for aphids or other pests. If they appear, remove them manually or use a diluted soap solution to wash them off. Ensure that plants are spaced well enough for airflow to deter pest infestations.
---
Conclusion
Creating a hydroponic vertical garden using repurposed plastic bottles offers a rewarding opportunity to cultivate plants in an eco-friendly manner. This project not only contributes to sustainability but also provides a unique way to showcase your gardening skills.
Having taken you through the steps, you can now experiment with different plants and arrangements. Embrace creativity – consider implementing various design variations, such as tiered structures or colorful decoration on your bottles.
Regular maintenance, including watering, nutrient management, and pest control, ensures your hydroponic garden will thrive for months to come. Enjoy the experience of watching your plants grow, and relish in the fresh vegetables and herbs that you'll soon have at your fingertips!