Introduction
Create An Indoor Vertical Garden Using Repurposed Shipping Pallets And Led Grow Lights
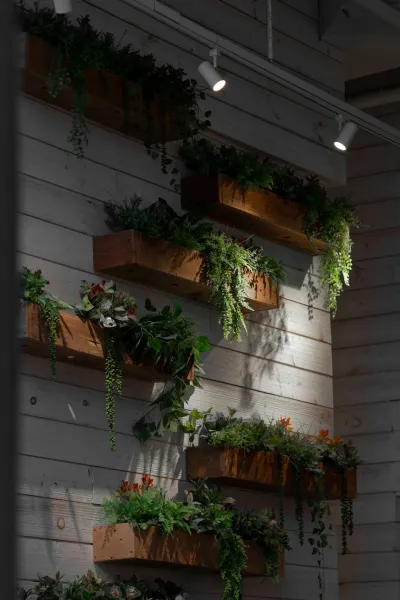
indoor vertical garden is a fantastic way to breathe life into your home while cultivating your own greens, herbs, and flowers. This is especially appealing for newcomers to gardening, as it combines the worlds of sustainability, creativity, and agriculture by repurposing shipping pallets. Given the increasing popularity of indoor gardening, particularly in urban environments, there’s no better time to embark on this rewarding endeavor.Gardening with shipping pallets is particularly appealing due to their availability and low cost. Many businesses discard these pallets, which can often be picked up for free or at minimal cost. With a little creativity and effort, you can transform a simple, discarded pallet into a stunning vertical garden that can thrive indoors, even in limited space.The benefits of an indoor vertical garden extend beyond aesthetics. Not only does it help purify the air in your living space, but it also provides you with access to fresh duce right at your fingertips, promoting a healthy lifestyle. Imagine snipping fresh basil for your pasta dishes or pulling a few sprigs of mint for your refreshing summer drinks, all without stepping out of your door!This guide is crafted for beginners and walks you through the entire process from gathering
materials
to successfully nurturing your plants. While the requires some basic tools and a little elbow grease, anyone with a desire to learn can pull it off—regardless of prior gardening experience.
Tools Needed
- Drill with Wood and Metal Bits: Essential for making holes in the pallet for planting. A drill makes this process faster and ensures precision.Screwdriver: You'll need this for securing any attachments and assembling parts of the vertical garden.
- Saw (Handsaw or Jigsaw): Helpful for cutting the pallet down to size or making adjustments for fitting in your indoor space.
- Sandpaper or Power Sander: To smooth the surface of the pallet before planting. This prevents splinters and adds to the aesthetic.
- Level: Ensures that your vertical garden stands straight and stable on the wall or freestanding
- Paintbrush (or Spray Paint): For applying any non-toxic wood finishes or paints if you choose to treat the wood.
- Measuring Tape: Important for accurately sizing your garden, ensuring it fits within the designated indoor space.
- Safety Gear (Gloves and Eyewear): Always wear gloves to protect your hands while working with tools and wood, and eyewear for protection from potential debris.
Materials
Repurposed Shipping Pallet (1): Source your pallet from local businesses or warehouses.Terracotta Pots or Fabric Grow Bags (5-10): Depending on the size of your pallet and plants, you can adjust quantity; these will house your plants. Potting Mix (2 bags, about 20 liters each): Use a lightweight, Wellng mix suitable for indoor plants. Drip Trays (5-10): To catch excess water and prevent mess in your indoor environment. LED Grow Lights (1-2 panels depending on size): Choose Energyent lights suitable for the type of plants you wish to grow.
- Chains or Rope (for hanging if needed): If you're hanging the pallet, you'll need sturdy chains or rope for secure installation. Screws or Nails (1 pack): To fasten any additional parts, such as the grow lights or attaching pots to the pallet.
- Hose or Watering Can: For watering your plants regularly. Organic Fertilizer (1 bag): Helps provide the necessary nutrients to your plants for growth. Plant Selection of Your Choice (herbs, flowers, or veggies): Opt for plants that suit indoor growing, such as basil, mint, or small flowering plants.Steps to Create Your Indoor Vertical Garden#Choose Your LocationThe first step in your vertical garden journey involves selecting the ideal spot in your home.
- Think about:Light
- Availability: Ensure the location receives ample natural or artificial light. SOuth windows are usually best as they get the maximum sunlight.Space: Measure your wall space to confirm it can accommodate a pallet. Vertical gardens usually do well in kitchens, living rooms, or even bathrooms.
- Air Circulation: Good air flow is essential to ward off mold and pests. This can be challenging in poorly ventilated spaces, so think ahead when choosing your location.After determining your location, ensure it is easily accessible for maintenance like watering and harvesting. You might need to adjust your indoor layout to optimize space!#Prepare Your PalletOnce you've selected the location, it's time to get your pallet ready.Clean
- Your Pallet: Remove dust, debris, and any nails sticking out. A clean surface is crucial for a healthy garden.Sand the
- Surfaces: Using sandpaper or a power sander, smooth down any rough edges, which not only protects your hands but also motes longevity for your pallet.
- Stain or Seal (optional): If desired, apply a non-toxic wood stain or sealant to protect against moisture. Let it dry completely before ceeding.
Tip: If you choose to stain your pallet, ensure the duct is labeled as non-toxic and safe for indoor use.#Cut the Pallet (if necessary)Depending on the size of your pallet and the area it will occupy, you might want to trim it down to fit better.Measure: Use measuring tape to identify where you might want to cut. Common cuts include removing excess slats or reducing height.Cut
- Gently: Use your saw, maintaining a straight line. Take your time, and don’t rush—it’s better to make multiple small cuts than one large, messy one.#Install PlantersNow it's time to make your pallet a functional vertical garden by attaching your pots or grow bags.Planning the
- Layout: Decide how many pots you want to use and where each will be placed. Make sure to account for the size and growing pattern of the plants you will use.Securing
- Planters: For terracotta pots, you may need to drill holes into the pallet slats, then secure pots using screws or brackets. For fabric grow bags, you can secure them by flat-tying or using an appropriate hook or fasteners.
Tip: Make sure the pots have drainage holes to prevent water from pooling and causing root rot.#Fill with Potting MixNow that your pots or grow bags are secured, it’s time to fill them with potting mix.Choose the
- Right Soil: A lightweight mix encourages good drainage, as most indoor plants dislike soggy roots.Fill the
- Pots: Leave about an inch of space at the top to prevent overflow when watering. Compact the soil gently but don’t overdo it; roots need space to breathe!Safety
Tip: Use a mask if you're sensitive to dust or soil to avoid inhaling particulates.#Add PlantsIt's time to introduce your chosen plants to their new home!Choose
- Plants Wisely: Consider companion planting or selecting plants with similar sunlight and water needs. Popular choices include herbs like basil, mint, and parsley, or flowering plants such as petunias.Gently
- Transplant: If your plants are in smaller nursery pots, ease them out carefully; shake off excess soil and plant them in your prepared pots.
- Arranging by Size: Place taller plants at the top and shorter ones at the bottom to ensure all plants get adequate light.
Tip: Water the plants just enough to settle them into their new homes. Avoid soaking them immediately to prevent root shock.#Install LED Grow LightsAfter your plants are in place, it’s essential to optimize their light intake.Mount the LED Strips/Panels: Depending on your setup, hang or attach lights to the top of your pallet garden using hooks or mounting brackets. Aim for approximately 12-24 inches above the plants.Wiring: If your setup requires, follow the manufacturer’s guidelines to properly connect the grow lights to an electrical source.Safety
Tip: Ensure all connections are secure and that you’re using lights rated for indoor use to minimize electrical hazards.#Water & MaintainWith everything set up, routine maintenance is key.Watering: Check the top inch of your soil. If it feels dry, water lightly. Use the drip trays to catch excess water.Fertilizing: After plants have settled (about a month), you can begin adding organic fertilizer according to the instructions. OVerizing can damage plants.
- Pruning: As your plants grow, regularly prune back any excess leaves to mote healthy growth and harvesting.
Tip: Create a schedule for watering and fertilizing to develop a routine that keeps your garden thriving.#Monitor for Pests and DiseasesKeep a close eye on your indoor garden.Daily
- Checks: Look for signs of pests such as webbing, discoloration, or insects.Treatment: If you spot any pests, use insecticidal soap or neem oil as a treatment. Similarly, monitor for signs of disease, and remove affected plants mptly.
Tip: Incorporate companion planting, as some plants repel pests naturally.#Enjoy Your Indoor OasisThe final step is perhaps the most rewarding—enjoying the fruits of your labor!Harvesting: Pick herbs when they’re about one-third the height they’ll be at maturity. Regular clipping encourages fuller growth.Share
- Your Success: Show it off to friends and family. Share your knowledge, and who knows, you might inspire others to join the indoor gardening community!
2026 •