How to create an eco-friendly vertical garden using repurposed pallets and drip irrigation
Setup & Materials
By Alex • November 13, 2025 • DIY Guide
Introduction
In today's fast-paced world, the importance of sustainability and self-sufficiency has never been more prominent. One eco-friendly project that has gained traction among gardening enthusiasts is the creation of vertical gardens. These vertical gardens not only maximize your growing space but also enhance the aesthetics of your home—whether you're constructing it on a small balcony, a patio, or a backyard. By utilizing repurposed pallets as your primary structure and incorporating a drip irrigation system, you can not only provide a sustainable home for your plants but also reduce water wastage and energy consumption.
This DIY project is perfect for beginners—it offers a hands-on opportunity to make use of salvaged materials, which is not only environmentally friendly but also cost-effective. Imagine transforming discarded wooden pallets into a lush, green space that contributes to air purification, carbon sequestration, and fresh produce right at your fingertips. Another aspect is that vertical gardens have a host of benefits: they can facilitate better air circulation, lower the risk of soil pests, and create natural insulation, ensuring your home remains cool in summer and warm in winter.
While the project does require some basic carpentry and gardening skills, don’t fret—everything you need to know will be laid out in straightforward, easy-to-follow steps. So grab your tools, gather your materials, and let's embark on this exciting eco-friendly gardening journey together!
Tools Needed
Hand Saw: A reliable hand saw will help you cut the pallets to the desired dimensions. Make straight, even cuts for uniformity when assembling your vertical garden.
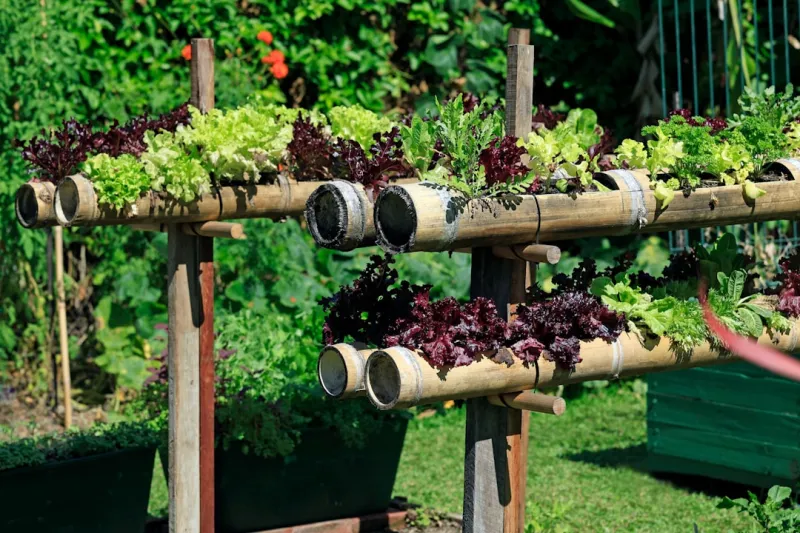
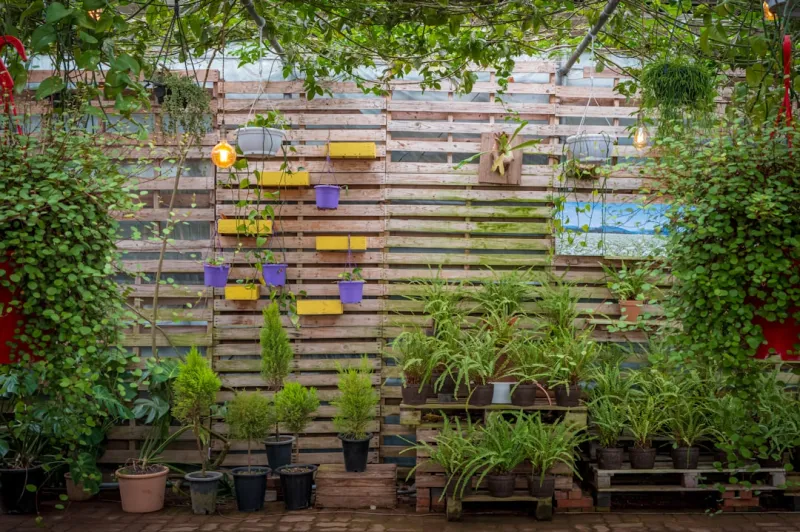
Final Result
Drill/Driver: A power drill equipped with various drill bits will be crucial for drilling holes for the drip irrigation system and securing screws into the pallets.
Screwdriver: You'll need a good quality screwdriver, often used in conjunction with the drill, for tightening screws and assembling the pallets.
Level: A level will ensure that your vertical garden structure is aligned correctly, preventing any tipping or uneven weight distribution.
Measuring Tape: Accurate measurements are vital when cutting and assembling the pallets. A measuring tape will help you adhere to the correct dimensions and spacing for your plants.
Paintbrush or Roller: If you choose to paint or seal your pallets to protect them against the elements, a paintbrush or roller will help apply your chosen protective coating evenly.
Garden Gloves: Proper gardening gloves are essential for protecting your hands from splinters, soil, and any chemicals you may come into contact with.
Garden Hose: If you're installing a drip irrigation system, a garden hose is necessary for connecting to your water source and maintaining your vertical garden.
Materials Needed
Repurposed Wooden Pallets: 2-4 pallets (depending on the size of your garden) to create your vertical frame.
Wood Screws: 100 screws (1.5 - 2 inches) to secure the pallets together and reinforce the structure.
Landscape Fabric: 1 roll (approximately 3 feet wide and 25 feet long) to line the back and compartments of the vertical garden, preventing soil from falling out.
Potting Soil: 1-2 bags (2 cubic feet each) to fill the compartments within your vertical garden with nutritious growing medium.
Plants/Seeds: 8-12 plants or seed packets (herbs, flowers, and vegetables) suited for vertical gardening.
Drip Irrigation Kit: 1 standard kit, which includes dripline, connectors, and stakes. This will provide efficient watering for your plants.
PVC Pipe (optional): 1 length (1 inch diameter, around 6 feet) if you want to create a vertical frame for the drip irrigation.
Wood Sealant or Outdoor Paint: 1 quart to protect the wood against moisture and pest damage.
Brackets/Corner Supports: 4-8 brackets to reinforce the corners and joints of the pallet assembly.
Bungee Cords or Wire (optional): If you want to create additional support lines for climbing plants.
Step-by-Step Instructions
### Step 1: Selecting and Preparing Your Pallets
What: Choose high-quality, untreated wooden pallets that are in good condition.
How: Examine the pallets carefully for any broken boards, signs of rot, or excessive splinters. Lightly sand the pallets to smooth any rough edges and avoid injury when handling. If desired, you can also paint or seal your pallets with a non-toxic outdoor wood sealant to protect them from moisture and pests.
Tips: Look for pallets labeled with “HT” (heat-treated) rather than “MB” (methyl bromide) which indicates they haven’t been treated with harmful chemicals commonly used as pesticides.
Safety: Always wear gloves and a dust mask when sanding to protect your hands and lungs.
### Step 2: Arranging Your Pallets
What: Decide on the layout of your vertical garden in your desired location.
How: Stack the pallets vertically or lay them flat against a wall for easy access. The ideal arrangement will depend on your space and what type of plants you want to grow (i.e., trailing plants versus upright plants). If you’re stacking, ensure the bottom pallets are sturdy enough to support the others above.
Tips: Use a level to ensure each pallet is aligned properly, preventing a potential toppling of the structure as it fills with soil and plants.
Safety: Always ensure that your structure is stable and can support the weight gained when wet soil is added.
### Step 3: Reinforcing Your Structure
What: Make sure the pallets are securely joined together.
How: Use wood screws to connect the pallets at the corners and along the edges. If stacking, you might also use brackets for additional support. Secure them to a wall or fence for extra stability, ensuring your vertical garden can withstand wind or even adverse weather.
Tips: Pre-drilling holes can prevent the wood from splitting and make it easier to drive screws in.
Safety: Use protective eyewear while drilling to shield your eyes from flying debris.
### Step 4: Lining with Landscape Fabric
What: Line the back and compartments of each pallet with landscape fabric to keep soil contained.
How: Cut the landscape fabric to fit the back and each compartment of the pallet. Use a staple gun or a heavy-duty adhesive to secure the fabric to the wood, ensuring it covers all areas where soil will be held.
Tips: Make sure to leave enough fabric at the top to fold over so that water does not drip down your wall when watering your plants.
Safety: Wear gloves when handling staples or sharp tools to prevent injury.
### Step 5: Adding Soil
What: Fill the compartments of the pallets with potting soil to prepare for planting.
How: Use a shovel or garden trowel to fill each compartment with potting soil, pressing it down gently to eliminate air pockets. Make sure to fill each compartment adequately but allow some space at the top for planting.
Tips: Mixing compost with your potting soil can provide essential nutrients for your plants!
Safety: Lift carefully to avoid straining your back, particularly when moving heavy bags of soil.
### Step 6: Planting Your Seeds/Plants
What: Choose your plants and arrange them in the soil-filled compartments.
How: Select plants that thrive in vertical gardens, such as herbs (like basil and thyme), trailing flowers (like petunias), or compact vegetables (like lettuce). Make deep holes for larger plants, breaking the root ball of each plant for seedlings. Cover them with soil and gently pack to ensure they’re secure.
Tips: Consider the sun and shade preferences of each plant; place sun-loving plants on the top and shade-tolerant varieties lower down.
Safety: Keep your gardening gloves on while handling soil and plants to avoid skin irritation.
### Step 7: Setting Up Drip Irrigation
What: Create a watering system for your vertical garden to ensure consistent moisture.
How: Follow the instructions in your drip irrigation kit, connecting the mainline and distributing the drip line throughout the garden. Position drip emitters so that each plant's roots receive adequate water.
Tips: You can also use a PVC pipe as a vertical fixture to run the drip system more uniformly, establishing multiple rows or streams for your plants.
Safety: Ensure connections are tight to prevent leaks, and if installing a timer, make sure to find a safe and dry area for electrical parts.
### Step 8: Testing and Adjusting the System
What: Ensure the garden is ready for growth by testing your watering system.
How: Once everything is set up, turn on your drip irrigation system to test if the water is reaching every plant. Observe the flow of water and make adjustments as necessary—this might include repositioning emitters or fixing leaks.
Tips: To save water, install a timer to ensure that plants receive watering at optimal times without water wastage.
Safety: Always check for leaks when the system is on to avoid flooding and the associated damage.
### Step 9: Maintenance and Care
What: After establishing your vertical garden, proper maintenance is key.
How: Monitor plants for signs of pests or disease, trimming away any affected areas. Regularly check soil moisture and the efficiency of your drip irrigation system, making adjustments as necessary. Fertilize as needed, particularly since vertical gardens can quickly deplete soil nutrients.
Tips: Rotate crops if you have vegetables to provide better nutrients and prevent soil depletion.
Safety: When using any chemical treatments, wear gloves and a mask, and ensure adequate ventilation.
### Step 10: Enjoying Your Vertical Garden
What: Take time to appreciate the fruits of your labor!
How: Regularly harvest herbs and vegetables as they ripen. Enjoy using fresh ingredients in your cooking, or simply sit back and enjoy the greenery that your vertical garden brings to your home.
Tips: Document your gardening process by taking photos or journaling about the growth of your plants—this can provide insights for future plantings.
Safety: Kids and pets should be monitored around the vertical garden to prevent any accidental damage or ingestion of plants if growing edible varieties.
Troubleshooting Common Issues
1. Overwatering: Results in root rot and plant death. Fix: Monitor the drip irrigation system daily and adjust the watering schedule; consider using a moisture meter to determine soil moisture levels.
2. Insufficient Drainage: May lead to standing water. Fix: Ensure the back of the pallets is elevated or has drainage holes. If necessary, plumb in additional drainage.
3. Pest Problems: Discovering aphids or spider mites. Fix: Introduce natural predators like ladybugs or use insecticidal soap. Regularly inspecting your plants helps to catch infestations early.
4. Nutrient Deficiencies: Yellowing leaves may indicate a lack of nutrients. Fix: Apply a balanced, organic fertilizer and amend your soil with compost or well-rotted manure.
5. Plant Death: May occur due to unsuitable light conditions. Fix: Research the sunlight needs of your plants and relocate your vertical garden if possible, or choose shade-tolerant plants if light is inadequate.
Conclusion
Creating an eco-friendly vertical garden using repurposed pallets and a drip irrigation system not only enhances your living space aesthetically but also promotes a sustainable lifestyle. By following these steps carefully, you’ve transformed a few pallets into a thriving green oasis, effectively utilizing space while minimizing environmental impact. Whether you decide to grow herbs, flowers, or vegetables, the maintenance and care of your vertical garden will ensure you enjoy the fruits of your labor for seasons to come.
Remember, the beauty of vertical gardening is not just in aesthetics but also in its adaptability. Feel free to experiment with different plants, layouts, and watering schedules as you become more familiar with the needs of your garden. Each growing season presents a new opportunity for growth and exploration, ensuring your gardening journey remains fresh and rewarding. Happy gardening!