Introduction
Indoor Garden Using Repurposed Pallets And Hydroponic Systems
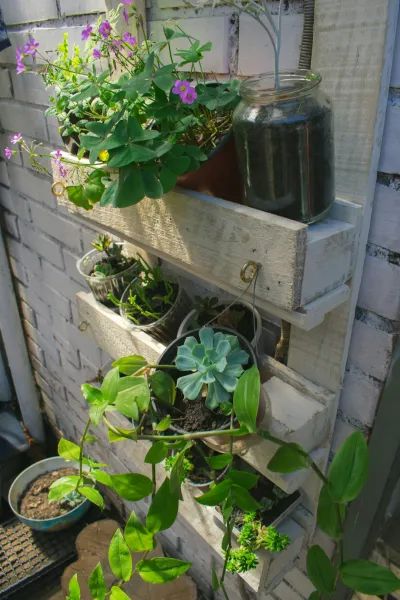
Indoor Garden Using Repurposed Pallets And Hydroponic Systemsbody.navh1.rating.hero-img.share.btn Indoor Garden Using Repurposed Pallets And Hydroponic SystemsIn the concrete jungles of modern living, the need for green spaces has transcended mere aesthetics. With more people adopting urban lifestyles, transforming underutilized areas into lush, green landscapes has become a necessity to maintain peace of mind and a connection to nature. One fantastic way to achieve this is by creating a vertical indoor garden using repurposed pallets and a hydroponic system. Not only does this offer an efficient use of space, but it also motes sustainability by recycling
materials
that would otherwise end up in a landfill.Building your own indoor garden may seem daunting, particularly if you’re a novice gardener or DIY enthusiast. However, this is perfectly suited for beginners seeking to learn new skills without demanding too much time or investment.
- Vertical gardens provide multiple benefits: they create a stunning visual appeal, improve indoor air quality, and allow you to grow fresh herbs and vegetables year-round, regardless of external weather conditions. Hydroponics—which involves growing plants in a nutrient-rich water solution instead of soil—further enhances this by saving space and optimizing plant growth.In this guide, we will cover everything you need to know to create your own vertical indoor garden, from the necessary tools and
materials
to each detailed step in the process. By the end, you’ll have a flourishing indoor garden that not only beautifies your space but also nourishes your body. Let’s get our hands dirty and embrace the joy of gardening!
Tools
- Needed
- Screwdriver or Drill: Essential for assembling the pallet structure. A drill speeds up the process, especially if you're using screws.Saw: Necessary for cutting the pallets to the desired size. Ensure you have a handsaw or jigsaw that's suitable for wood work.Paintbrush / Roller: To apply protective finishes or paint to the pallet. This method will improve durability and aesthetics.Measuring
- Tape: To ensure accurate measurements when cutting wood and arranging your garden layout. Precision is key for stability.Level: To make sure your vertical garden is perfectly vertical; this helps maintain aesthetic value and structural integrity.Utility
- Knife: Handy for cutting fabric or DRIP TUBING and plastic sheets that will go inside the pallet.Bucket: For mixing the nutrient solution for hydroponics. Choose a large container to help prevent spills.Wire
- Cutters: Useful for cutting wires used in securing plants or hoses in your hydroponic system.
Materials
Wooden Pallets (2-3): Choose pallets that are in good condition; make sure they are not broken or rotting.Plastic Sheeting (1 roll): To line the pallets, preventing leaks and protecting the wood. Look for heavy-duty plastic that can withstand moisture.Hydroponic Nutrient Solution (1 quart): Specialized nutrients that your plants will need to thrive without soil.Growing Medium (2-3 bags):
Materials
like rock wool or clay pellets that will support plants in the hydroponic system and assist with drainage.Drip Irrigation System (1 set): Consists of a pump, hoses, and emitters. This system will help distribute water efficiently to your plants.Net Pots (12-15): Small containers that hold your growing medium and plants, allowing roots to grow while maintaining stability.Plant
- Seeds or Seedlings (various): Choose herbs like basil or mint, or small vegetables like lettuce; these are perfect for indoor hydroponic gardens.Wood Sealer or Outdoor Paint (1 can): To protect the wood from moisture and long its life. Ensure it’s non-toxic if plants will be in direct contact.Screws or Nails (1 box): To securely fasten the pallets together and aid in any additional framework needed for stability.Power Strip or Timer (1 set): Useful if you're installing grow lights to ensure that your plants receive the Right light at the right time.Steps to Create Your Vertical Garden
Step 1:
Choose the
- Right Location
What: Finding an appropriate spot for your vertical garden is crucial. Look for a wall, balcony, or other vertical space that gets ample sunlight—usually about 6–8 hours a day for most plants.
How: Stand back and visualize where your garden will fit best. Take into consideration factors like accessibility (for watering and harvesting), proximity to power outlets (for grow lights if needed), and how it fits in with your overall interior design.
Tips: Be mindful of air circulation; overly enclosed spaces can lead to mold and rot. If sunlight is limited, consider installing LED grow lights.
Safety: Ensure that your chosen location won't cause any damage to walls or flooring when installing and that it can support the weight of the garden once filled with water and plants.
Step 2:
Prepare
- Your Wooden Pallets
What: Once your location is identified, it’s time to prepare your pallets for planting.
How: Start by cleaning the pallets. Remove any loose debris and sand down rough surfaces to prevent splinters. If desired, paint or seal the wood with non-toxic sealant to increase durability—apply two coats for best results.
Tips: Avoid using pallets marked with “MB” (methyl bromide), a toxic chemical used for pest control. Look for pallets with the “HT” (Heatd) mark.
Safety: Always wear gloves and a dust mask while sanding to protect against any dust particles and splinters.
Step 3:
Cut and
- Arrange the Pallets
What: Depending on your space, you may want to stack or lean the pallets against the wall.
How: Use a saw to cut any pallets that need resizing. Arrange them in a staggered fashion, ensuring that they have enough space for air circulation and sunlight to reach all plants. Use the level to make sure each pallet is aligned properly.
Tips: Use a backer board (another flat piece of wood attached to the wall) for extra stability, especially if stacking pallets vertically.
Safety: Always wear safety goggles when cutting with a saw to protect your eyes from flying debris.
Step 4:
Line the
- Pallets with Plastic Sheeting
What: A layer of plastic sheeting will protect the wood and help manage water drainage.
How: Cut the plastic sheeting to fit the front and sides of each pallet. Use a staple gun or duct tape to secure the sheeting to the wood. Make sure to leave the top open for planting.
Tips: Ensure that the plastic is tightly secured to prevent leaks. You can create pockets in the plastic to hold the growing medium and plants.
Safety: If using a staple gun, keep hands clear of the staple exit point to avoid injury.
Step 5:
Install the
- Hydroponic System
What: A hydroponic system is crucial for providing nutrients to your plants.
How: Set up your drip irrigation system according to the manufacturer's instructions. Typically, this involves connecting a water pump to a reservoir (like a bucket), running hoses to your plants, and installing emitters at each pot.
Tips: Test the system before planting; run water through the system to ensure even distribution and check for any leaks.
Safety: Ensure all electrical components are safely wired and away from water. Use waterof extension cords if needed.
Step 6:
Fill with
- Growing Medium and Net Pots
What: The next step is to prepare your planting vessels.
How: Fill each net pot with the growing medium of choice (rock wool or clay pellets). Place the filled net pots into the openings created by the plastic sheeting in the pallet.
Tips: Leave some space at the top of net pots to avoid spillage when watering.
Safety: Avoid overfilling the net pots; excess media can obstruct drainage and lead to root rot.
Step 7:
Plant
- Your Seeds or Seedlings
What: Now it’s time to populate your garden with plants!
How: Follow the specific planting instructions for each variety of seed or seedling. Bury seeds at their recommended depth and gently firm the medium around them.
Tips: If using seeds, consider starting them in smaller seed trays for greater success before transferring them to the vertical garden.
Safety: Ensure your hands are clean, as contaminants can affect plant health.
Step 8:
- Your Reservoir and Start the Pump
What: The final step is to set up the water and nutrients needed for your hydroponic system.
How: Fill the reservoir (bucket) with water and add the hydroponic nutrient solution according to the instructions on the package. Start the pump and check for even distribution of water to all drip lines.
Tips: Monitor the water level and acidity regularly to ensure optimal plant growth.
Safety: Be cautious when working near electrical components. Ensure all wires and connections are insulated and waterofed.
Step 9:
Monitor and
- Adjust
What: After the installation, consistent monitoring is essential for success.
How: Keeping an eye on water levels, nutrient concentration, and plant health is vital. Regularly check for any disease or pest issues.
Tips: Keep a journal to track growth, adjustments, and any problems that arise, as this will help you improve future garden setups.
Safety: If you’re using electrical grow lights, ensure they are set up according to safety guidelines to prevent overheating.
Step 10:
Harvest and Enjoy!
What: Finally, it's time to enjoy the fruits (and vegetables) of your labor!
How: Harvest your herbs and vegetables gently, ensuring you do not disturb the roots of the plant unnecessarily. Use scissors when cutting to avoid damaging the stems.
Tips: Regular harvesting motes continued growth. Enjoy fresh herbs in your cooking or share your bounty with family and friends.
Safety: Be careful with sharp utensils during harvesting to prevent cuts and injuries.
2026 •