Introduction
Garden Using Repurposed Wooden Pallets And Upcycled Containers
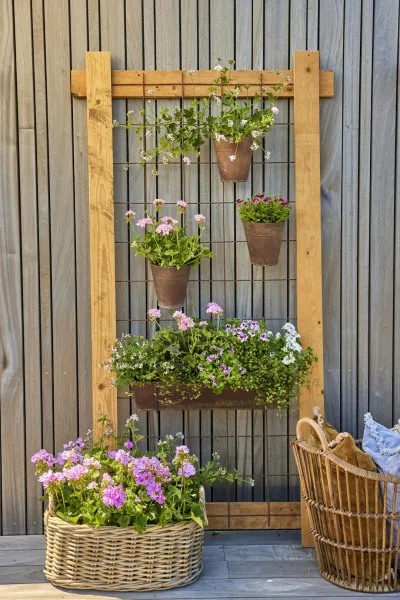
Garden Using Repurposed Wooden Pallets And Upcycled Containersbody.navh1.rating.hero-img.share.btn Garden Using Repurposed Wooden Pallets And Upcycled Containers Garden Using Repurposed Wooden Pallets And Upcycled Containersh2.content p Garden Using Repurposed Wooden Pallets And Upcycled Containers Garden Using Repurposed Wooden Pallets And Upcycled Containers Garden Using Repurposed Wooden Pallets And Upcycled Containers Garden Using Repurposed Wooden Pallets And Upcycled Containersh2a Garden Using Repurposed Wooden Pallets And Upcycled Containers Garden Using Repurposed Wooden Pallets And Upcycled Containersh2a Garden Using Repurposed Wooden Pallets And Upcycled Containers Garden Using Repurposed Wooden Pallets And Upcycled Containersh2a Garden Using Repurposed Wooden Pallets And Upcycled Containers Garden Using Repurposed Wooden Pallets And Upcycled Containersh2a Garden Using Repurposed Wooden Pallets And Upcycled Containers Garden Using Repurposed Wooden Pallets And Upcycled Containersh2a Garden Using Repurposed Wooden Pallets And Upcycled Containers Garden Using Repurposed Wooden Pallets And Upcycled Containersh2a Garden Using Repurposed Wooden Pallets And Upcycled Containers Garden Using Repurposed Wooden Pallets And Upcycled Containersbody.Nav.Nav ah1.rating-chip.hero-imgh2pulli.social-share.share-grid.btn#fb-root} Garden Using Repurposed Wooden Pallets And Upcycled Containers Garden Using Repurposed Wooden Pallets And Upcycled Containersimgh2.btn-box.btn Garden Using Repurposed Wooden Pallets And Upcycled Containers Garden Using Repurposed Wooden Pallets And Upcycled ContainersIntroAs urbanization continues to expand, green spaces often find themselves at a premium. Whether you have a small balcony, a limited backyard, or a sunny wall that’s just begging for life, creating a vertical garden is an excellent solution. This DIY of building a vertical garden using repurposed wooden pallets and upcycled containers not only helps save space but also breathes new life into discarded
materials
, minimizing waste.Vertical gardens are not just a delightful sight; they bring numerous benefits to your home and surroundings. First and foremost, the aesthetic appeal of colorful flowers, lush greenery, and vibrant vegetables can transform any dull wall into a living canvas. Moreover, vertical gardens can improve air quality by filtering pollutants and releasing oxygen. They can also provide insulation, helping to regulate indoor temperatures and lowering energy costs. Additionally, growing your own herbs and vegetables reduces your reliance on Store duce, leading to a healthier lifestyle.If you’re new to gardening or handy , have no fear! This guide is tailored for beginners, breaking down the process into easy steps. Creating your vertical garden will not only beautify your environment but also give you a great sense of accomplishment. So, let’s roll up our sleeves and get started on this exciting journey of sustainable gardening.
Tools Needed
Cordless DrillEssential for making holes in the pallet and containers and securing screws in place.ScrewdriverUseful for manual tightening of screws if the drill is cumbersome in tight spots.Wood Saw or SawzallRequired for cutting the pallet and other wooden pieces to the desired length.Sandpaper/SanderImportant for smoothing out rough edges on the pallet and wooden containers to avoid splinters.LevelHelps ensure that your vertical garden is straight and visually appealing when mounted on a wall.Measuring TapeNecessary for measuring dimensions accurately before cutting and assembling your garden structure.Gardening Glovestects your hands from splinters and dirt while working with
materials
and planting.Safety GlassesEssential to protect your eyes from dust and debris when cutting wood or drilling.
Materials
Wooden Pallet – 1 large or 2 small palletsWooden Boards (for back support) – 2 pieces, each 2 x 4 feetUpcycled Containers (like tin cans, old pots, or crates) – 6-8 containersPotting Soil – 1-2 bags, depending on container sizePlants or Seeds – Various (herbs, flowers, or succulents)Wire Mesh or Landscaping Fabric – 1 roll (to prevent soil from falling out)Screws – 1 box (for securing the pallet and containers)Wood Stain or Sealant (optional) – 1 can (to protect the wood and add color)Rope or Wire (for hanging and securing plants) – 1 coilDrip Tray (optional) – 1-2 trays for drainage
Step 1:
Choosing the Right PalletWhatSelect a wooden pallet suitable for outdoor use. Look for pallets that are sturdy and free from chemicals, pesticides, or mold.HowExamine the pallet carefully. You can often find pallets at local hardware stores, grocery stores, or lumber yards. Ensure the wood is untreated.TipsLook for pallets marked with “HT” for HEatd; they are usually safer for gardening.Check for broken or damaged slats that may not hold your plants securely.Safety Wear gloves when inspecting and moving heavy pallets to avoid splinters or injuries.
Step 2:
Preparing the PalletWhatPrepare the pallet by cleaning it and, if needed, sanding it down.HowScrub the pallet using soapy water to remove dirt and grime.Once dry, use sandpaper or a sander to smooth out any rough edges or splinters that could cause injury later.TipsIf you want to add color, this is the time to apply wood stain or sealant before planting.Allow the stain or sealant to dry thoroughly before ceeding.Safety Always wear a mask when sanding to avoid inhaling dust particles.
Step 3:
Setting Up the Back SupportWhatvide additional support for your vertical garden by attaching wooden boards to the back of the pallet.HowCut two pieces of wood to measure 2 feet by 4 feet.Attach these boards vertically to the back of the pallet using screws. Pre-drill holes to prevent splitting the wood.TipsEnsure that the boards are level. The level will help maintain the structure when hung.Leave some space at the bottom for drainage or use a drip tray.Safety Be cautious with the drill and support the pallet when moving it to avoid accidents.
Step 4:
Adding the ContainersWhatAttach upcycled containers to the front of the pallet to create planting pockets.HowUsing screws, fasten the containers to the slats of the pallet.You can also use landscaping fabric or wire mesh to create pockets if you want more soil area.TipsArrange the containers in a staggered fashion for aesthetic appeal and to ensure sun exposure for all plants.Consider using different-sized containers for variety.Safety Be mindful of sharp edges when handling containers.
Step 5:
Preparing for PlantingWhatPrepare the containers for planting by adding a layer of drainage and soil.HowIf using tin cans, drill holes in the bottom for drainage.Fill each container with potting soil, leaving space at the top.TipsMixing in some compost can provide nutrients for your plants.Place a small layer of gravel at the bottom of the containers for extra drainage.Safety Ensure proper posture when bending down and lifting heavy bags of soil to avoid strain.
Step 6:
PlantingWhatChoose and plant your desired greens, flowers, or herbs.HowSelect small plants or seeds that fit well in your containers.When planting seeds, follow specific depth guidelines. If using small plants, gently remove them from their pots and place them into the soil, firming around the base.TipsPrioritize Sun plants for the top containers, and consider Shadent plants for the bottom.Don’t overcrowd the containers; plants need space to grow.Safety Be gentle when handling roots to avoid damaging the plants.
Step 7:
Watering and MaintenanceWhatperly water and maintain your vertical garden.HowWater thoroughly, ensuring the soil is moist but not waterlogged.Consider using a drip irrigation system for convenience.TipsMonitor the moisture level, especially in hotter months. Adjust your watering schedule according to weather conditions.Regularly check for pests and remove any dead foliage to mote plant health.Safety Use a sturdy ladder when watering high containers to maintain balance, and avoid overwatering.
Step 8:
Securing the Vertical GardenWhatMount the vertical garden onto a wall or fence.HowIdentify a suitable location with adequate sunlight.Use screws to secure the pallet firmly to the wall or lean it against a stable structure.TipsIf unsure about the strength of the wall, use brackets for added stability.You can also create a Freeng structure if mounting isn’t feasible.Safety Ensure you use appropriate anchors for the wall type, and be cautious while securing the pallet.
Step 9:
2026 •