Introduction
Garden Using Repurposed Plastic Bottles On A Balcony
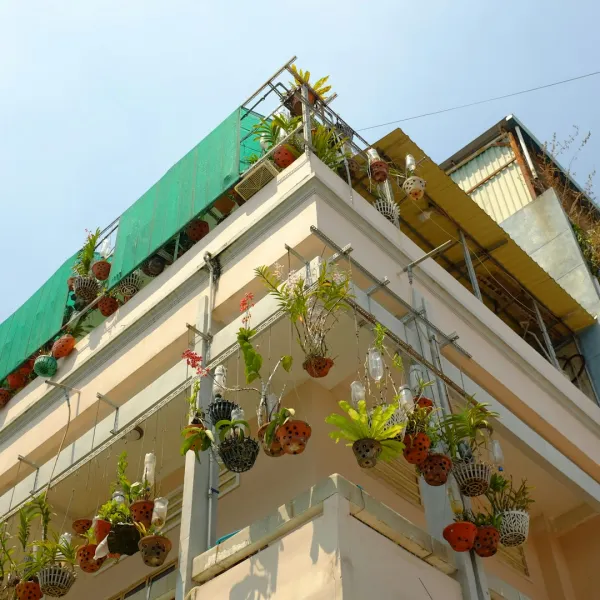
Garden Using Repurposed Plastic Bottles On A Balconybody.navh1.rating.hero-img.share.btn Garden Using Repurposed Plastic Bottles On A Balcony5 (32Creating a vertical garden is a fantastic for anyone looking to maximize their growing space, particularly if you have a small balcony. This DIY not only reuses
materials
that might otherwise end up in a landfill but also adds a splash of greenery to your living space. Vertical gardens are a stunning way to bring nature into urban environments.Benefits of this are multifaceted. Firstly, it allows you to grow your food at home. Imagine snipping fresh herbs like basil or parsley straight from your vertical garden while cooking dinner! Beyond edible plants, vertical gardens also provide aesthetic appeal, imving the ambiance of your space with lush greenery and colors that brighten even the darkest corners. They also contribute to improved air quality, making them a healthy addition to urban environments.As for skill level, this is Beginner-friendly. You don’t need extensive gardening knowledge or sophisticated woodworking skills to create your vertical garden. This emphasizes creativity and resourcefulness in reusing plastic bottles, making it accessible to everyone, including kids (with adult supervision). It’s an excellent way to foster an interest in plants and the environment.Step-by-Step Instructions
Step 1:
Collect Your
Materials
Before starting, Gather All Your
Materials
and Tools in one location. This minimizes interruptions during the construction process. Make sure each bottle is clean and free of residue from previous contents.
Tip: Use soap and water to wash the bottles and rinse them thoroughly. It’s a good practice to remove any labels as well.
Step 2:
Choose a Location on Your BalconyDetermine where on your balcony your vertical garden will be placed. Consider light availability, as most plants thrive in sunlight. An East balcony is often ideal for morning light, while a South balcony provides all-day sun.
Tip: Observe the sunlight patterns over several days to figure out the best location for your plants.
Step 3:
Cut the Plastic BottlesUse your scissors to cut bottles in half horizontally. Make sure you’re cutting at a height that allows for ample soil and roots.
Tip: For increased drainage, you can create additional holes near the bottom of the half that will be upside down in your vertical system.
Step 4:
Drill Drainage HolesUtilizing the drill, make small holes at the bottom of each bottle (half). This will allow excess water to drain to prevent root rot.Safety
- Note: Always wear protective eyewear and gloves while drilling.
Step 5:
Prepare the Hanging MechanismDecide how you wish to hang your bottles vertically. You can either stack the bottles and use wire mesh for support or create a more structured frame using wood or metal. If opting for a frame, secure the frame tightly to your balcony railing.
Tip: String or twine can also provide a rustic feel while keeping weight distributed evenly.
Step 6:
Fill the Bottles with SoilFill the cut bottles with potting soil, leaving about one inch from the top. Ensure that the soil is not too compact; looser soil allows better aeration.
Tip: Mixing in some Slowe fertilizer with your potting soil can provide your plants with essential nutrients over time.
Step 7:
Plant Your Chosen PlantsNow it’s time to plant your seedlings or seeds into the bottles. If you are using seedlings, create a small hole in the soil and gently transplant the seedling while ensuring the roots are covered.
Tip: It’s best to choose smaller plants or herbs like mint, basil, or tomatoes since they don’t require a lot of space.
Step 8:
Secure the Bottles in PlaceUsing the zip ties or hanging hooks, secure the filled bottles in your frame or arrangement. Ensure they're tightly fastened and that their weight is well supported.
Tip: Regularly check the stability of the bottles, especially right after watering when they are heavier.
Step 9:
Water and FertilizeOnce your plants are secured, water them thoroughly. For newly planted seedlings, use a spray bottle or watering can to avoid displacing the soil.
Tip: Watering should be done early in the morning or later in the evening to prevent evaporation.
Step 10:
Maintenance and ObservationWith your vertical garden now established, the key is regular observation and maintenance. Keep an eye on soil moisture, the health of your plants, and any unwanted pests.
Tip: Rotate your plants if they start leaning towards the sun to ensure even growth.
2026 •