How to create a vertical garden using repurposed plastic bottles and rustic wooden pallets
Intro
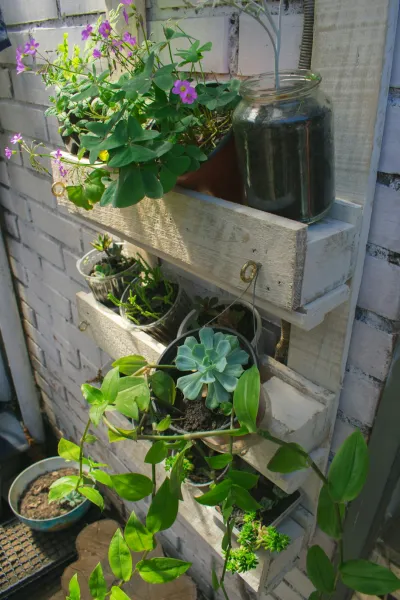
Creating a vertical garden is one of the most fulfilling and eco-friendly projects you can undertake if you're looking to bring greenery into your home or yard without taking up too much space. This DIY project uses repurposed plastic bottles and rustic wooden pallets, both of which can often be found easily and inexpensively. Not only does this project help reduce waste by recycling plastic items, but it also allows you to display a myriad of flowers, herbs, or even vegetables in a visually appealing manner.
One of the most attractive features of a vertical garden is that it’s perfect for smaller living spaces, balconies, and patios. Even if you've got a small yard, vertical gardens maximize the use of available space and add life and color to dull walls. Moreover, they promote sustainability through recycling while encouraging creativity as you explore various design possibilities with the bottles and pallets.
Skill level-wise, this project is approachable for beginners, requiring no advanced gardening or carpentry skills. The act of creating a vertical garden allows you to unleash your creativity while learning something new about plants and gardening. Plus, the satisfaction of nurturing your plants, all while knowing you’ve helped minimize plastic waste, can be incredibly rewarding. Whether you’re looking to cultivate a few herbs for cooking, create a stunning floral display, or even grow some small fruits, this project is the perfect starting point. So gather your supplies, roll up your sleeves, and let’s dive into this engaging DIY journey!
Tools Needed
- Drill: Important for creating holes in the pallets and plastic bottles to allow for drainage and support.
- Saw: A handsaw or a jigsaw will help you cut the wooden pallet to the desired size if necessary.
- Screwdriver: Used for securing the wooden pallet to a wall or for assembling any additional supports you may need.
- Measuring Tape: Essential for ensuring that your vertical garden is correctly sized to fit your available space.
- Marker or Chalk: For marking where to drill holes or cut the wood, ensuring precise measurements and cuts.
- Garden Trowel: Handy for digging, transferring soil, and planting your chosen plants into the pockets created by the bottles.
- Sandpaper: To smooth out any rough edges on the pallets or bottles to avoid injury or damage to plants.
- Gloves: Essential for protecting your hands from sharp edges and dirt while working on your project.
Materials
- Wooden Pallet: 1 or 2 depending on your vertical garden size preference. Make sure it is in good condition.
- Plastic Bottles: Approximately 10-20 bottles, depending on how many “plant pockets” you'd like to create.
- Potting Soil: 1-2 bags (each bag usually weighs 1.5 cubic feet) to fill your bottles and provide nutrients for your plants.
- Plants or Seeds: Choose 3-5 types of plants—herbs like basil and mint, or flowers like petunias—to create diverse greenery.
- Staples or Nails: A handful for securing soil pockets in the bottles to the pallet.
- Twine: About 20-30 feet to provide additional support for hanging the bottles.
- Mesh or old fabric: Approximately 1-2 square feet, cut into pieces that will fit inside the bottles to hold soil and plants.
- Wood Finish or Sealant: Optional, to protect the pallet from moisture if it will be placed outdoors.
### Step 1: Preparing the Pallet
Begin by choosing a sturdy wooden pallet that has not been treated with toxic chemicals, especially if you plan to grow edibles. Inspect the pallet for any broken boards or protruding nails and fix or remove them as needed.
- How: Use a saw to cut the pallet if needed to fit the size of your space. Sand down any rough edges to prevent splinters.
- Tip: Use a measuring tape to ensure your pallet will fit against the designated wall or area.
- Safety: Always wear gloves when handling wood and use safety goggles when using power tools.
### Step 2: Collecting and Preparing Plastic Bottles
Collect your plastic bottles—2-liter soda bottles are ideal. Clean them thoroughly to remove any residue and labels.
- How: Use warm, soapy water followed by a rinse. Cut the bottles in half or create a circular opening about 1/3 from the bottom, ensuring a sizeable opening for plants.
- Tip: Save the cut-off tops as they can serve as caps to prevent overwatering if you have large openings.
- Safety: Be cautious with scissors or knives when cutting the bottles.
### Step 3: Designing the Configuration
Before attaching anything, lay out your plastic bottles on the pallet to decide how you want them arranged.
- How: Vertical alignment usually works best, and stagger the bottles to allow light to reach lower plants.
- Tip: Consider planting taller plants at the top and shorter ones at the bottom.
- Safety: Ensure the pallet is supported while you configure the design.
### Step 4: Drilling Drainage Holes
To keep your plants healthy, drainage holes are essential in both the pallets and bottles to prevent water retention.
- How: Use a drill with a small bit to create a few holes at the bottom of each bottle, and if you have additional boards on your pallet, drill holes in them to allow excess water to escape.
- Tip: Ensure the holes are large enough to allow free drainage but not so large that soil washes out.
- Safety: Be careful while drilling to avoid slipping or damaging the surface.
### Step 5: Securing Bottles to the Pallet
With a finalized layout, it's time to attach the bottles to the pallet.
- How: Position the bottles in your desired spots and use staples or nails to secure them in place. Add mesh or fabric inside the bottles to hold soil.
- Tip: Make sure you secure the bottles tightly; they need to withstand wind if outdoors.
- Safety: Keep fingers clear from staplers and hammers.
### Step 6: Filling the Bottles
Now that your bottles are secure, it’s time to fill them with potting soil.
- How: Using your handheld trowel, fill the bottles with soil, leaving a small amount of space at the top for planting seeds or seedlings.
- Tip: Water the soil lightly as you fill it to reduce air pockets and ensure even moisture.
- Safety: Use gloves to protect your hands from soil and bacteria.
### Step 7: Planting Seeds or Seedlings
Now comes the most satisfying part - planting your seeds or seedlings.
- How: Make small holes in the soil mixture and gently place your seedlings in or sprinkle seeds according to the package instructions.
- Tip: It's ideal to plant what thrives in vertical placements, such as herbs or flowering plants.
- Safety: Handle seedlings gently to avoid damaging their roots.
### Step 8: Watering and Maintenance
After planting, gently water your vertical garden to help establish the roots.
- How: Use a spray bottle or a small watering can for even distribution. Check moisture levels every few days, especially after planting.
- Tip: Observe how your plants grow and adjust their watering needs as necessary.
- Safety: Store gardening tools safely after use to avoid trips or falls.
### Step 9: Hanging the Pallet
Once everything is planted, it’s time to secure your vertical garden to a wall or hang it if that is your design.
- How: Use heavy-duty screws and drywall anchors to attach your pallet securely to the wall.
- Tip: Make sure the pallet is level so that water doesn’t pool.
- Safety: Use a sturdy ladder and ensure your footing is secure while hanging the pallet.
### Step 10: Enjoying Your Vertical Garden!
With the garden secured and planted, all that’s left is to enjoy your handiwork.
- How: Regularly check for signs of growth, pests, or diseases. Enjoy the visual impact of your recycled vertical garden in bloom.
- Tip: Take notes of what works and what doesn’t for future gardening projects.
- Safety: Always be mindful of your surroundings when maintaining your vertical garden.
Troubleshooting
Even with a well-thought-out plan, things may not always go smoothly. Here are some common issues you might encounter:
1. Plants Dropping Leaves: This may indicate improper watering. Ensure you are not overwatering, as this can cause root rot. Adjust your watering schedule based on the plants’ needs.
2. Poor Plant Growth: If your plants are not thriving, check the quality of your soil. Ensure you’re using high-quality potting soil and consider fertilizing with organic options to boost nutrients.
3. Pests: Insects can invade your vertical garden. Create a natural pest deterrent using a diluted soap solution or neem oil spray to keep pests at bay.
4. Bottles Falling: If your bottles are not securely fastened, they may fall. Reinforce them with additional staples or even tie them in place with twine for extra security.
5. Mold Growth: Mold can develop if there isn’t enough airflow or if the area is too damp. Increase air circulation around your plants and ensure proper drainage to combat mold.
Conclusion
Congratulations! You’ve successfully created a stunning vertical garden using repurposed plastic bottles and rustic wooden pallets. Not only have you reduced plastic waste, but you also have the beginnings of a great green space that can provide you fresh herbs or beautiful flowers.
Consider variations such as using different types of recycled containers, incorporating drip irrigation systems, or even decorating the pallets with paint to match your home decor. For maintenance, regularly prune the plants, check soil moisture, and be vigilant against pests.
A vertical garden is a living project that evolves, allowing you to explore new plant varieties and design techniques. With continued care, you will not only enjoy a beautiful display but also the satisfaction of sustainable gardening.