How to create a vertical garden using repurposed pallets and sustainable materials
Setup & Materials
By Alex • November 14, 2025 • DIY Guide
Introduction
Vertical gardening has become increasingly popular among urban dwellers and gardening enthusiasts alike, providing a wonderful solution for those looking to make the most out of limited space. If you’ve ever desired a lush garden but felt confined by the constraints of your surroundings, a vertical garden could be the answer. Not only does a vertical garden add a beautiful green touch to your living space, but it can also yield fresh herbs, vegetables, and flowers, making it both aesthetically pleasing and functional.
The project is not just a treat for the eyes; it also teaches sustainable practices through the repurposing of materials. This DIY guide focuses on using repurposed pallets—a readily available, cost-effective, and eco-friendly option that plays a significant role in sustainable gardening. By using materials that might otherwise be discarded, you play your part in reducing waste and promoting sustainable living.
This beginner-friendly project is perfect for anyone from seasoned DIYers to those new to gardening and crafting. Whether you have a green thumb or are just starting, creating a vertical garden with repurposed pallets is an achievable and rewarding project. The best part is the satisfaction of watching your plants grow and thriving in a customized environment that you've created.
Not only will you save money and minimize waste, but you'll also create a stunning feature that enhances your outdoor space's aesthetic. This guide will walk you through every step of the process, providing tips, troubleshooting advice, and maintenance suggestions to ensure your vertical garden flourishes.
Tools Needed
Screwdriver: A good-quality screwdriver will be essential for assembling your vertical garden. Depending on the pallet, you may need either a manual or electric version.
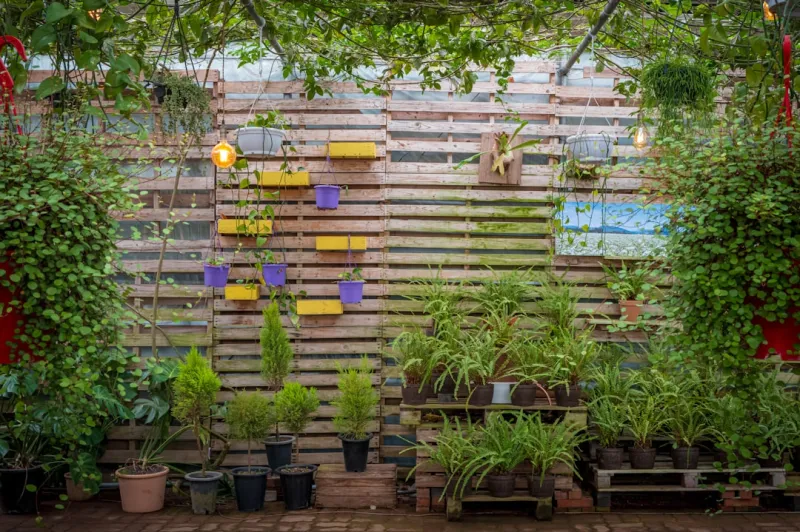
Final Result
Saw (Hand or Power): If you need to cut the pallets to a certain size, a saw is crucial. A hand saw works well for a small project, while a power saw speeds up the process for larger jobs.
Drill: A drill is essential for making pilot holes and securing the structure of your vertical garden. It’s faster and allows for better precision than manual tools.
Sandpaper: To prevent splinters and create a polished finish, sandpaper will help smooth out rough edges on the pallets.
Gloves: Protecting your hands is important, as pallets often have rough edges or nails. A good pair of gardening gloves will provide safety and comfort.
Measuring Tape: Accurate measurements are key to a successful project. Use a measuring tape to ensure all your cuts and placements are precise.
Level: A level will help ensure your vertical garden is straight throughout the setup process, which is crucial for aesthetic appeal and plant health.
Paintbrush or Spray Gun (optional): If you wish to finish or treat your pallets, a paintbrush or spray gun can be used for applying protective finishes or color.
Materials
Repurposed Wooden Pallet (1-2): One to two pallets will be sufficient, depending on the size of your vertical garden.
Landscape Fabric (1 roll): You'll need landscape fabric to line the back and sides of the pallet to retain soil and moisture while providing essential drainage.
Potting Soil (4-6 bags, depending on the size of the pallet): Quality potting soil is needed to provide the nutrients your plants will need.
Plants (8-12 depending on selection): Choose a range of herbs, flowers, or vegetables. Select plants according to the amount of sunlight your vertical garden will receive.
Wood Screws (1 box): These will be utilized to strengthen joints and secure the pallet's structure.
Hinges (2-4): If you aim for a more movable design, hinges will allow you to fold and adjust the pallet.
Pallet Wood Sealant or Outdoor Paint (1 can): Applying a sealant protects the wood from the elements and insect damage. Choose an outdoor paint if you want to add color.
Drip Tray (1): To catch excess water, use a drip tray at the bottom of your structure to prevent water damage to surrounding surfaces.
Brackets (optional, 2-4): If you plan on mounting the vertical garden to a wall, brackets will help secure it safely.
Step 1: Find Suitable Space
Before starting the project, it’s important to choose the right location for your vertical garden. Look for a spot that receives at least 6-8 hours of sunlight each day, especially if you’re growing edible plants. Make sure the area has access to water and is close to an outlet if you plan to use electricity for additional lighting.
Tips:
Observe the site at different times of the day to check the sunlight and shade patterns.
Ensure that the surface where you place or mount the garden is stable and can support the weight of the plants and soil.
Safety: Clear the area of debris or sharp objects that could cause injury as you begin to work.
Step 2: Prepare the Pallet
Once you have selected your location, it's time to prepare your repurposed pallets. Inspect them for any damage or signs of rot. If the pallet is sturdy and dry, you can move forward. Use sandpaper to smooth out rough edges and splinters.
Tips:
Disassemble any broken pallets; using only the best pieces will result in a more stable structure.
If the pallet has been previously treated with chemicals, ensure it's safe for planting by checking for safety ratings.
Safety: Always wear gloves when handling wood to avoid splinters.
Step 3: Seal or Paint the Pallet
To protect your repurposed pallet from the elements and pests, apply a coat of wood sealant or outdoor paint. If using paint, make sure it is non-toxic and safe for growing plants.
How to do it:
Apply the sealant with a brush or spray evenly across all surfaces.
Allow sufficient drying time according to the product instructions before proceeding to the next step.
Tips:
If you want to color-match your garden with your décor, paint it in complementary colors.
For a rustic look, consider leaving it untreated, provided it’s free from chemicals.
Safety: Use protective eyewear and a mask if applying paint or sealant outdoors to avoid inhaling fumes.
Step 4: Line the Pallet
Using landscape fabric, line the back and sides of the pallet. This will help contain the soil while allowing for adequate drainage.
How to do it:
Cut pieces of landscape fabric to fit the dimensions of both sides and the back of the pallet.
Use a staple gun or small nails to secure the fabric to the wood.
Tips:
Ensure you leave openings at the bottom for drainage.
If you're feeling creative, consider using brightly colored fabric for a pop of visual interest.
Step 5: Fill with Soil
Now it’s time to fill the lined pallet with potting soil. Layer the soil to maximize the growing potential.
How to do it:
Carefully tilt the pallet and fill each section with potting soil, packing it lightly as you go.
Leave some space at the top for plants and to prevent soil from spilling out.
Tips:
Mix in organic fertilizers as desired to boost soil nutrients.
Hydrate the soil slightly before planting as it will compact when wet, making it easier to work with.
Step 6: Choose and Plant Your Vegetables or Flowers
Select your plants based on your climate, how much sun the vertical garden will receive, and how much space you have. Mix herbs, flowers, and vegetables to create a diverse garden.
How to do it:
Begin by removing the plants from their containers.
Create small depressions in the soil with your hands or a small tool.
Gently place the roots of each plant into the depressions and cover them with soil.
Tips:
Group taller plants at the back and shorter plants at the front of the pallet for visual appeal and to ensure all plants receive adequate sunlight.
Consider companion plants that grow well together, such as tomatoes with basil.
Step 7: Water and Fertilize
After planting, give your vertical garden a good soak to help the plants settle in. It’s also good to fertilize them to promote healthy growth.
How to do it:
Use a watering can or a gentle hose spray to moisten the soil without washing it away.
Choose a balanced liquid fertilizer and apply it according to the instructions.
Tips:
Check moisture levels regularly for the first few weeks, watering if necessary.
Replace the fertilizer based on the recommended schedule for the types of plants you’ve chosen.
Step 8: Install and Secure Your Vertical Garden
Finally, it’s time to install your vertical garden. You can place it against a wall or fence or keep it freestanding, depending on your design preference.
How to do it:
If mounting on a wall or fence, use brackets and screws to secure the pallet in place.
Ensure it is level and stable.
Tips:
Use extra “L” brackets for added stability if the garden is tall.
If it’s free-standing, position it in a way that the sunniest side is facing towards the garden.
Step 9: Regular Maintenance
Routine maintenance of your vertical garden is vital for plant health. Regularly check for weeds, pests, or diseases that may hinder growth.
How to do it:
Inspect the plants weekly, removing dead leaves or flowers.
Water according to the needs of the plants, usually early in the morning or late in the afternoon to prevent evaporation.
Tips:
Rotate the plants if some are not thriving; this allows them equal exposure to growth-promoting conditions.
Be proactive about pests by researching common issues and effective organic remedies.
Troubleshooting
Even the best-laid plans can hit bumps in the road. Here are some common issues you may face and how to fix them:
Issue: Soil Erosion
If you notice soil erosion from the gaps, verify that the landscape fabric is secure and holds the soil in. You can fill gaps with additional fabric or use smaller rocks to secure the edges.
Issue: Plant Death
If plants are wilting or dying, check the moisture levels. Too much water can suffocate roots and lead to rot; meanwhile, too little can dry them out. Adjust your watering schedule accordingly.
Issue: Pests
Keep an eye out for bugs, insects, or fungi. You may use neem oil or insecticidal soap to combat common pests. Regularly inspect plants and remove affected leaves.
Issue: Lack of Sunlight
If some areas of your garden are not receiving enough light, consider relocating your vertical garden or judiciously pruning back taller plants to provide sunlight to the lower-growing plants.
Issue: Structural Stability
If your vertical garden looks like it might topple, reinforce it by adjusting the brackets and securing any loose areas. Ensure it is evenly distributed with weight and well-supported.
Conclusion
Creating a vertical garden using repurposed pallets and sustainable materials is an enjoyable and rewarding project that can transform your outdoor space into a green oasis. From the initial design to the planting process and ongoing maintenance, this project is a fantastic way to engage with nature, promote sustainability, and enjoy the fruits of your labor.
Don't hesitate to experiment with different types of plants or varying the layout to match your personal style. Whether you want to focus on luscious herbs, vibrant flowers, or vibrant vegetables, the possibilities are endless!
Lastly, remember that vertical gardening requires ongoing maintenance, so routinely check on your plants and adjust as necessary. Enjoy the colorful display and delicious harvest that your vertical garden will produce. Happy gardening!