Introduction
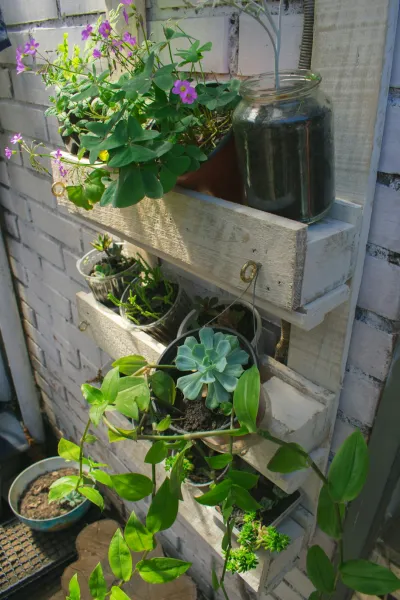
Garden Using Reclaimed Pallets And Repurposed Glass Jars
allows you to utilize wall space creatively and efficiently, turning your home or garden into a lush oasis.Why This ? Using reclaimed pallets means you are giving new life to
materials
that may otherwise end up in a landfill. This aligns with the increasing push for sustainability, making this environmentally friendly. Furthermore, repurposing glass jars into planters offers an elegant and unique display for your plants, giving your garden character and charm. The act of gardening can be highly therapeutic, reducing stress and promoting mental well-being. This is perfect for anyone looking to foster new skills, connect with nature, or simply spruce up their indoor or outdoor environment.Skill
- Level: This is Beginner-friendly, making it suitable for all skill levels. Anyone with basic understanding of tools and a bit of creativity can accomplish this. It requires no specialized gardening knowledge—just a willingness to learn, plan, and maybe get your hands a little dirty!
Tools
- Needed
- Hammer: Essential for driving nails into the pallet and securing the structure.Screwdriver: Useful for attaching additional supports and ensuring a sturdy build.
- Saw: A hand saw or power saw will work well for cutting pallets to size.
- Measuring Tape: Ensures accurate measurements for pallets and the arrangement of jars.
- Drill: Necessary for making holes in the pallet for jar attachments and drainage.
- Sandpaper or Sander: Smooths out rough edges on pallets to prevent splinters
- Paintbrush: If you choose to paint or seal your pallet, a brush is crucial for applying finishes evenly.
- Gloves: protects your hands while working with wood and glass jars.
Materials
- Reclaimed Pallet: 1-2 depending on the desired height of the garden.Glass
- Jars: About 10-15 (varying sizes for visual interest).
- Nails or Screws: 1 box (for securing pallets and jars).
- Wooden Dowels: 2-4 pieces (to support jars if needed).
- Hanging Twine or Wire: 25-50 feet (for securing plants or jars if needed).
- Soil Mix: 2-3 bags (preferably organic; essential for planting).
- Plants or Seeds: Varying according to preference (herbs, flowers, or succulents).
- Wood Sealer or Outdoor Paint: 1 quart (optional for aesthetic and protection).
- Drill Bits: Various sizes (for drilling holes in both the pallets and jars). protective
- Eye Goggles: 1 pair (to protect your eyes while drilling or cutting).Step-by-Step Guide
Step 1:
Select
- Your Location
What: Before doing anything, choose a suitable location for your vertical garden.
How: Look for a spot that receives ample sunlight, ideally 6-8 hours a day, especially if you are planting Sun plants. Ensure that the surface can support the weight of your vertical garden when fully planted.
Tips: Consider proximity to a water source for easy watering. If you have limited sunlight, think about Shadent plants.
Safety: Make sure the area is free of debris and hazards like sharp rocks or broken glass.
Step 2:
Prepare the
- Reclaimed Pallet
What: Clean and prepare the pallet for gardening.
How: Inspect the pallet for damaged boards. Use sandpaper or a power sander to smooth over any rough edges. If desired, you can paint or seal the pallet to protect it from the elements (consider using a non-toxic, garden-safe finish).
Tips: If you want a rustic look, you may choose to leave the pallet untreated
Painting can also create a fun, colorful backdrop for your plants.
Safety: Always wear gloves to avoid splinters and protective eyewear while sanding or cutting.
Step 3:
Cut the
- Pallet to Size
What: Customize your pallet to fit your space.
How: Use a measuring tape to decide how you want to cut the pallet. A standard palette is usually 48x40 inches. Cut down to size using a saw. Ensure the cuts are straight to avoid rickety construction.
Tips: Opt for a height that allows you to reach the top easily. A width of around 24-30 inches is manageable for most spaces.
Safety: Always follow safety tocols for operating saws. Keep hands clear of cutting lines.
Step 4:
Attach the
- Jars
What: Create a way to securely hold the glass jars on the pallet.
How: Decide on the arrangement of jars, starting from the bottom and working your way up. To attach, drill holes at the base of each jar’s rim or simply use wire to wrap around and secure the jars directly to the pallet.
Tips: Use varying heights and spaced-out jars for a more visually appealing arrangement. Alternatively, you can use wooden dowels for added support between the jars and pallet.
Safety: Beware of sharp edges on the glass and ensure jars are secured to avoid breaking.
Step 5:
Plant
- Preparation
What: Prepare your plants for planting in the jars.
How: If using seeds, follow the packet instructions for initial planting. For small plants, remove them from their original containers and gently loosen roots. Fill each jar with a Wellng soil mix, leaving some space at the top for the plants.
Tips: Consider planting herbs or small flowers that thrive in confined spaces. Herbs require consistent water and sunlight.
Safety: Use gloves while handling soil and plants to—again—avoid skin irritation.
Step 6:
Fill the
- Jars with Soil
What: Moisture retention and healthy roots.
How: Using a scoop or your hands, fill each jar about Threers full with soil. Add the plant—ensuring roots are not crowded—and fill the remainder with soil, then gently press down to eliminate air pockets.
Tips: Water the soil after planting but do not Overte, as excess water can cause root rot.
Safety: Handle jars carefully to avoid breaking.
Step 7:
Watering and
- Maintenance Plan
What: Establish a watering schedule.
How: Immediately after planting, give your newly planted jars a deep watering. For ongoing maintenance, check jars daily for moisture; if soil feels dry to the touch, it’s time to water.
Tips: Using a spray bottle can help minimize overflow and water more effectively. Consider drip irrigation for larger gardens.
Safety: Avoid getting water into the glass directly when using electrical devices.
Step 8:
Secure the
- Vertical Garden
What: Stability is key to sustaining height.
How: Use nails or screws to attach the pallet securely to a wall or another supportive structure. Ensure it is level. Adding a horizontal piece at the base can help distribute weight evenly.
Tips: If you plan to anchor it to a fence, ensure the structure is stable to hold vertical weight during high winds or storms.
Safety: Ensure you’re using appropriate wall anchors or fasteners, especially if mounting on drywall.
Step 9:
Regular
- Checks for Plant Health
What: Regular maintenance keeps your garden thriving.
How: Inspect your plants weekly for signs of pests, wilting or disease. Trim dead leaves and tend to any nutrients as necessary. Use organic solutions for pest control.
Tips: Keep a journal of plant health and changes to help you learn and adapt.
Safety: As always, use gloves and if safety gear is needed while dealing with pests or chemicals, don’t hesitate to use it.
Step 10:
Enjoy and
- Add Personal Touches
What: The finishing touches can enhance your garden.
How: Consider adding decorative stones, fairy lights, or other embellishments to make the garden more visually appealing. You can also label plants using repurposed
materials
for an added rustic touch.
Tips: Experiment with seasonal plants to keep your vertical garden blooming all year round.
Safety: Ensure nothing is too heavy that it risks breaking jars, adding unnecessary weight.
2026 •