How to "Build Your Own Vertical Garden Using Recycled Pallets and Eco-Friendly Soil in 2025"
Tools Needed
- DeWalt drill
- Hammer
- Measuring tape
- Level
- Staple gun
- Gardening gloves
- Screwdriver
- Saw
Materials
- Wooden pallets (preferably heat-treated)
- Eco-friendly potting soil
- Landscape fabric
- Nails or screws
- Small plants or seeds
- Wood sealer (non-toxic)
- Watering can
- Paint or wood stain (optional)
Introduction
Building your own vertical garden using recycled pallets and eco-friendly soil is a fantastic way to embrace sustainable living in 2025. This DIY project not only helps you grow your favorite herbs and vegetables but also promotes upcycling by giving new life to discarded materials. As urban spaces become more crowded, vertical gardens offer a practical solution to cultivate greenery in limited areas, making it a beginner-friendly project that anyone can tackle.In addition to being visually appealing, vertical gardens can reduce your carbon footprint through energy-efficient practices. The act of growing your own food can lead to significant cost savings on groceries while also minimizing waste—contributing to a zero-waste lifestyle. With a little creativity and effort, you can create a thriving garden that enhances your living space and positively impacts the environment.
In this guide, we will break down the steps to build your own vertical garden, ensuring that you have all the information you need to succeed. From selecting the right materials to planting your first seeds, this comprehensive overview will equip you with expert tips, safety advice, and real-world examples to inspire your journey into sustainable gardening.
Step 1: Select and Prepare Your Pallets
Before starting your vertical garden, it’s essential to choose the right pallets. Look for heat-treated wooden pallets, as they are less likely to contain harmful chemicals. Safety Tip: Always wear gloves when handling pallets to avoid splinters. Once you’ve selected your pallets, clean them thoroughly to remove any dirt or debris.
Common Mistake: Skipping the cleaning process can lead to contaminated soil. Pro Tip: To ensure stability, check each pallet for any broken slats. If you find any, replace them or use a sturdy wood adhesive to fix them. Proper preparation of your pallets is crucial for the durability and functionality of your vertical garden.
Step 2: Create a Support Structure
To ensure your vertical garden is secure, you need to create a sturdy support structure. Using your measuring tape, determine the height you want your garden to be. Cut additional wood pieces to serve as vertical supports, securing them with nails or screws.
Safety Tip: Always use a level to ensure that your structure is straight. Common Mistake: Not reinforcing the base, which can lead to instability. Pro Tip: For added stability, consider anchoring your garden to a wall or fence. A solid support structure is vital to prevent your garden from toppling over.
Step 3: Attach the Landscape Fabric
Once your structure is stable, it's time to line the back and sides of your pallets with landscape fabric. This fabric will act as a barrier, preventing soil from falling out while allowing for drainage. Use a staple gun to secure the fabric in place.
Common Mistake: Forgetting to leave a flap at the bottom for drainage can lead to waterlogging. Pro Tip: Cut the fabric slightly larger than the pallet to allow for easy folding and securing. Properly attaching the landscape fabric ensures that your soil stays in place while promoting healthy drainage.
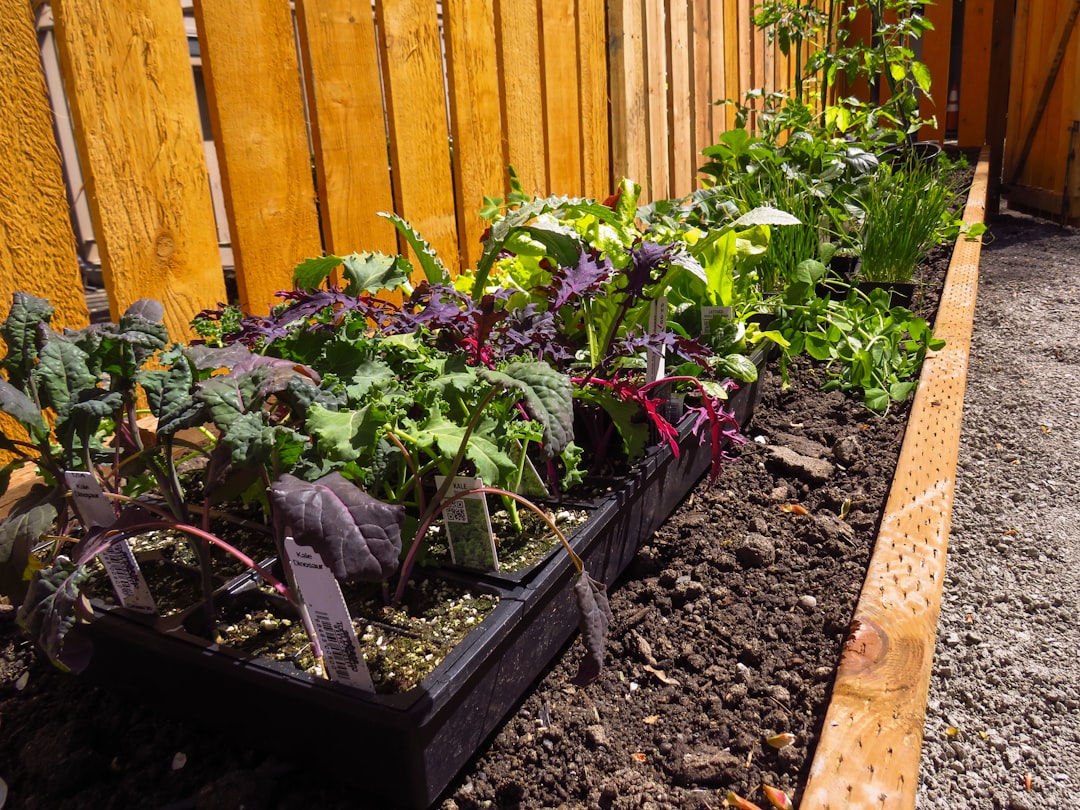
Step 4: Fill with Eco-Friendly Soil
With the landscape fabric in place, it’s time to fill your pallets with eco-friendly potting soil. Choose a high-quality soil mix that retains moisture but drains well to support healthy root growth.
Safety Tip: Wear a mask if you’re sensitive to dust while handling soil. Common Mistake: Overfilling the pallets can lead to soil spilling out. Pro Tip: Use a trowel to pack the soil gently, ensuring an even distribution. Filling your garden with the right soil mix is critical for the health of your plants.
Step 5: Choose Your Plants
Select plants that thrive in a vertical garden setting. Herbs like basil, mint, and rosemary are excellent choices for beginners, as they are easy to care for and require minimal space.
Safety Tip: Ensure you’re not allergic to the plants you choose. Common Mistake: Mixing sun-loving and shade-preferring plants in the same pallet. Pro Tip: Group plants according to their sunlight and water needs to create a harmonious garden. Choosing the right plants will lead to a more productive and visually appealing garden.
Step 6: Planting Your Garden
Now it’s time to plant! Start by making small holes in the soil with your fingers or a small tool, ensuring not to disturb the roots of your existing plants. Place your chosen plants or seeds into the holes and gently pack the soil around them.
Common Mistake: Planting too deep can suffocate young plants. Pro Tip: Follow the planting depth guidelines for each type of plant. Proper planting techniques encourage healthy growth and development in your vertical garden.
Step 7: Watering and Maintenance
After planting, thoroughly water your garden to help settle the soil around the roots. Ensure that each plant gets adequate moisture, especially during hot weather.
Safety Tip: Don’t overwater; this can lead to root rot. Common Mistake: Neglecting regular checks for pests or diseases. Pro Tip: Use a watering can with a long spout for precision watering. Regular maintenance and careful watering practices are essential for the longevity of your vertical garden.
Step 8: Adding Finishing Touches
For a polished look, consider applying a non-toxic wood sealer to your pallets to protect them from the elements. If you want to add some color, you can paint or stain the wood as desired.
Common Mistake: Using toxic paints can harm your plants. Pro Tip: Choose eco-friendly paint or wood stain to maintain a sustainable approach. Adding finishing touches not only enhances the aesthetic of your garden but also prolongs its lifespan.
Step 9: Enjoying Your Vertical Garden
Now that your vertical garden is complete, take the time to enjoy it! Spend time watering, tending to your plants, and harvesting your fresh produce.
Safety Tip: Always be cautious when using tools around your garden. Common Mistake: Forgetting to prune plants can lead to overcrowding. Pro Tip: Regularly check your plants for growth and health to ensure they thrive. Enjoying your garden is the ultimate reward for your hard work.
Step 10: Scaling Up
Once you’ve mastered your first vertical garden, consider scaling up! You can create additional pallets or experiment with different plants and designs.
Common Mistake: Rushing into expansion without proper planning. Pro Tip: Assess your space and resources before expanding. Scaling up allows you to deepen your commitment to sustainable living while enjoying the benefits of home gardening.
Troubleshooting
Building a vertical garden can present challenges. Here are some common issues and their solutions:
- Problem 1: Soil is spilling out of the pallets. Solution: Check the tightness of the landscape fabric; reinforce it or add more soil to create a barrier.
- Problem 2: Plants are wilting. Solution: Assess your watering schedule; adjust based on plant needs and weather conditions.
- Problem 3: Pests are invading your garden. Solution: Utilize natural pest repellents like neem oil or introduce beneficial insects like ladybugs.
- Problem 4: Plants are not growing as expected. Solution: Check for soil quality and sunlight exposure; consider rotating plants or adding organic fertilizer.
- Problem 5: Pallet structure is wobbling. Solution: Ensure all screws are tight and add additional supports if necessary.
- Problem 6: Some plants are overgrowing others. Solution: Regularly prune and remove dead leaves to allow airflow and light to all plants.
- Problem 7: Unpleasant odors coming from the soil. Solution: Check for overwatering or root rot; allow the soil to dry out and improve drainage.
Conclusion
Creating your own vertical garden using recycled pallets and eco-friendly soil is a rewarding project that merges creativity with sustainability. Not only does it allow you to grow fresh produce, but it also contributes to a cleaner environment by embracing a zero-waste philosophy. Remember, as you embark on this journey, don’t hesitate to explore variations—try different plants or designs to match your style.We encourage you to share your build and experiences with your community. Consider exploring other DIY projects, such as building a compost bin or creating an indoor herb garden, to enhance your sustainable living journey. Together, we can foster a healthier planet for future generations.
FAQ
- What is the estimated cost and time for "Build Your Own Vertical Garden Using Recycled Pallets and Eco-Friendly Soil in 2025"? The estimated cost can range from $50 to $150, depending on the materials and plants chosen. The project typically takes about 1-2 days, including preparation and planting time.
- Is "Build Your Own Vertical Garden Using Recycled Pallets and Eco-Friendly Soil in 2025" suitable for renters? Absolutely! Vertical gardens are perfect for renters as they require minimal space and can be moved if necessary. Just ensure that you secure your garden properly to avoid damage.
- How long will it take for my plants to grow? Growth rates vary depending on the type of plants chosen. Most herbs can be harvested within weeks, while vegetables may take a few months.
- Can I use any type of pallet for my vertical garden? It’s best to use heat-treated pallets to avoid harmful chemicals. Avoid pallets that have been treated with methyl bromide or other toxic substances.
- How do I maintain my vertical garden in winter? In colder climates, consider moving your garden indoors or using frost cloths to protect plants. Some hardy plants can survive in cooler temperatures.
- Can vertical gardens be grown indoors? Yes! As long as your indoor environment has adequate lighting, you can grow a variety of plants in a vertical garden indoors.
- What are some alternative materials I can use instead of pallets? Other materials include repurposed crates, old ladders, or even hanging planters to create a unique vertical garden.